Turning An Oak Salad Bowl on Your Wood Lathe

Turning An Oak Salad Bowl

I can’t imagine trying to learn how to turn wood 10 years or so ago. You would have to go to a class, be a member in a woodturning club or just poke and hope for your woodturning lessons!

Fortunately, today we have youtube and other woodturning sites to go to and watch videos about woodturning, learn how to use woodturning tools and find out where to get woodturning tools and supplies.

Learning How to
Turn Wood From Youtube

You can go to youtube and search for the type of project you want to do and find a 100 videos about that woodturing project!

As I journey through my woodturning experience, I hope to categorize videos and lessons on how to turn wood, what projects you might do and where to find to best woodturning supplies and tools.

Learn woodturning from the best of the best!

woodturning an oak salad bowl
quick way to turn an oak salad bowl

Sure, you can do this on your own but I’m hoping that you stumble on my blog and find the information I share worth your time, I hope to save you time by giving you the best of the best. Let’s face it, everyone with a phone now has a camera and can take and post videos about their woodturning experiences. Sometimes these aren’t the best and will waste your time.

I look for unique projects along with detailed videos that show you technique and methods that will help you turn your woodlathe projects.

Today I stumbled on a simple video, the guy turns an oak bowl in a matter of minutes. The camera work is pretty good, you can see the tools used and how they are used and he cranks out an oak bowl in a matter of minutes. I don’t think the time was sped up. He uses sunflower oil and grapeseed oil. He also uses a handful of shavings to burnish the oil into the wood ….pretty interesting and I’ve never seen this approach.

As far as tools go, he starts with a quarter sawn oak blank. Then it looks like a bowl gouge with a modified fingernal grind and finishes with a large round edge scraper to create a very nice Oak Salad Bowl. Then he sands down to 220 or so and applies the oil.

I think its 8 minutes or so but it is encouraging because you can see how easy this becomes after some practice ….well, maybe a lot of practice. I think he said he’s been turing for 10 years. But, he’s perfected a techinque over 10 years and you can benefit from the technique and start producing oak salad bowls like his in no time!

Here’s some of the comments I found interesting:

that was awesome! I am assuming the wood was dry?
That’s beautiful, both bowl and turning techniques. The base recess seems shallow, how deep is it? how can it hold so steady and safe?
Thank you 🙂 Although I never measure the depth of the recess I’d say it is usually around 4-6 mm. The reason it is intentionally shallow is that the deeper the recess the thicker the base of the piece must be to accommodate it. I like to have relatively thin walls to keep my bowls nice and light in weight. Having been turning for over 10 years I have had plenty of opportunity to experiment with different depths of recess and in all that time having work fall off the lathe due to a failure of the recess is extremely rare. When it does happen it is almost exclusively with cherry, which is noticeably more brittle than most of the other woods I use. Keeping the piece stable is also achieved by not pushing too hard with your gouges/scrapers, for which they need to be kept nice and sharp, and also by supporting the edge of the piece with your fingers when performing the finishing cuts.
what is that you put on with the brush? does it seal it in any way? and what’s the idea behind using the sawdust I’ve never seen that bowl looks awesome
Thanks 🙂 The ‘finish’ I use does not seal the wood in any way, it is just there to bring out the grain and show a potential customer how the piece will look when it gets wet (ie, when they put their dinner on it or wash it afterwards). As stated in the description, this bowl is coated with sunflower oil, though I have recently started using grape seed oil instead. The handful of shavings I use to burnish the piece once it has been oiled. I find the shavings are a great way of generating a bit of friction which puts a nice shine on the wood and they remove any excess oil at the same time. Because timber is naturally anti-bacterial, and I only use species which are non-toxic and have a history of use as tableware, I don’t feel there is any need to seal the timber to protect the food from the wood. Likewise, I don’t eat foods which are highly toxic, so there is no need to seal the wood to protect it from the food. In time, each piece will of course change colour and take on its own unique patina from daily usage. It is precisely this which makes wood such a wonderful material to use 🙂
What do you use to get the sharpness on your chisel?
I have a Tormek water cooled grindstone that I use to do all of my sharpening. It only takes 1-2 passes of the chisel over the stone to restore it’s sharpness as I go to the stone as soon as the edge begins to dull. With softer woods like oak and sycamore I will be resharpening every 4-6 bowls whereas on harder woods like cherry and ash they need resharpening every 2-4 bowls. I also use a high speed grinder occasionally, though mostly for re-profiling rather than sharpening.
Nice. How fast was that turning?
Thanks James. I’ve lost the sticker that tells me the lathe speed but it is the top speed for the lathe. From memory the speeds were 450, 950 and 2000 rpm but I can’t be certain. The lathe doesn’t produce much torque and on the slower speeds it just stops spinning if I take a decent cut, but by running it this fast I can overcome that problem.


No Wood Turning ….Gets Me Mad!!!

No Wood Turning ….
Gets Me Mad!!!

I don’t know about you, if you turn wood or consider yourself as a woodturner, do you …do you just want to go out and start turning bowls, tool handles, candle sticks, lamps, baseball bats or under the seat “personal protection device”? And if a day goes by and you’re not turning wood…..Do you get angry at yourself for not getting into the shop???

Woodturning Passion?

I do. That is, I get mad if I miss a day of doing some woodturning. I guess it’s my addictive, compulsive personality. When I fall in love with something, I want it all the time. Probably a bad character trait, but maybe it’s the difinition of “passion”!

I’ve become addicted to the hobby of woodturning. I guess you could say I’m addicted to turning wood. I was a little apprehensive at first, you need a lathe, lathe accessories and some turning tools and off you go. Putting everything together took some time and I purchased probably some of the cheapest stuff out there, harbor freight lathe, harbor freight woodturning gouges and a lot of DIY type tools. Not the best but my setup could turn a branch or log and I made a wood bowl!

I was addicted after that first bowl!

Somebody said, “that new woodturners are always so impatient“. That was me. I tried and tried to make my projects look like a piece of art, or just a nice looking bowl. But most didn’t turn out. I watched videos on new tools, new woodturning techniques and I practiced…. and I practiced.

I’m a better woodturner
after I’ve practiced.

But I still need more practice, I love learning new wood turning techniques. I love making your own tools. And I now really enjoy trying out real, professional or high quality wood turning tools like the new Sorby 1/2″ Bowl Gouge.

I was like a kid at Christmas, I just couldn’t wait to try that Sorby Bowl Gouge and when I as I used it, I was just as excited. I also picked up a quart of Food Safe Salad Bowl Finish by General from the new Woodcraft store in Buffalo Grove, IL …..can’t wait to try that out. I have a couple of blanks ready to finish so maybe I’ll be able to finish with my new bowl gouge and try the Salad Bowl Finish …..will keep you posted on how that goes.

general food safe salad bowl finish
Food Safe Salad Bowl Finish By General

I tell you all this because I wanted to share the fact that I really try not to let a day go by without doing some woodturning. Sometimes a week will go by because I’m to sick to go out, but …..I watch videos or read about woodturning.

And….. a whole day has gone by, it’s too late to do anything except to type a few words, to diclose the fact that I did not turn anything today and I was really “disappointed or upset” that I didn’t get to lathe today!

Another Day Gone….No Woodturning!

I actually wrote this yesterday and sadly another day has gone by without any turning due to a bad reaction to some new medicine I was taking …..sometimes, life just sucks! I literally thought I was gonna die, started shaking, hard time breathing, hallucinations, couldn’t walk ….should have woke up my wife but it was 3 am and I wrote her a note in case I didn’t make it through the night. But I did …that’s my life, hope you don’t mind me sharing the good and bad of it ….along with some good woodturning tricks, tips and thoughts!

As they say, there’s always tomorrow (sometimes) 🙂 But I was pretty scared last night so I share this word of God with you Psalm 103:15As for man, his days are like grass; As a flower of the field, so he flourishes.” The older I get the more inevitable it is that life is really short. God says our life is like the grass and flowers of the field, here for a couple of days, weeks….beautiful and healthy and then gone. So are we. Question you need to ask yourself is are you ready?


#Woodturning Tools, #Woodturning Supplies, #Woodturning Videos, #Woodturning Lathe, #Woodturning Ideas, #Woodturning A Bowl, #Woodturning Accessories, #Woodturning, #Woodturning Tools, #Woodturning Supplies, #Woodturning Accessories, #Woodturning Books, #Woodturning Bowl, #Woodturning Chisels, #Woodturning Chucks Chuck Jaws, #Woodturning Carbide Tools, #Sorby Bowl Gouge, #Food Safe Salad Bowl Finish

DIY Parting Tool Make Your Own Custom Parting Tool

How To Make A Parting Tool

I needed a thin parting tool and I needed it now!

Sure, you can buy a Parting Tool for $25 to $50 but there’s noting like making your own parting tool. It gave me a lot of satisfaction once I figured how to grind the right angle on the tool tip. I actually took my design from the Sorby Parting Tool. Although Sorby has a wide selection of parting tools to meet your needs I tried to make mine look similar to this Sorby 1/16″ Parting Tool.Sorby 1/16" Parting Tool

Description of DIY
Parting Tool Project

I feel like I’m writing a term paper here but let me give you a quick description of the project. I wanted a parting tool with a 1/8″ blade. The idea is to turn an old used sawzall blade into to tool, make a handle of wood and used some epoxy and brass rod for rivets or whatever they are called in knive handles. Shape it a little on the disk sander and fine tune the cutting tip. That’s it…. BA DA Bing BA DA Boom!

Starting On Parting Tool Project

I started off with a sawzall blade, I think it was 1 1/4″ wide and 12″ long. Unfortunately I did not take a picture of it before I cut it.

I took a 4″ thin grinding wheel and cut the shape on the end of the sawzall blade and then I cut the teeth off. It cut pretty easily, I’m not a metal guy…. in fact, what I know about metal I probably learned on youtube 🙂 I remember watching someone on a video make something like mine, so its not an original idea.

Something possessed me to purchase a 12″ disk sander a while back and I have used that thing for so many tasks I can’t believe I’ve lived all these years without one. You can sand just about anything, metal, wood, figerglas and fingers 🙂

Parting Tool Blade Almost Ready

Anyway I sanded the blade to clean it up and take off any remainine paint. Coolest thing, the piece of metal looked like it was just shipped from Amazon, all nice an shiney. I was pretty proud of myself right about then.

So at this point I have the profile in the front, teeth cut off and all polished up. I need to trim up the end that goes into the sawzall ….just square it off. I have it in a vice, ready to cut off in the pic below.

DIY Parting Tool
Using a sawzall blade for a parting tool blade, shaped and in a vice ready for more cutting

DIY Parting Tool Wood Handles

Next I plan to cut and prepare the handles for attachement to the parting tool blade. I had some mulberry that had been drying for a year or so, it is very, very hard and finishes very nice. Who would have thought. But I find myself looking for a kinds of different wood types and the stuff that would end up on the burn pile …..ends up on the wood lathe or gets squared off on the band saw to be used for different projects.

PICTURE OF bandsaw WITH HANDLE HALFS *********

So I ripped down a couple of pieces 3/8″ x 5″ to use for the parting tool handles. I wanted the handles to be wood on wood when glued together so I traced the blade on one handle and chiseled out the shape at the thickness of the blade. In other words the blade sat flush in that half of the handle. Before I forget, that a small 1/8 or 1/4″ chisel and cut some grooves into the other handle half…..the purpose is for the epoxy to have someplace to grab on the wood.


parting tool handle
Wood handles ready for epoxy

Gluing the Parting Tool Handles
and Blade Together

At this point I mixed up some 5 minute epoxy, spread the expoxy on both handle sides, placed the blade in the cut out space, put more epoxy on the top of the blade and then clamped the whole thing together. Instead of 5 minutes I let it stay clamped overnight 🙂

parting tool handle
Handle blanks, one is chiseled out to hold the sawzall blade and the other is chiseled out to hold some of the 5 minute epoxy
parting tool handle and blade
Setting sawzall blade into the 5 minute epoxy


parting tool wood handles
Clamping parting tool blade and wood handles with 5 minute eposy.

Next I needed to put a couple of rivets thru the wood and the blade. Since it is just a shop tool I could have used a 16 penny nail, but I ended up using 1/4″ brass rod. The idea is to make the pin about 1/8″ longer on each side and the “peen” the pin on both sides. This mushrooms out the pin on both sides and keeps it in place. Here’s what I did.

I took my parting tool with the handles glued to the blade with epoxy and then I drilled three holes thru the handle, 2 or which went thru the metal blade. I started with 1/8″ drill bit on a drill press and as soon as it hit the steel it started smoking and sputtering! I knew right then I screwed up.

Next time I will drill the hole thru the parting tool blade seperately and then thru the handles. I ended up breaking about 3 bits and had to use cutting oil which soaked into the wood but I did get the holes drilled 🙂

So….next I cut the 1/4″ brass rod a total of 1/4″ longer that the width of the handle. First I added some 5 minute epoxy to the hole before driving in the pin. I peened the pin on both sides until it started to mushroom over the handle. The I hit the last pin one too many times and got a small crack in the wood….just added some CA and saw dust as a crack filler to be sanded latter.

Shaping and Sanding Parting Tool Wood Handle

Since everything was square I went over to the  12″ monster disk sander and sanded both sides flush. This gets down to clean wood and it evens out the brass pins. Then I used the disk sander to round off the corners and the wood end of the parting tool. Took it over to the 1″ belt sander, cleaned up the blade a little more and fine tuned the wood edges.

Using My New Parting Tool

Being excited, I went to the wood lathe to try out the new parting tool. I was working on a handle for a gouge blade. It was about a 4″ ash tree trunk that had died from the beetles. As it was spinning I slowly entered into the wood and ………it moaned and groaned and burned!

Urgh, I was devastated! It cut like crap !!

After taking 5, I took a look at the Sorby parting tool that I was modeling I was modeling and noticed my angles were off. I reground both the top and bottom angle and tried it again. Voila! It cut like butter and ash is pretty hard.

Custom DIY Woodturning Parting Tool
Finished Parting Tool, 2 Wood Blanks for Handles, Hunk of Mullberry I cut the handle from and 1/4″ brass rod used for handle rivets

So if you try making one of these pay attention to the grind angles and pay attention to how you grind the angles. Try sharpening/grinding both angles remembering which one you did first, then try reversing the order. Then try sharpening only on side, try just touching the bottom up, and try just grinding the top angle.

Now I have mine set up so I just touch the grinding wheel on the bottom angle.

Want to see how the big boys sharpen their tools….. here’s one big boy, Sam Agelo….. I have learned a lot from him and he sharpens his thin parting tools on a belt sander ….you could also use a disk sander. He doesn’t use a grinder because he has CBN wheels on them and he was afraid the thin parting tool would ruin them….. very expensive, anyway check out his sharpening technique for parting tools.

REMEMBER always use a platform when sharpening on a grinding wheel, take your life into your own hands if you try to free hand!!

If you’re interested here’s a really good video on all the different methods of pinning that knife makers use. I might even invest in a special rivet for making knife and tool handles called a “Cutlery Rivet” they are in 2 pieces and on slides into the other and expands as it does. Pretty much a no brainer.

Looking to Upgrade My WoodTurning Tools Need Crown 251 1-Inch Oval Skew Chisel

Looking to Upgrade My WoodTurning Tools

I really want to turn some nice projects, bigger bowls mainly.

So I need some new tools and a new wood lathe!

Today I was looking for a good quality Skew Chisel, they say it’s one of the most difficult tools to master and I would like to take a shot at it because it leaves behind a beautiful finish.

Considering A Crown
251 1-Inch Oval Skew Chisel

Check out the quick video on the skew chisel for woodturning.

I was looking at the Crown 251 1-Inch Oval Skew Chisel

If you follow any of the woodturners online they will tell you that you should never buy “sets” of woodturning tools but purchase the ones you think you will need and like.

But….how do you know what you need or like if you never used any woodturning tools before?

So…..I purchased some chinese tools and I turn chinese bowls …and my nickname is “catch” because my tools don’t sharpen, or they don’t stay sharp and I can dislodge just about any piece of wood you give me from a faceplate, scroll chuck or between centers !!!

Ya, I’m kind of joking but my tools are crap …so is my lathe. So I thought I would start looking around and see what type of tools and lathe I might really want to get. Amazon has a really nice feature where you can create lists and make them “public” kind of like a wedding registry 🙂

Maybe one of my son’s or wonderful and beautiful daughter-in-law might see my public list for lathe tools and fulfill my wishes……or maybe I’ll win the lottery 🙂 Better yet, I would get healthy and spend the rest of my years working, building, drawing or building websites and making money for myself….. oh, how I pray things would end that way!

So, I figured I would check out some of the tools available online. Buy them if I could and do a review of the tool. If you buy the tool from my link, I’ll make a small commission. If not, at least you got an honest opinion.

Woodturning Gouges I Need!

I really need and would like the following:

  1.   a 5/8″ bowl gouge with fingernail grind
  2.   a 1/2″ bowl gouge with traditional grind
  3.   a nice beefy 3/8″ thick 1″ wide or better round nose scraper
  4.   a nice beefy 3/8″ thick 1″ wide or better left side scraper
  5.   a set of spindle gouges
  6.   a set of detail spindle gouges
  7.   a 1 1/4″ roughing gouge
  8.   a 1/8″ parting tool
  9.   a 1″ or 1 1/4″ oval skew
  10.  Oval Skew Chisel

As long as I’m wishing…..I’m sure I will add more to the list.

Importance of Good Quality Woodturning Tools

At this point in my woodturning experience I have come to understand the importance of good quality equipment. In woodturning, this probably means more than any other trade or hobby I’ve been involved with. For instance, you can spend 300 bucks on a fishing rod and reel but still catch some pretty good fish with a Zebco $25 dollar special.

Even in construction. Sure a Bosch demo hammer is 1500 dollars and will probably last a long time but a harbor freight demo hammer will get the job done and if you baby it, the thing will last a long time and you spent a 1/4 of the price.

Spend More Money and Be A Better Turner

But with woodturning tools and equipment, you just can’t get past the fact that spending more money will get you good tools and equipment that will make you a better turner.

I want to master the Skew Chisel so I’m looking at a Crown Skew Chisel or a Sorby Oval Skew Chisel.

However, if you’re just getting started, don’t let that fact stop you. Spend what you can afford and go from there…..heck, you might even not like woodturning. But if you do, you can start adding pieces one at a time, save your money and buy a $100 dollar bowl gouge. You’ll be amazed at the difference.

Here’s my dilema.

I need to make some money and I do that with a variety of websites where I compare and recommend products. But I’ve never do it with a site that I’ve been so passionate about, like woodturning!

I want to provide the best information I can to help anyone who reads this to make a well informed decision about what they should buy and use. To do that, I need to buy and use the products to let you know what works and what is the best.

So I will probably be buying products from places like Rockler, ebay, or Amazon. They all carry brand name, high end products. Most of these sites have some type of review system and I won’t purchase anything that has a bunch of negative reviews. So I look for the best, make an informed decesion to buy and then tell you what I think of that product. If you purchase thru my link, as I mentioned I make a very small commission…. but they will add up over time. I hope!

US Manufactured Skew Chisels

My problem is in approaching differnet products this way I leave out those manufacturer’s and suppliers that do not have affiliate programs that I can enroll in. Most of these are small stores or small manufactures but offer high end, very good products. I feel obligated to tell you about them as I discover them but since they don’t have affiliate programs, in all honesty, I probably will not purchase the products from them so I can’t give you a first hand testimonial of their products.

As time goes by, I will mention these sources and give you links to their sites. I’ve visited www.D-waytools.com many times and would love to purchase some of Dave’s tools …..watched his videos on sharpening and how to use the tools …really good stuff and Dave seems like an all around good guy. He’s a small business man in the US and fighting the daily battles to build his own business. I would much rather support him than someone across the pond. There are a handfull of others out there and I will talk about them as the circustance dictates.

I really didn’t plan on getting this far into the weeds …..but I really wanted you to know where I’m coming from.

Bottom line is I want to help any woodturner find good information on how to be a better woodturner!

One more time, check out how easy this guy makes cutting with a skew, the shavings just slice off….. wish I could do that! If I had a Crown 251 1-Inch Oval Skew Chisel …. bet I could 🙂

Maybe I Should Consider
A 1-1/4″ Robert Sorby
#809H Oval Skew Chisel

I really wanted a skew chisel wider than 1″ inch. Sorby has a Oval Skew Chisel that is 1 1/4″ wide. So, after looking a little further the Sorby Skew Chisels look really nice, especially the 1-1/4″ Robert Sorby #809H Oval Skew Chisel.

I’m going to make it my goal to master the skew chisel, after watching so many turners produce glass smooth finishes, I know I can do it. Like with all woodturning …..it takes practice!!!

After cranking out 3 stairway spindles that really look the same, I tried to do a slicing cut with the skew chisels have….the ones from China and besides the fact that they are square edged I just couldn’t make that slicing cut in a piece of oak. Could be me, I’m finding out that the China tools will actually cut if you sharpen them correctly, maybe I need to work on the edge of the skew.

Bottom line I want to get a good oval skew chisel, whether Sorby or Crown. I’m not quite ready to purchase their super expensive super duper metal that holds an edge forever type turning tools. Although I’d really like to try one out to see what the difference is, I need to work on my sharpening skills.

Live to turn another day!!!

Build Your Own Steady Rest Or Buy A Steady Rest

Build Your Own Steady Rest
Or Buy A Steady Rest

Ok ….what the heck is a steady rest?

A steady rest is a device that attaches to your lathe bed and helps to stablize a long piece for turning or a bowl or vase.

Let’s say you have a 30 inch x 1″ broom handle you want to turn some decoration in. If you place that broom handle between centers, and you try to turn something in the center of the piece it will start to vibrate and actually bend away from your turning gouge.

steady rest for long lathe projects
a steady rest centers and stablizes a project as it turns on a wood lathe

On the other hand you might have a vase or other shape you want to hollow out and it is in your chuck but not reinforced by the tail stock on the other end. If the turning project starts to wobble and lose its center you will need a “steady rest” to keep the turning project running “true”.

As with so many other things “woodturning related” I really didn’t know when or if I would ever need a “steady rest“. As it would happen I found myself in need of a steady rest and thought I would just buy one. Holy cow…those things are expensive. If you want to buy one, Rockler has a nice one Click Here

Steady Rest From Rockler
You can always buy a steady rest from Rockler if you have some extra cash!

I Really Needed A Steady Rest

Here’s what happened.

One of my friends is a contractor who needed some stair balasters or stair  spindles duplicated.

Although I’ve turned some handles, candle stick holders and lamps ….I really never did anything long like a stair spindle, balaster or newel. So, I told him …”NO problem, I can crank out those stair balasters for you!”

Well, first I needed some oak. The base of the stair newel was, at it’s biggest 1 1/4″ X 1 1/4″ square.

Oak Ripped for Stair Spindles

I found some clear oak 2x6x4′ at Menards, the stair spindles I needed to duplicate were 33 inches, so I ripped 3 pieces that I needed on my Jet table saw that now has a rusted top because my roof leaked because the insurance company and building department are a nightmare to work with…..but that’s another story!

Next I mounted them on the wood lathe between centers and started working on the tapered rounded part. Since my chinese tool set did not come with a roughing gouge, I had to use what they called a spindle gouge….. that was a big mistake because it almost ripped the piece from the lathe.

Rounding the Square Stock
for the New Spindle

So I tried to knock the corners off and round it out with my custom carbide insert tool.

That worked pretty good, but it mostly scraped and I tried every tool I had. The spindle vibrated and bounced, there was no way I was going to turn that spindle without some additonal support.

Youtube For Learning How to Turn Wood

Next I turned to my favorite place to learn some  woodturning lessons…. youtube! After a while I thought a steady rest would solve my problems and there were plenty of tutorials on how to build a steady rest ….man, I just didn’t have the time to do that…..but I seriously considered making a steady rest!

I found a bunch of tutorials on how to make your own “steady rest” a device that provides additonal support for turned projects, whether it be a balaster, broom stick, spindle or vase. The additonal support helps you to make clean cuts and proper coves and beads as needed in your project….or in my case just to taper the spindle.

Rockler Steady REst
steady reast stabalizes a turning project, could be a vase bowl or spindle

The problem I was having was once I got in the middle of the spindle and tried to reduce the diameter, you could see the spindle being pushed out, I was actually afraid it would break or come off the live centers.

Should I build a steady rest? Really didn’t have the cash to buy one …check out these steady rest plans and watch the video


I saw it on Rockler Woodworking and Hardware

Lathe Steady Rest Downloadable Plan — $7.95

Here’s an innovative, adjustable rest for holding spindles steady. It just may give those dusty, discarded in-line skates a second shot at useful life-in the shop!

Building A Steady Rest

I don’t have time to build a steady rest right now but I think I will in the very near future! You can get a set of plans on how to build a steady rest from Rockler click on Steady Rest Plans.

And you should watch the video below from someone who I have followed for a while on youtube, his name is Stephen Ogle, click on his name for the youtube channel he has lots of good stuff. Watch Stephen’s video below, as he shows how to build a very nice “steady rest“, however I would change the wooden wheels for some roller skate wheels, I think it would be a little easier on the project you are turning, a little cheaper and a lot faster! Anyway, check out his video, he goes into great detail …if not pick up the rockler plans.


Steady Rest Or Better Tools?

Well….

I didn’t have time to build a steady rest and I wasn’t going to buy one!

I thought if I had a couple of better tools I might be able to pull this off. I did some searching online and found a new Woodcraft store in my area and took a fast trip to the new store. I purchased a 3/8 spindle gouge (blade only) and a 1/2″ bowl gouge with a fingernail grind from Sorby. I really wanted to get some other tools online but I needed to get this done now!

I’ve read that a good 1/2″ bowl gouge with a fingernail grind can be used for many things including turning spindles.

I was shocked at how good these tools cut the red oak blank. The finish was perfect and I didn’t even sharpen them yet! I really wanted to get a 5/8 bowl gouge from D-Way, Carter or Thompson but the 1/2″ Sorby will have to do, it definitely is a step up from the crappy tools I’ve been using.

3/4" Bowl Gouge "U" Shaped. 12" x .760--- With 5/8" Tang
D-way’s 3/4″ Bowl Gouge has a “U” shaped flute. An excellent gouge for roughing, and with the full radius flute it makes a great shearing cut for finishing the inside of bowls and platters.

This is a wood eater

I WANT ONE !!!!!

I’m retired (not by choice), actually on disability so my income is below poverty at this point. Otherwise I would probably have 2 or 3 of every tool I needed or thought I needed!

Make Money Turning Stair Spindles?

However, I planned on supplementing my income with some of my bowl turnings amongst other things. A little job like turning some stair spindles could bring some extra bucks but what couild I really charge for 3 spindles? If you were able to buy them from some of the big box stores they might cost anywhere from between $5 and $10 each for an oak stair balaster or spindle.

My friend’s problem was that he was unable to find the profile he needed to replace 3 stair balasters. So he needed someone to custom turn the stair spindles to match the profile he had.

It cost me $40 bucks for the oak, $32 dollars for a 3/8 spindle gouge, and $98 dollars for a 1/2″ bowl gouge. So, what do I charge him for 3 spindles….it would be nice if I could get $40+$32+$98= $170 !

That doesn’t even include my time, figure at least 2 hours a balaster, that’s 3 balasters …so a total of 6 hours at 40 bucks an hour equals $240.

So, I have $170 + $240 = $410 into a stair spindle project. Ha, ha ….what a joke. I’ll never get that and wouldn’t try…..I might as well go put them in for him too 🙂

Do you think I could get 400 bucks for 3 custom balasters? …..Ha, ha ….I’d be luck to get 100 bucks….if I do it will go toward my collection of tools and experience.

Next time I will use a steady rest and hopefully have a few more good quality tools.

It’s all a learning experience!

Take a Look At These Steady Rest Videos

Scroll Chucks and Jaws

What Are Scroll Chucks?

Learn about scroll chucks and jaws from Sam Angelo… good stuff!

This started as a test post but when I started watching Sam’s video on Scroll Chucks and Jaws for Wood lathes I thought it would be perfect to post here for anyone getting started or just trying to understand what these pieces of machinery really are.

When I got started I was really confused when it came to scroll chucks, I had to watch many, many videos and do a lot of ready before deciding which one I wanted ….I wish I would have found Sam’s video because it really clears things up. Anyway…. enjoy the video and thank you Sam!


In this tutorial Sam discuses important factors in the selection of scroll chucks and jaws. His collection of scroll chucks spans tenon sizes from 3/8″ to 5 1/2″ as well as many profiles for various projects.


I saw it on Rockler Woodworking and Hardware

Rockler – Search Results for lathe chucks


 Couple comments from
the video on Scoll Chucks


Have you ever consider of buying wood lathe chuck quick change system like those two: 1- Barracuda 5 Quick Change Jaw Chuck System with FREE Pen Blank Drilling Jaws 2- Nova Infinity Quick Change Chuck System (you can also buy only some parts to make your old Nova2 chuck/jaws to make it/hose a quick change system). I’m starting looking and I think I’d buy the Barracuda 5 because it is seems to me to be a faster quick change system and I like to have many jaws options (4 sets of jaws and a central screw are included. The only thing with this choice is, after the price issue (I am in Quebec Canada), for the sake of security and speed, I would rather like to have an hexagonal wrench for jaws tightening instead of having a key that penetrates the chuck.

Hi Sam, I want to turn very small items. Down to 8mm or possibly even smaller if I can. I want to use the central machinery 10×18″ lathe from harbor freight. Could you possibly suggest which kind of chuck I should use?
Kmsan I think what you need to look for are “pin” jaws. You could buy a number of small scroll chucks, with or without the jaws: (Body only). Pin jaws can hold very small items. You can check the dimensions in the description of the jaws. Something like this—– http://www.rockler.com/nova-mini-spigot-jaw-set?utm_source=google&utm_medium=cpc&utm_term=&utm_content=pla&utm_campaign=PL&sid=V9146&gclid=CjwKCAjw2s_MBRA5EiwAmWIac-ULDzE5ddBVrvWdBIkljuUoN-eQ1l5NK5VX6Y0tvE_4Rji9xOARzRoCPeQQAvD_BwE

Food Safe Wood Bowl Salad Bowl Finish by General for Woodturning Projects

Food Safe Wood Bowl
Salad Bowl Finish by General

If I’ve seen this addressed once, I’ve seen it commented on at least a hundred times, that is, “What is a food safe finish for wood bowls?”

I could make this article 10,000 words or more but I just want to comment on one finish I recently ran across called “Salad Bowl Finish” by General and you can get it at Rockler http://shrsl.com/k8bm for the best price ….around $18 for a quart, it’s $28 on Amazon and more at other online stores. If you go to the General website there is a store locator that might help you find the product locally. Click on General Finishes  and you’ll find more specs regarding the food safe salad bowl finish.
…………………………….

OVERVIEW OF SALAD BOWL FINISH

general food safe salad bowl finishCreate a beautiful and safe finish on wooden bowls, cups, spoons, and countertops. Easy to apply – just wipe on with a soft clean rag. Achieves the sheen and resistance of a varnish. Dried film is non-toxic for food contact 72 hours after drying. Additional coats can be reapplied at any time if maintenance of item becomes necessary. Right from the label!

…………………………….

When I first started turning I discovered many turners talking about their work being for display only because of the finishes. I thought that was ashame, why couldn’t you use the beautiful wood bowl that you turned to display your evening’s dinner?

I purchased some butcher’s block finishes and they seemed to work out for salad bowls. But in reality I believe they were mostly mineral oil and some also contained beeswax. These finishes did not last too long but were functional and I felt safe using them with food.

If you’re making wood cups, you’ll want to find metal inserts ….wood simply won’t hold liquid very well. I even thought soup bowls would be cool, but finding a finish that won’t kill you eventually has been a challenge!

(Time out….had a couple of fishing lines out, gotta check em)

OK …I’m back.

So….why can’t I use polyurethane, shellac, CA or OB shine juice for a food safe finish?

I’m not sure you can’t!

Now this isn’t legal advice and I think that’s the whole issue with food safe finishes. It’s called cover your butt. No one wants to say use our finish for food vessels because it isn’t FDA approved.

Cap’n Eddie on
Food Safe Wood Turning Finishes

I think it was Cap’n Eddie who gave the best advice. He was commenting on “food safe finishes” and to sum it up basically he said that almost all finishes are food safe once they are cured. That is once the chemical process of the finish has completed and VOL’s are no longer being gassed off the finish is safe to use for food.

Now, I’m not telling you to use these finishes for food vessels but logically it makes sense. I would recommend that you use Salad Bowl Finish by General for all your wood salad bowls.

Cap’n Eddie said to use common sense, you’re not gonna want to use the wood bowl finished in lacquer to eat your spaghetti, think about it, your fork scrapes the bottom of the finish and you get a 1/2 teaspoon of lacquer by the time your done. Wood has its limitations!

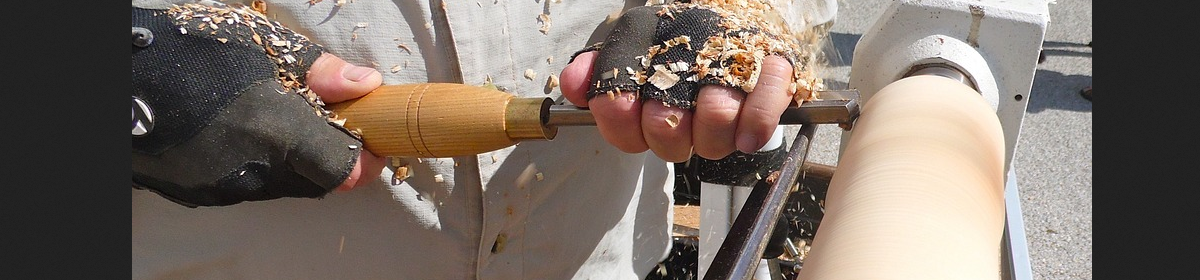
Watch the Salad Bowl Finish being applied!

Salad Bowl Finish Comments

Here’s a few comments on Salad Bowl Finish from General

Comments from Rockler.com

Makes Excellent Finish
I have used this on 5 salad bowls and every one loves the finish.
I apply while the bowl is on the lathe spinning at a very low speed and leave is spinning until finish sets.
this avoids runs. I usually use 3 to 5 light coats.

Excellent
I have been overjoyed with this product, not only did I refinish the cutting boards I also refinished all wood type cooking utensils.

salad bowl finish
This finish is great to use. Cures to a hard surface and food safe. Brings out the beautiful grain in the material. Great finish.

Salad bowl finish
I used this product to seal and protect an end grain cutting board I made. I love this product and recommend it to anyone making cutting boards.

Ease to use
I’ve used this and it goes on like pure Tung oil, let it soak in and it hardens. Then you can sand it to smooth urethane like finish. If you read the MSDS sheets for this and their Toy finish they have the exact same things in the exact same proportions so I’m not sure what why they are labeled differently but they should both be “safe” for mouth exposure.

I like this finish.
I like this finish I put it on most of my bowls I turn. I do light coats with soft cloth for me works the best. I lightly sand with 4×0 steel wool and most of the time I buff final coat with a buffing system to a very nice high gloss.

Great finish
I use this for all my cutting boards that I make….a go to finish.

Finesse is success!!
The product is awesome for finishing end grain butcher blocks of all varieties of wood. I tried several different salad bowl finishes this hands down the best for my uncontrolled climate in Fl. The experience with Rockler has been to say Good is soft spoken they are pro’s from on spot packing to immediate shipping –I am a customer for life and have used them for several years now –Hats off to all the employees and staff–Thank you!!!

General Finish Salad Bowl Finish
Great product! Easy to use and exceptional finish. It is all I use now for my bowls.

Great product
I use this on my salad bowl turnings, it dries fast and lasts
Salad Bowl Finish by General

Salad bowl finish
I have used this finish for at least 25 yrs. and have always been very satisfied with it. Have discovered that by using a piece of cloth to apply it, have had no problems with runs.

Fantastic
It looks great and came out with a very smooth finish.

Salad Bowl FinishSalad Bowl Finish from General


Good stuff
I having been using General Finishes Salad bowl finish for a couple years now. Most of my bowls are pine. I wet sand the first coat with 320 grit to cover any lingering blemishes, then fine sand prior to another two or three coats. At least 12 hours between coats, more when its cold in the shop. I get a beautiful smooth final finish with a lot of depth.

SALAD BOWL FINISH
I’ve used this product for several rears with great results! I use a minimum of 3 coats, lightt sand in between on all my bowles, platters and hollow forms.

American Specialty Hardwoods rolling pin
This is a great product. I have been looking for a long time to replace polyurethane and finally found it.
Great high gloss finish.
INSERT PICS saladbowlfinish-Rockler-5.jpg saladbowlfinish-Rockler-6.jpg *******************

General Salad Bowl FinishGeneral Food safe salad bowl finish

I made some bowls out of…
I made some bowls out of maple and walnut and was amazed at how this product brought out the beautiful grain of the wood once applied. I applied according to directions: four applications six hours apart “sanding” with 0000 steel wool in between applications. Then I let it “cure” for 72 hours. I’m very pleased with the result and will use it on all of my bowls and trays that I am making.

Many, many more testimonials at http://shrsl.com/k8bm **************
………………………………

From Amazon.com

Question:
How would this work on carved wooden spoons that are actually intended to be used regularly for serving food? I am concerned it will wear too quickly.

Answer:
I own 2 sawmills in Texas. We use even the smallest drop-offs making cutting boards ,or “cheese boards” & have found this finish to be extremely tough & durable with 2 coats once cured. Additional coats produces a slightly gloss finish. Stands up to daily rinses in hot soapy water. Hope that helps. Peppercreek Creations
By Capt DK on July 21, 2017

I use it to restore restaurant cutting boards used daily and not well cared for by staff. The finish is highly durable and an occasional re-coat maintains the luster.
By Steven W. Rust on July 21, 2017

It wears well– FDA approved I believe– also I have used it on cutting boards but no as a cutting surface a serving surface and has outstanding gloss –spoons should wear well–several coats making sure dry times– saturating deep in the grain of the wood.

By moemadebb481 on July 20, 2017
Never used on spoons but on cutting boards and after a year the finish is still good. Safe to use and should be great on anything used around food.
By Bjohns on July 20, 2017

More comments from Amazon.com

ByPeteon October 13, 2016
Verified Purchase
I really like the finish on my bowls after at least four coats of salad bowl finish they get a nice gloss to them you can just see the difference on them after each new layer put on. Very good finish and easy to put on

Great finish and easy to apply
ByMC NHon January 23, 2015
Verified Purchase
Great finish and easy to apply. I used multiple thin coats applied with a cloth to a large salad bowel and the results were excellent. It was best to let dry overnight before subsequent coats (also used 400 grit sanding between coats).

It is a good product for applications that come in contact with food …
Bought and used this a few times. It is a good product for applications that come in contact with food or food utensils.

Best I’ve used
Excellent product I have used this varnish many times for utensils to be used in food preparation and serving. It’s durability far exceeds any other I have used.

Easy to use and great results
BySalli & Geneon August 18, 2017
Verified Purchase
This is a great finish. There was a bit of a learning curve for me however. Not that the piece didn’t turn out ok but it required more coats than were necessary. I have learned to spend extra time with the first coat. Keep wiping it on when you see it has absorbed into the wood, primarily end grain. I just keep wiping more on until it stays wet evenly, then do a final wipe to even it out. Leave extra time for the first coat to dry, I do both sides the first time. I sand with 400 between coats and alternate sides, every 3 or 4 hours seems to work of me. If I see a spot that still soaks in I just apply more until all is wet then do a final wipe to even out just like with the first coat. Last coat gets 0000 steel wool instead of sanding. The more you put on the glossier it gets. Last coat is just a thin wipe.

INSERT PICS saladbowlfinish-1.jpg saladbowlfinish-2.jpg ***************

food safe salad bowl finish from generalgeneral food safe salad bowl finish

I am experimenting with using this as a sealer coat before using oil or wax. The second picture shows a comparison of 2 ELM bowls with 5 coats of SBQT on one ant the other with one coat SBQT/sanded with 400/and wax. The sanding removes all finish on the surface. Using Mahoney’s wax. Really like this result. I Think this is a great solution for an open grain wood where you do not want a gloss finish but also do not want just Walnut Oil and wax.

This is a very versatile and easy to apply finish that gives great results.