Ash Anniversary Vase setting on Oak base so I did not have the take the tennon off because I was not finished 🙂
Yesterday was the anniversary of 38 years of marriage to my wonderful and beautiful wife (Elizabeth), friend, grandmother to my grandchildren and mother to my children. Since I started woodturning I’ve done some sort of special project for special occaisions, at first bowls but eventually got down to usually a vase or some sort, I almost always usually finish it the night before …collect some flowers or green things 🙂 and put it on the table with a card. Neighbors must think I’m some kind of whacko ….since I am foraging plants to put in these vases at 2am or latter. When things are alive we have plenty to choose from. Winter, early spring and late fall provide little to chose from so they usually are dry flowers. I always try to throw a couple of cockleburs, thorns and other weeds to remind us that life hasn’t been easy. I will usually explain what the cocklebur represents or the ragweed ….sometimes an acorn or two. I suppose most women would have tossed me and the vases a long time ago ….but not mine….she is a keeper 🙂
Had An Ash Vase in the Works
My father in law had gotten very sick in the last 2 weeks….they did not know if he was going to make it, however he spent a week in the hospital and then was released to a convalescent facility where they would determine where he would go depending on his improvement. I guess I never had the perfect relationship with my wife’s family but I felt sorry for the old guy. He loves gardening, flowers and vodka. I came up with the idea of making a big enough vase that I could put some flowers in it and have a trap door on the bottom where I could hide a couple 1 ounce bottles of vodka. So I secretly started working on “Operation Nursing Home” The guy is 92, has had a drink evey night after dinner for the last 20 or 30 years and now has been cut off…..I felt sorry for him. So, I had been working on this project for about 2 or 3 weeks. He had lost almost all his strenght and balance but still had presence of mind to be determined to make a come back, so I wanted it to be as easy as possible for him to get to the goods to take the edge off his situation ….when I told my wife, I do not think she approved …..but I pushed on 🙂
Well, I had some Trojan Vase design flaws. It had to be big enough to be a Trojan horse …holding the flowers and the vodka. He was weak, probably not as coordinated as he once was and I didn’t know if he would be able to remove the flowers to get to the trap door? I know, some of you will think I am terrible for doing this. But remember, he has lived his life, no medicines were changed and they had a “happy hour” on Friday’s where they could have a beer or wine. So I thought I was helping …..after all, he went in there cold turkey from the hospital, no alcohol for a week and he had to be going through withdrawls and since no one in my wife’s family likes me anyway I wanted to help eliminate some pain and discomfort…..I had nothing to lose!
Never Finished the Nursing Home Project
Turned out I had hollowing problems while woodturning the vase. I also had one back surgery/procedure per week which affected me much more than I thought. I had 4 of these procedures so far and although it is amazing what can be done and my doctor/surgeon is the best it started to really affect me. Constant pain, constant sickness and I could barely move. So my good intentions still have not made it to my poor father-in-law.
Repurposed the Custom
Woodturned Nursing Home Vase
So, I found myself with one of the best shaped vases I have made in a long time. I just needed to figure out how to hollow the rock hard ash end grain out so I could get the size I needed.
Had to Make a Quick Decision For
The Purpose of The Trojan Horse Vase
Sometimes things just work out. That night I was hurting from the surgery but had a half finished vase. I really wanted to give my wife something for putting up with me all these years so I repurposed the nursing home vase to an anniversary vase!
How Can I Become More Efficient
At Hollowing Endgrain
That’s the story. However it has put me on the hunt on how to become more efficient on hollowing. If I had $500 or more I would buy one of those hollowing systems …..I don’t have the cash so I need to figure out how to make something that can help me hollow. I would really like to do hollow forms without spending an arm and a leg. Furthermore, I would like to be able to hollow out a simple log end grain without having to spend all kinds of money and install some sort of expensive system. A quick check on Amazon reveals some of the most used hollowing systems or you can check Youtube for Hollowing Systems
Guess I will be spending my next weeks and months doing some research on how to build a hollowing system myself.
Unless some of you who manufacture hollowing systems would like to send me your system so I can test it and do a review? I see this happening all the time, yet no one has approached me to test their products for a true and factual review.
Back to My End Grain Hollowing Problems On My Vase Woodturning Projects
I had been working on an ash vase for the last week, I had a terrible time hollowing it. The end grain was so hard my tools were taking forever to make any progress, in fact I think I took the temper off a forstner bit because it got so hot ….couldn’t even make it all the way down.
I have a ton of dead ash so I’d like to get a good system for working with with it, especially end-grain hollowing. Turning the outside was a piece of cake, cuts well….little tear out. I finished it with a couple of coats of Deft Lacquer Sanding Sealer and sprayed a few coats of Satin Lacquer from Watco.
Hollowing An Ash Vase While Woodturning
First off, I am doing end grain hollowing. Secondly I knew this was gonna be tough because it was a big piece and I needed an average of 4″ diameter for the hollowing.
I figured I would start with a 1″ forstner bit, then 2″ bit and then a 2-1/2″ bit. I sharpened all bits and started. It was slow going with the one inch bit but I got about 10″ down into the vase. I put the next big on and only could get down to about 5 or 6 inches so I then tried the 2 1/2″ bit and got no where with it, maybe 2 inches before it got so hot I think it lost its temper.
So next I tried some gouges, I first tried the spindle gouge hollowing method. I just couldn’t do it. I tried a couple different size bowl gouges and it was catch city.
Carbide Cutter Tools for Hollowing End Grain Woodturning Projects
I turned to my trusty round carbide cutter tool. I think the cutter is 15mm and I could make that work but it was slow going. I just made another round carbide tool
these were some of the more effective tools I used for hollowing out my vase
with a 10mm cutter on it but the steel it was mounted to was only 3/8 or an inch and there was just too much flutter.
Using Big Hurricane
Scrapers For Hollowing
Next I tried my big Hurricane scrapers and surprisingly they did very well. I couldn’t get a very good angle for shear cutting with them so I had to just scrape. These are big scrapers 3/8″ to 1/2″ thick and 1 1/2″ wide.
I had my custom built steady rest on the piece at all times ….otherwise I am sure it would have gone air born more than once, if that thing hit me in the head (even though I had my shield on) I probably would have gone down!
Anyway, I finished it with the scrapers and my homemade carbide tools. I could not hollow as far and wide as I wanted to so I need to find a solution, an inexpensive solution to the problem. Hopefully something I can make.
Making the Platic Insert for
The Wood Turned Vase
I was going to use a water bottle as the insert and I did. However, I had to turn the water bottle upside down and cut the bottom out because the vase hole was kind of tapered. In order to make that work I used some CA on the bottle cap and glued and sealed that into place.
Facebook Group, Wood Turning Basics for
Hollowing Ideas for Woodturners
I asked my facebook group, Wood Turning Basics what was working for others. Here is the copy of my post:
Best Hollowing Tools
For Endgrain Hollowing
Well, 8/28 is my wife and my anniversary….. 38 years, who would have thought 🙂
Seems like yesterday, time just flies by so fast ….good times, bad times …its all time and it seems the older you get the faster the days go by. My father told me that when he was alive and I really could not relate ….but his words were so true.
My wife and I raised 3 boys, all of which we are extremely pround of. We have 2 grandsons that are my reason for living ….don’t know what I would do without them. And we have one in the oven!
Anyway, I was working on an ash vase ….had problems, lathe broke, couldn’t hollow it correctly…..but I always try to make something for these special days. So, I hollowed the best I could…. it was designed to hold a plastic water bottle insert. Since the hollowing was tapered at the end I glued the cap on and cut the bottom off to fit inside the vase. It turned out pretty good, no leaks and almost got the whole water bottle inside the vase.
Since I was still working on it, I left the tenon on it and turned a piece of oak for the base. The oak platform has a recess that accepts the tenon from the vase and I hot glued them together. I was thinking that at some point in time I might finish it correctly and knock the base off, finsh hollowing and remove the tenon ….but if I know myself that propbably will never happen 🙂
I finished around 4am and then went out to look for some flowers to put in the vase. I found some geraniums, flocks, ferns, hostas, wild grape vines, some type yew I think, horseradish leaf and a few other miscellaneous plants.
We live a pretty simple life. Liz really enjoys what I put together. I’m blessed and lucky to have been married to her for all these years!
Reuse Old Food/Condiment Bottles For All Your Woodturning Finishes
Maybe you have already thought of the ideas I will share regarding using emptied food or utility containers for your woodturning projects. That is, these can help you get organized, they don’t cost anything and you can make them a one time use or they might last for months or even years. One of my favorite is the Catsup bottle, mustard bottles and salad dressing bottles. I particularly like the clean bottles so I know the condition of the finish or glue that is inside the bottle.
Storing woodturning finishes in catsup bottles. The top screws on tight and the flip top snaps tight eliminating evaporation of the finsh.
I was mixing up some special finishing mixes for my woodturning projects when I thought it might help others to know how and where I store these finishes. It might seem like a simple thought and for the most part when we buy a finish it comes in a can or bottle.
When you mix your own finishes you need to store it in something and hopefully it can also be a container that you can use to apply your finish …..I mean like, squirt it out onto a rag or the project or a paint brush.
Although this isn’t game changing information …it is practical information that you can use to help store and apply your finishes.
Ketchup and Mustard Bottles for Storing Woodturning Finishes
And make use of food jars and bottles when emptied. I’m on a low budget so I’m always thinking how I might be able to use this bottle or the next bottle or can. Some work out pretty good, others ….not so good, so in the long run you just need to experiment with different containers.
I can tell you I prefer glass containers. One big downside to glass is that it cracks to pieces when hitting the concrete floor 🙂 I use mason jars of various sizes for a lot of things and I break a lot of mason jars because they were left too close to the edge of the bench and hit the floor.
Use Big Plastic Bottles to
Keep Paint Brushes Clean
I keep my cheap paint brushes in a big plastic bottle with some lacquer thinner, the brush hangs in the thinner and is always clean and ready to use when apply different sanding sealers and woodturning finishes.
I found some big pretzel bottles that were perfect for hanging paint brushes in with a little lacquer thinner on the bottom. I drilled a couple holes in the top and hot glued a dowel that I hang paint brushes on. I just use some baling wire to make some S-hooks and hang the brush into the lacquer thinner …..or course you could use whatever thinner you want…..I found lacuqer thinner cleans just about anything,
Capn Eddie’s Thoughts On finish Storage
I remember watching some Captn Eddie Castelin videos on how to mix OB Shine Juice and then apply it. He also was just as interested in how to store the finish you just made up and how to keep it in the right proportions since some of the ingredients will evaporate over a period of time, thru use or just through the plastic storage bottle itself.
Capn Eddie recommended using some squeeze bottles from Harbor Freight for storing and applying his finish but made the distinction that the DA (Denatured Alcohol) will evaporate over a period of time and you will then not have the proper amount of separate ingredients in the OB Shine Juice formula.
The long and short of it is that the alcohol evaporates from the bottle through the bottle and through the snap on top. Over time, you then need to calculate how much alcohol has evaporated and add the necessary Denatured Alcohol to get the formula back to the original recipe.
Capn Eddie recommended some plastic squeeze bottles from Harbor Freight, I purchased some and they didn’t last long. I found a good variety of Plastic Squeeze Bottles to store your finishes and other solutions….pretty cheap, Click Here.
Storing Your Custom Made Woodturning Finishes
So, over the last couple of years I have been using a variety of different food or condiment containers to store and apply woodturning finishes, glue and keep paint brushes on hand.
Reuse Old Plastic Squeeze Mustard Bottles
Mustard bottles make excellent glue storage and applicators. Buy your wood glue by the gallon and fill your old mustard bottles with the glue, the cap stays pretty tight and you can use it over and over. I use several types of wood glue so I ended up with about 3 mustard bottles filled with food safe woodglue …..works great . Mustard bottles are not the greatest for finishes because most do not seal very well. You have a screw down cap and a snap cap. The snap cap often times is loose fitting and will allow finish to evaporate …..but they are excellent for wood glue like the different formulas of titebond and other woodglues you can easily have 4 or 5 bottles of glue laying around the shop for easy use or easy to get to.
Finishes like OB Shine Juice require air tight bottles. First I want a clear bottle so I can see how the individual components of the OB Shine juice seperate. Next I want to find a bottle that has an “air tight” seal at the screw in top and the snap on top. It becomes a trial an error method ….some work, some do not. I found Catsup bottles pretty good, salad dressing bottles are also good.
Remember you are looking for a bottle that is clear, the top is easy to screw on and seals tight (no leaks) and a flip top that seals tightly ….again, no leaks!
Recycled Plastic Food Bottles
for Temporary Storage
Once again, I try to reuse things before they hit the trash!
Cottage cheese containers come in handy when woodturning, whether storing parts and pieces, finishes, or filling up with coffee grounds they help you stay organized.
Large cottage cheese containers are perfect for holding parts while working on a project. They can also be used to clean paint brushes or glue brushes ….I also use them for mixing up special finishes in small batches. We go through at least one container a week ….when you are done using it, just toss it, doesn’t get any easier!
With any of these containers you can use them for long term storage if needed, with or without a lid. For instance I have a lot of 2″ sanding disks, they get used or the backing breaks off. I just keep one container for each grit. I’ll also throw in small square sandpaper sheets that aren’t completely used up.
You can use yogurt food containers for casting small resin woodturning projects
Yogurt and Cottage Cheese
Containers for Resin Molds
Plastic food containers make excellent resin molds. Anything from the size of a gallon plastic milk or water bottle to small yogurt containers. One serving size yogurt containers are perfect to experiment with casting turning wood and resin projects.
Storing and Using CA
Glue For Woodturning
Since most woodturners use CA glue in some form, whether it be thin or thick CA …you often get it in bigger bottles that the top gets clogged or the cap is lost causing all kinds of problems. Some CA’s come with very thin and long applicator tips ….these get lost, clogged and eventually have nothing left. Once you start using those applications you realize how handy they are.
CA by the way refers to Cyanoacrylate Glue or Superglue.
What to Use CA for When Woodturning
I use CA mostly for gluing purposes when woodturning. I will use it to fill cracks or crevices. You can pack a crack with sawdust, coffee grounds, shavings and then apply some CA to it, usually you will want to use thin CA because it will soak into the material you packed in the crack and it will bond with all material it touches ….there fore helping to keep the bowl or turning project together and not flying apart.
Use a small amount of mica to fill holes, cracks and crevices in your woodturing projects
You can also mix a little mica color with the CA, in this case you would want to use the medium thick to thick CA to give the crack a color that either blends with the wood or is in start contrast with the wood. I also use a 5 minute epoxy for this, you get more time to work the material and most times it looks better.
CA For A Finish On Your Woodturning Projects
It would be remiss of me if I didn’t mention the fact that CA is a very popular finish for many woodturners. Many wood pen turners use CA for a glossy finish on their pens. Although CA isn’t used on bigger projects much, smaller stuff like handles, eggs, wands, billy bats etc look great with a CA finish…..some turners will use CA on bowls and cups but I’m not so sure that it is food safe even after it cures.
Although I do not use a lot of CA for finishes some turners do and will buy larger bottles of thin CA. This is where you would want to keep most of it in the freezer and split it up into smaller bottles for your use. Like I mentioned, some say you can keep it in the freezer for 2 years or more.
Storing Your CA
Depending on how much woodturning you do, your CA could go bad if not used in a reasonable period of time and kept in the right conditions. Therefore if is advisable to store your CA in a refrigerator/freezer until you use it. I know of some woodturners who use a lot of CA for their projects (CA can be used to give a bright glossy finish) and they purchase larger amounts of CA and by keeping it refrigerated it will last up to three years.
Kit for storing and using your CA glue more efficiently
I mention CA, storage and application because you can purchase kits that contain smaller dispensing bottles, a couple hundred applicator tips and other pieces to help make the most of your CA.
I purchased this CA Accessory Kit and am very happy with it. I did it mostly for the CA applicator tips but ended up using the smaller bottles and refrigerating my thin CA, Medium Thick CA and Thick Ca. Something you should consider if you use any CA at all, the applicator tips are golden. They help direct the CA into cracks and crevices and keep the CA from bleeding into the surrounding wood which cause discoloration.
Final Woodturning Storage Thoughts
Coffee cans are good for one time use or storage of parts and pieces ….good to a few at hand!
I hope I might have opened up your eyes to finding new and unthought of methods of storing your glues, finishes and other woodturning related products. Just keep your eye out for empty spray bottles, coffee cans, condiment bottles and other disposable food containers and you just might get a little more organized in your woodturning shop!
I have a couple of garbage bags filled with empty plastic and metal containers. Some I probably will never use but others can really make life easy in the shop….. and coffee cans, whether metal or plastic are always of use and can be easy one time containers that you’ll be glad you had around 🙂
Plastic Bottles for Vase Inserts
As I write I keep thinking I should mention other purposes for used containers. One of the most important ones for me is using a plastic water bottle for a vase insert. It holds water, won’t leak and is easy for a client to replace. Smaller vases can use medicine bottles or other pill bottles.
Empty drinking water bottles provide excellent inserts for woodturned vases and are easily replaced.
Wood vases are really cool, I enjoy turning them but it becomes expensive to epoxy the inside to make it water proof so you simply have to make it big enough to hold a drinking water bottle that has had the top cut off. When turning a wood vase with a water bottle insert in mind I usually make it at least 1/4″ wider than the plastic bottle ….sometimes even a 1/2″ bigger. You want to make it bigger because the hole will either shrink or get deformed if water is dropped into the untreated vase interior.
Alex Snodgras from Carter products shows how to properly and easily setup a bandsaw blade and we further more look at best blades for cutting wood bowl blanks on the bandsaw using bandsaw blades from www.sawblade.com
Learn How To Set Up Your Bandsaw For Perfect Results
Every woodturner really needs a bandsaw, probably 14″ and above. If you are going to be doing resaw work or making large bowl blanks than think more like 16″ or 18″….always get the biggest you can get. But the fact is if you are a woodturner a good bandsaw is a must!
Its been a while since I posted this video How to Setup Your Bandsaw for woodturning, but I post it because we have new members every month….if we aren’t 15,000 strong we are getting close. So this video will help you understand your bandsaw a little better. You really only need to know some very basics, the guy doing the demonstration is from Carter Products, they have a whole line of bandsaw blades and accessories you should check out their products on Carter Bandsaw Products on Amazon https://amzn.to/2lBtNUq their magnetic fence is really cool and its on my list of things to get of course they have their famous roller guides and a lot more besides just blades that some call the best you can get.
A good group of people to deal with. Family owned company and well knowledged and versed in bandsaws.
The video is a demonstration of some of the very basics that I found I was doing all wrong…..and I’ve had a bandsaw for 20+ years, I adapted his techniques and was able to increase my productiveity and blade life.
Center the Blade on the Wheel?
For instance. Everyone tells you to center the blade on the wheel. He says no, center the deepest part of the gullet in the center. If you do this you will never have to adjust the position of the side bearings. He shows you how to adjust your side rollers if you have them, explains the theory behind what and why he does everything.
Difference between bandsaw blades
He will show you the difference between setting up a narrow blade and a resaw blade, usually on 2 seperate machines for box work and scroll work ….you almost need two machines. and you’ll be able to find out if your table is running true with a simple piece of 2×4.
He makes a lidded box from a piece of green lumber in a bout 1 minute 30 seconds.
How to unfold a bandsaw blade
Of course in the very beginning he goes over how to unfold a bandsaw blade and how to take one off and turn it into a small basket ball size circle for easy stowage …..so simple you will forget it so you better do some screenshots or write it down 🙂
Bandsaw Blades I use to Process My Woodturning Blanks
As a bowl turner I like to do most of my bowl preparation with some jigs I made for my bandsaw that will take a 2′ or 3′ log and I can use it to cut it down the center of the pith or cut it on each side of the pith so there is no pith in my bowl blanks, I usually will put on an 1″ or 1-1/4″ bandsaw blade and spend the day ripping my logs in half. I will then either seal the ends and put them in storage/drying until I can cut some circular blanks using smaller bandsaw blades.
Cutting Wood Bowl Blanks with 3/8″ and 1/2″ Bandsaw Blades
I experimented with 3/8″, 1/2″ 5/8″ bandsaw blades for cutting bowl blanks and I found the 3/8″ blade would have been perfect but I end up with too much drift on big blanks, the 1/2″ works good down to about a 4″ blank and the 5/8″ blade will work on almost anything I through at it. These blades were from www.sawblade.com. They were given to me to do a review on from www.sawblade.com, the order was broke in 2. The first box of blades were the correct length and the second box of blades were 25″ longer …..I was never able to get the correct blades. The first blade I put on, the 5/8 worked like a demon. It cut just about anything I threw at it, but finally it broke.
I tried a 1″ resaw bandsaw blade from www.sawblade.com and it was so dull it couldn’t cut a 2×4 without whining.
I did try another blade, I have to look at my notes, again it seemed like it was either used or made of poor metal because it snapped …..I WILL LET YOU KNOW WHICH ONE IT WAS.
As I said, the 3/8 inch blade, some woodturners swear by this blade would not allow me to cut perfect circles on my bowl blanks that were maybe 6″ thick and green wood. I tried to readjust and reset to no avail. Not sure if I got a bad blade but I was disappointed.
Review of www.Sawblade.com
I wanted to give sawblade.com a good review for their bandsaw blades but number one the whole order did not arriver, half of the blades were backordered. I called, no body knew anything about the order. It finally can and all the blades were 25″ longer than I needed them. To this day, I have not resolved the problems.
(Edit on sawblade.com review)
They did contact me after a year but I have been very ill and have not been able to send back blades or pictures. I do think they will help set things right but I was surprised they sent the wrong size out to start with. I would recommend them to others since their service reps were kind and compasionate and seemed anxious to satisfy me.
I have to say that the salesman I talked to that set me up with the order was a cool guy and anxious to help me. He wanted me to try the blades and I was supposed to get a discount code to offer to readers of my blog and facebook group. He went missing in action and so did any customer support.
I think www.sawblade.com has some good products, but they must be working on their customer support since I really did not get any, except for some new guy who calls me every couple months asking me for an order!
I only share the sawblade.com story with you because I really wanted to find the best bandsaw blades for woodturners. And if I could find some good bandsaw blades I wanted to negotiate a discounted price for anyone who might need one or two from both our facebook group, Wood Turning Basics https://www.facebook.com/groups/woodturningbasics and of course to anyone who might visit my blog.
Guess I’ll have to look around and see if I might be able to find another supplier.
Watch the Carter Rep run through some bandsaw basics, you will be amazed https://amzn.to/2lBvmlg and check out some of the Carter accessories for bandsaws that I know you will find helpful!
Since this is a blog about Woodturning Basics I like to post content that brings us back to our beginnings. That is always relatable because every day someone buys a new lathe and has no idea how to use it. Every day something causes a casual woodworker to buy a lathe, buy some woodturing tools and even buy a new woodturing chuck ……but they have no idea how to use them.
Wood Bowl Finishes
Every day someone turns their first project and then realizes it needs to be finished…..how do I finish my new bowl?
Once again, a subject like woodturning finishes could fill a book easily. You could probably spend your woodturning lifetime trying and learning how to use different woodturning finishes.
One aspect to consider when deciding on what type of finish you want to use for your wood bowls….. you have to ask, is it food safe if you are going to use the bowl for food or drink.
I’ll suggest 2 wood bowl finishes that are food safe and I use them inside my bowls all the time.
There are many, many finishes. You can use plain Shellace, comes in many varietys ….or you could make your own finish like Eddie Castelins OB Shine Juice, a very good (and cheap) utilitarian finish, easily apply multiple coats in a short period of time.
Wood Bowl Repairs
I would be remiss if I did not at least mention some of the tools you need to repair wood bowl repairs. Wood checks, cracks and shrinks. You might turn a beautiful bowl and because the wood wasn’t dry or didn’t get dried properly you get a crack.
To fix a crack you need some glue, sawdust, shavings and maybe coloring dust. CA is the easiest to apply and with an accelerator it will stick quickly, instantly.
The idea is to rub some sawdust, coffee grounds or shavings and push it into the crack or hole. Apply some thin CA glue and then spread more sawdust or coffee over it, push it into the hole or crack and apply more CA. Then you need to sand back to smooth.
There are all types of CA available. I try to keep on hand a
Stick Fast has a CA kit that contains all you need to get started using CA on your woodturning projects, you can even use it on small projects like pens, and you will find a use for the thicker viscosity CA’s are you began to turn more and more …..I recomment you check it out.
I could go on with the questions but suffice it to say that learning to be a woodturner encompasses many different aspects of working with wood. We learn these methods, processes, equipment and tools one at a time!
So, if you will, allow me to talk a little about how I got started. Then, how you might get started. And finally a couple of good videos on learning how to turn your first wood bowl!
Oak wood bowl with cracks filled with CA and coffee grounds.
Learning how to turn your first bowl
Warning ….woodturning is a highly addictive habbit. Be prepared to spend mornings, afternoons, days and nights in your shop learning all the different aspects of turning wood!
How to Learn Woodturning
I started out by betting a wood lathe from Harbor Freight and a cheap set of chinese woodturing tools ….again, from Harbor Freight. My only experience prior to that was maybe 40 years or so ago in high school wood shop class.
My lathe came with a 6″ faceplate. This is how you attach to the piece of wood you want to turn to the lathe. It also had a spur drive center with a morse taper and and live tailstock center for the opposite end. Basically this setup was for turning spindles.
My first project was some kind of candle holder for tea candles. All I did was take a branch, put it between centers ….it was about 6″ long. I turned some design into it and then drilled a hole for the tea candle.
I was hooked 🙂
My next project was going to be a cup/mug made from about [4 or 5] 2×6’s glued up.
Even with my dull chinese tools I was able to turn the outside and make it look pretty good…..in fact, it looked awesome, the wood cup
2×6 wood turned cup
had a construction look which was exactly what I was after.
Woodturning Hollowing
Then I had to hollow out the inside!
If you plan on turning cups, deep bowls or hollow forms you really need to use hollowing tools. The Easy Wood hollowing tool is great for beginner and experienced and you can get one on Amazon
That’s when I got into trouble. I didn’t have the right woodturning tools. The tools I had were dull (I had no idea how to sharpen) the tool rest was all wrong……and I had a catch every 15 sections or so. I did finish hollowing but the inside looked as rough as the bark on an oak tree 🙂
I wanted to waterproof the inside of the cup …..that led me to google/youtube to do some research and I discovered the online world of woodturning! I did eventually find a food safe epoxyto coat the inside of the cup ….and surprisingly it turned out pretty nice. There is a learn curve with wood epoxy finishes, however, the results are well worth it. There is even a whole world of epoxy resins and castings for woodturning but that’s for another day!
Sharpening Woodturning Tools
I couldn’t end this article without making mention of a couple of things regarding woodturning tools. No, you don’t need an expensive set of turning tools. In fact in my opinion you should buy a cheap set of turning tools and as you began to learn how to use them you will need to learn how to sharpen them.
This may be hard for you to comprehend right now. However, lets say you picked up a cheap set of wood turning tools. You also purchased the sharpening jig and at this point you have practiced for a year and you are ready to move on to bigger and better tools.
Don’t think those old tools are wasted. All you need is a grinder and your sharpening jig and you can reshape your old tools and make them into specialy tools. These tools can perform special tasks and are open to your imagination. Al Furtado is someone who has repurposed a lot of his tools and I have copied some of his favorite tools ……this will give you a lot more flexibility and satisfaction in your abilities and your projects.
Sharpening your bowl gouges and other turning tools will ultimately decrease the size of the tool and shorten the life span of your tools. That’s why it makes sense to invest in a sharpening system and practice on cheap woodturning tools. After a period of time you will feel confident in your abilities to sharpen your wood turning tools and you can buy more expensive tools made with the best steel.
I invested in the Wolverine Oneway Sharpening Jig, one of the first of its kind and there are many imitators. This system is built from strong steel and made to last ….I have heard that the knock offs (those who copied) are made of stamped steel and just cheaply made. I love my sharpening system and its one of the best purchases I made for turning wood.
Carbide Tipped Woodturning Tools
This may be the first article or blog post on woodturning and you are swamped with questions and ideas. I’m trying to expose you to ideas and concepts ….mostly tools that you will need along the way.
So lets assume you have a piece of wood mounted on your lathe. Next you need to be able to shape that wood with some type of woodturning tool. Again, it takes another book to tell you which one to use but suffice it to say that a bowl gouge is for makeing bowls, spindle gouge is for making spindle type items. Hollowing tools dig out the inside of a cup or bowl. Parting tools act as a slicing tool to remove a turning piece from the chuck or faceplate. Roughing gouges are mainly for turning cylinders when the grain goes with bed of the lathe. And scrapers can be used just about any where. There are many more tools but these are some of the basic traditional tools.
Woodturning Scrapers
Carbide tipped woodturing tools are mainly scrapers. They consist of a handle, square or round bar with a carbide cutter or insert screwed into the end of the bar. The carbide cutter comes in many shapes and sizes. You have square cutters, radiused cutters, diamond cutters, negative rake cutters and round cutters ….all of different sizes.
The benefit with carbide cutters is that you do not have to sharpen them (although you can) you just rotate the cutter to a different face …tighten it back down and start turning again. They are sharp, last a long time and can hog off a lot of wood. You can learn how to make traditional cuts like shear scraping and slicing which help to eliminate endgrain tear out. But they are a modern tool and some dispise them while others will only use carbide tools.
Bottom line is whatever gets you going with turning wood ….is a good thing. Learning all the different aspects of turning wood will take a lifetime and you should have fun doing it and not argue the finer points of traditional vs new.
I made my own carbide tipped turning tools. I’m not a metal guy but after watching a few videos I gave it a try. Now my 15mm round carbide tipped tool is one of my favorite when I am turning something that is a little scarey.
Easy Wood Turning Tools has some of the best carbide tipped tools you can get. They make a small size for doing things like pens, mid size and full size Easy Wood Turning Tools.
My Favorite Cannot Do Without
Traditional Woodturning Tool
Before I leave the subject of Scrapers for woodturners I wanted to mention a traditional set of 1-1/2″ by 3/8″+ scrapers from Hurricane woodturning tools.
This set comes with a full round front and if that’s all you can afford…..get that one. The other 2 are a left and right bowl scraper.
These tools take a beating. Once you learn how to use them you can refine the shape of your bowl or turning object with confidence. You do not have to be afraid to stick this tool into a rotating piece of wood…… hold on and approach slowly and your shape will began to be difined. You can define shape, you can hollow and you can shear cut and slice with these tools.
Sharpening is a breeze, determine what angle works best for you and lay it on the sharpening platform and run it over the grinding wheel once or twice.
Learn how to introduce the tool into the spinning piece and you will build your confidence and do things you never thought you could do before. Approach at less than 90° off of the tool rest and you will almost always be able to automatically spill a catch.
I use these scrapers when I am in a scarey situation but do not want to quit. I start with the carbide tipped tool…. if that doesn’t work I will try the big tradional scrapers. Do youself a favor and get a set of these……they will last a long, long time! Add to your tool collection with these 3 Large woodturning scrapers from Hurricane!
I use these all the time and consider them to be a must have for any woodturner!
How I Learned to Turn Wood or
My Woodturning Start!
I’ve had some health problems that prevent me from going out much. So, joining a woodturning club was out of the question. Going to wooddturning conferences was out of the question. And since I couldn’t find anyone near me that would be willing to come over and give me a few tips I had to learn how to turn wood on my own.
I read books. I read magazines. I used Google and probably learned the most from youtube. Learning from Youtube gives you the good and bad. You can learn from others videoing their mistakes and you can learn watching others turn outstanding projects.
If you are a complete newbie to woodturning the problem you will have is knowing what questions to ask and where to ask them. I have this blog and I also run a Facebook Group called Wood Turning Bascis at https://www.Facebook.com/groups/woodturningbasics. You can ask any question there and find someone to help you. I delete any member that makes fun of newbies or makes newbies feel uncomfortable. But I learn something new almost every day, certainly every week about woodturning.
Learning Woodturning On Youtube
Youtube can be your woodturning coach and friend. As you start to learn the different aspects of turning wood you will began to learn the parts, pieces and procedures used in woodturning. Now you can use those keywords to search for specific problems you might have. For instance, you might have read about woodturning chucks but do not know what is the best. Search “Best Woodturning Chuck” and you will be on your way to learning what type of chucks are out there, which ones are the best ….and which ones you might be able to afford …………check out Amazon for woodturing chucks
I found that the Nova Chucks had an excellent reputation and many woodturners recommended it. All parts are interchangeable and they come in a variety of packages. They are unique in that they have spindle adapters that make the chuck able to be used on a variety of wood lathes. So if you upgrade your lathe and the spindle size is different you can just buy the probably spindle shaft adapter. A fact that isn’t easily understood or learned quickly by the newbie woodturner. I purchased the SuperNova 2 with a couple sets of jaws and worm screw and couldn’t be happier 🙂
Maybe you just got started and you have no idea which tool to use. Again, search youtube for best woodturning tools or go to our Facebook woodturning group and ask what tools other members bought and would suggest to buy .
How Do I Turn My First Woodturning Bowl
OK ….I have some tools and want to get started …..what do I do first. I’ll give you 2 videos to watch. These videos will help you get started in your woodturning asperations.
Turn Your First Bowl ….A Video Class on Woodturning
Shawn Graham has a youtube channel called “wortheffort” ….he’s a good ole boy from Texas and loves to teach about woodturning and woodworking. I suggest you follow him and learn from him …..I’ve picked up all kinds of good tips and methods for turning wood and working with wood.
This video is a basics type video on how to turn a bowl. Good information and you will be a better turner after watching and applying what he teaches. His approach is understandable and the photography will be very helpful to anyone wanting to learn how to turn wood.
Here’s the index for this video in case you are looking for a specific aspect of woodturing:
In-depth video class for those interested in turning their first wood bowl on a lathe. Taken from the perspective of a new wood turner or someone interested in this side of the craft.
———————————————-
Table of Contents:
00:50 – 1st Lathe
03:45 – Lathe and Tools
05:55 – Chucks
08:24 – Lathe Gears
09:40 – Initial Lathe Upgrades
11:45 – Tune Up Tool Rest
12:40 – Additional Tools
14:08 – Band Saw
15:20 – Free Wood
19:50 – Mounting Wood to Lathe
22:21 – Grain Direction
25:55 – Bowl Gouge
26:40 – Spindle Roughing Gouge
28:50 – The Supported Cut
31:30 – Tool Rest Placement
34:16 – Gliding on the Bevel
36:00 – Front Hand
37:45 – Big Muscles
40:10 – 1st Cut, Rough to Round
47:20 – The Corners
53:00 – Mount in Chuck, Tenon
57:15 – Shape Outside, Shear Scrape
1:01:00 – Surface Rim
1:04:30 – Bowl Thickness
1:07:45 – Bowl Scraper
1:09:30 – Remove Tenon
1:13:08 – Conclusion
—————————–
“How to Turn a Basic Bowl-Part I“
The Youtube Channel “FineWoodworking” has a video called “How to Turn a Basic Bowl-Part I” by Richard RAffan ….an awesome teacher and woodturner. Not only will you learn about turning a bowl you will learn what woodturning questions to ask. He makes everything so easy, pay attention to all the details he discusses and watch how each tool is presented to the bowl.
Part II
The youtube channel “Carl Jacobson” has a ton of followers and although this video is not a basic video on how to turn a bowl, it does take you back to the basics, the title being
“Woodturning Back-to-Basics #3
Turn a bowl without a chuck”
Back in the day there was no scroll chuck, or woodturning chuck. You turned between centers or you used a faceplate. Carl talks about and shows how to turn a bowl without a chuck.
FUNdamentals of woodturning: #1 The faceplate
Youtube channel “Wyomingwoodturner” …..watch his stuff. Sam DeAngelo is someone I have learned so much from. In this video Sam talks about “The faceplate is at the core of woodturning. Sam covers techniques for utilizing this simple tool:
There are many other woodturners that I have learned from, some should be household names for any wood turner like Eddie Castelin, Mike Peace,RoboHippy,Brian Havens,As Wood Turns, Cindy Drozda, Mike Waldt, Kim Tippin, Al Furtado, Larry “The Wood Whirler”, Andy Phillip ….I know I missed a bunch of excellent woodturners …..I had hoped to give you guys a place to get started when it comes to turning wood. Again, I encourage you to join our Facebook Group at https://facebook.com/groups/woodturningbasics for help in all your woodturning needs.
Every now and again you will read or meet up with someone who likes sanding 🙂
I can almost say I hate sanding, however, it is the key to developing a flawless finish on your wood bowl. I’m not going to say much here except that fact that you need to get used to it and you need to follow the progression from low grit to high grit.
The better you are with your tools the higher grit you can start with.
I usually apply a couple coats of sanding sealer. I then try to get a better finish by using my woodturning tools to smooth out the wood as best I can.
I then apply another couple coats of sanding sealer and will start about 120 to 150 grit if my original finsh is in pretty good shape. Then I move on to 220 and 320 grit.
Now I am ready to apply the finish of my choice. Usually Lacquer on the outside and one of the foodsafe finishes on the inside. I will use scotch pads or steel wool to rough it up and smooth it further before applying more coats.
Sometimes my finishes will look like glass and just beautiful ….other times I still have failures and have to go back and start from the beginning …..or toss the bowl in t he fireplace 🙂
I read someplace that shiney, high gloss sells. So if you are trying to sell your woodturnings you need to perfect your high gloss finishes.
For me I can get a depth of luster from a Satin or Matte finish. It takes more coats but it can be buffed and polished or waxed for a beautiful finsh with the high gloss.
Do yourself a favor and turn a bowl and finish it with the most basic of finishes. Try mineral oil. Try mineral oil with beeswax and some diatomaceous earth. Try some of the Howard’s finishes. Give Acks a try or Triple eee a try. There are many finishes out there, all work differently on wood of other species ……but remember…..sanding is the secret to a perfect finish.
After watching Capn’ Eddies videos I realized that he preached the perfect finish comes from sanding. Skip a grit and your project will look like shit ……I don’t think he said that but I just did 🙂 However, the Capn’ always preached that you need to go through the progressions and not skip a step to get that mirror/flawless finsh.
I’m not going to go through the types of sandpaper here. But it seems as though each month there is a new sanding medium. Pay attention to these and if your budget allows ……get some and try them out.
I’ll do a special post on sanding and sandpaper soon.
Conclusion on Turning A Wood Bowl
Assuming you are new to woodturnig it might seem like there is just too much to learn, too much to buy and too dangerous to try to turn a wood bowl on your own wood lathe.
Yes there is a lot to learn.
But no, the negatives do not outweight the positives. It sounds more difficult that it really is and from a very basic standpoint …..you can get started very cheaply.
Our facebook group has young boys and girls turning wood ….of course with some guidance. Having a mentor, joining a group or watching youtube and reading articles is a wise decision when getting started.
You’ll find other woodturners all too willing to help you get started in your new hobby.
Every hobby, sport or pasttime has costs. As far as woodturning is concerned you can start for a small investment and build your collection of tools and equipment as time rolls on. I started for less than $300 and then found out that I could build a lot of my own tools and jigs to increase the size and quality of the projects I wanted to turn.
You might want a small lathe just for turning pens. Once set up, you only have to buy the turning supplies and your initial investment would be one of the smallest lathes made.
Maybe you want to turn larger bowls or spindle shaped items. You can search Facebook Marketplace, Craigslists and Ebay for used equipment. There are auctions where you can get awesome deals on used woodturning equipment.
You can start for next to nothing if you are willing to do the work…that is looking for deals.
Just the same, if money isn’t an issue you can get the best of the best and let’s say something comes up or you just do not want to pursure the hobby anymore. You can almost get your original investment in any tools or other woodturning equipment you buy.
I did not talk about what you might want to do with your woodturning projects. I think most woodturners give away their work ….or collect it for themselves 🙂 However, once you get good at turning different projects like:
-pens
-bowls
-cups
-spindles
-bats
-pizza cutters
-sinks
-boxes
-bird houses
-snowmen
-ornaments
-vases
-turning a root ball into a work of art
-woodturning business cards
-Legacy turnings
-YOU NAME It
You can sell these items at markets, shows, or online. You can make a profit to use as you see fit or reinvest in your woodturning tools and equipment.
For me, it started with turning bowls. I wasn’t that good but I kept trying. I worked the problem, found out I needed to sharpen my tools, I needed some new tools and I needed to perfect my techniques for each project I considered.
But it all started from wanting to learn how to turn a wood bowl! There is something that is very satisfying from turing a piece of firewood into a bowl or learning how to slice a log, mount it on to your lathe and turn a functional bowl or piece of art. In either case it is a one of a kind piece, never to be duplicated!
I genuinely hope you get something from this article/post. I hope you get some encouragement and direction. All the products that I mentioned I have used. Some of the links will result in me getting a small commission or affiliate payout. It is a very small amount but it helps me to pay for my hosting and other website costs so I very much appreciate if you buy these suggestions through my links 🙂
In an effort to clean and organize my shop I had an area that had a Jet jdp-17dx drill press https://amzn.to/2QbHmGR, next to it was a cheap steel tool cabinet, purchased at Menards, and next the the cabinet was an exterior door.
Drilling Speed Guide For Metal,
Wood and Different Bit Types
Before I tell the story, I’m going to link to a drilling speed guide for using various drill bits with different materials. Might save you some time and aggravation when trying to drill steel versus wood, and if you are not used to differentiating between the two this chart will help you cut clean holes with the bits that you have. Drill speedchart
I do not drill a lot of steel, but since I started turning wood I’ve been learning and doing more steel work…..that probably does not make sense but if you start making turning tools or making hacks to your lathe it will be helpful to learn how to drill steel and cast iron.
Make a Drill Press Jig to Hold
Your Wood Bowl Blanks
It all started with the bowl blank jig I made for the drill press. Typically my bowl blanks are flat across the face and round, following the curvature of the tree on the outside, bark included.
Drill press jig from wood bowl waste that is used to hold new bowl blank to drill a recess for your Nova or Wooturning Chuck
I would then shape the profile of the exterior bowl and put a tenon or recess at the bottom of the bowl.
I had a problem with the drill press. It is a floor model and I bolted it to a harbor freight moving dolly. That turned out to be very unstable so I shimmed it so the drill press table was close to level. It wasn’t level though and I always had problems so when I put my bowl blank jig in place the Forstner holehttps://amzn.to/2QbrXpL was uneven and I had the shim the jig ….big pain in the behind if you know what I mean.
So, I decided to fix it. I drilled some concrete bolts, shimmed, and shimmed some more and secured the drill press to the floor. I moved my tool box next to the drill press and lo and behold…… I put the f’ing drill press in the wrong place!
I called it a night and approached it the next day.
Fresh Outlook with A New Day
I moved the drill press over, drilled some new holes for the lag and shields in the concrete and finally got my drill press in the correct location. The drill press table is as close to level as I could get, now I simply stick my roughly constructed bowl blank jig on the drill press table, level out the bowl blank and adjust so the laser cross hairs hit center and BAM!!!! only takes a couple of minutes to drill a hole for the nova chuck and get started on a new bowl.
What’s the Difference With My Approach to
Start Turning A Wood Bowl Blank
Many woodturners will start a new wood bowl blank with a worm screw. That is, they drill a hole in the center and place the worm screw in the chuck and twist the blank until it backs onto the jaws of the scroll chuck. There is nothing wrong with that, however, I found it easier and more accurate to drill the 2″+ hole for the jaws of the scroll chuck. I have more options and I think it holds the bowl blank more securely.
By the way, the tool chest fits in nicely. I had to replace the cheap ass wheels with some I had laying around. You get what you pay for, I might go and fight with Menards and see if they will flip for some new wheels …..I kind of know what they will say 🙂 …..although, legitimate returns are always handled well at Menards.
I’m talking about the drill press and woodturning because drilling a 2-1/8″ hole in a wood blank is perfect for the Super2 Nova Chuck jaws and is a fast way to get your wood blank on the chuck and turning. I use it all the time, I have a simple jig
Hold bowl blank so you can drill recess for chuck with forstner bit
I set the blank in, drill 3/8″x 2-1/8″ hole for a recess and attach it to the Nova Chuck Jaws.
I usually pull up the tailstock to help keep the blank in place.
Then I shape the exterior of the bowl or project. I will leave the tailstock against the piece if I decide to turn a tenon, if I decide to form a mortise or recess I will pull the tailstock away and cut the tenon along with the dovetail profile.
Once again, everything depends on the original hole by the forstner bit (recess or mortise) to be squared to the piece as much as possible, that requires the drill press table to be level or leveling the wood blank by hand….a big pain in the backside……that’s why I spent so much time leveling my drill press!
“Looking for a reasonable option for epoxy to fill voids in wood before tuning. Not wanting to spend a lot.”
Gene Lord said, ” mix some saw dust & CA in the cheap & works for me void”
Chris Lunde says, “Coffee and epoxy”
Cheap Source For CA and
Epoxy For Woodturning
You can get some cheap epoxy at harbor freight, I found the best cheap approach for epoxy is the 5 minute epoxy….lets you start working it right away…. https://amzn.to/2BLvrHR then again, as someone mentioned, mix some CA with shavings, sawdust or coffee grounds and it doesn’t get much cheaper ….. however, if you have bigger checks and cracks you are going to want to go the 5 minute epoxy route ….just my opinion 🙂
Here’s the deal…for CA. There are times when you want to use the thin CA….so it penetrates deep into the check or crack and then push some sawdust, shavings or coffee grounds into it. Also, you will find yourself in a position that the crack or check is so big that the thin CA just disappears into the wood, then you will want to use a medium thick or a thick Ca to place into your damaged area and mix some coffee grounds or sawdust/shavings into.
Thin CA https://amzn.to/2MNea7c Medium CA https://amzn.to/2MNzB8d Thick CA https://amzn.to/2Jn1K3S
Collect CA and Epoxy So You Are Prepared to
Tackle Any Flaw As It Arises While You Are Woodturning
If you plan on doing much turning you should try to get yourself set up with a supply of the 3 CA’s and some cheap 5 minute epoxy. You do not want to use the 5 minute epoxy for finishing. I use a food safe brand for the last couple of years, works good but you only need it if you are using for a finish ….called Max Clear…..pretty easy to work with but as with most epoxy finishes you need to be set up to rotate your cup or bowl, use a hot air gun to kill the bubbles and you get an awesome glossy finish if that’s what you are after https://amzn.to/2BNHEM4
Use CA or 5 minute epoxy and Coffee Grounds with sawdust for filling checks and large cracks
Then, there are times when you probably should use epoxy but you can get away with medium thick to thick CA ….first apply the thin CA, then apply the thicker CA and quickly rub some sawdust or coffee grounds into the check or crack.
Grinding Coffee Grounds For Filling Woodturning Cracks
I stole one of our old coffee grinders from the kitchen and brought it into the shop, first I dry the old coffee grounds, then I grind them in the small grinder so it is nice and fine. I have also used walnut shells from some sandblasting products that I purchased from harbor freight.
You can actually take your coffee grounds, mix a small amount of shavings and grind that up and force into the CA or epoxy for a nice look.
Cracks and Checks Become The Focal Point For A Unique Woodturning
When turning wood, you will sooner or later run into checks, cracks and deformed pieces of wood. Knowing how to use CA and Epoxy for quick fixes will save a project and more often than not …..add a beauty and uniqueness to the woodturning that you would never have guessed could or would have happened!
Since our group is called WoodTurningBasics I like to focus on some of the basics of woodturning every now and again. Safety and safety basics are things we really do not think about but are so important to turning wood….since if you get hurt by flying wood, getting caught up in a turning spindle or have a gouge catch and come flying at you …..you just might call it quits on “wood turning” and I really don’t want to see that happen to anybody. So it is important to understand the basics of woodturning safety!
Over Confidence Is a Woodturners Worse Nightmare
I will say that over confidence is your worse enemy. You might ignore some of the rules and become very confident in your abilities. All it takes is one mishap and that could be the end of your woodturning career ….especially if you get badly hurt. In our facebook group, Woodturning Basics, we get people posting pictures of their mishaps and their wounds. I get requests to delete those posts because people get grossed out with pictures of fingers hanging on by a thread, stitches and blood…..but I leave them there for the simple reason that it might help our fellow woodturners to understand that the tools and equipment we use is very dangerous and needs to be used with caution.
Someone recently commented in our facebook group that they knew of a woodturner that was killed while working on a woodturning lathe. I’ve also gotten messages from woodturners that expressed how dangerous a lathe can be, whether it be metal lathe or wood lathe. Never let your guard down, always be aware of the dangers that might be in front of you. A bowl blank flying off our chuck or faceplate might go away from the lathe or it could target your head! Always wear a facemask and always stand to one side or the other of the piece that you are turning.
Safety Concerns With Dangerous Equipment Is Important to Understand
I worked construction when safety issues were not a big concern. You did not protect your hearing, eye protection was rarely considered, the focus was on getting the project done and your personal protection be damned!
Much has changed in the construction industry regarding the safety of workers and of the work site. Transfer much of that safety to your new lathe hobby. You have a block of wood, anywhere from a couple ounces to couple of pounds spinning at 300 to 2500 rpm at which you are going to stick a metal tool into.
Now we take the time to keep ourselves, that is our bodies, safe. Sometimes you need to read about safety 20 times before you began to consider it, sometimes its after your first accident or maybe you are just reading, watching and considering what can go wrong when turning wood.
Learn How to Use Your Woodturning Tools Safely and Practice Safety Habits All the Time!
Always properly and securely mount your wood to the lathe. I won’t go into details but you need to learn how to keep a project on a chuck or between centers. Learn what type of screws to use if using a faceplate or if using a glueblock, use the right kind of glue. These are all basics of woodturning but will help to keep you safe. A bowl that breaks apart or comes off the lathe happens fast, it might shoot off away from the lathe or it might come right back at you. If it heads your way and you head stops it, you will be a mess and it will cause serious damage……might even end your turning adventures. Always wear a full face shield, you can get one at Amazon for a small investment ….believe me, it is worth the price! This one only costs around $20 and you will thank me if you don’t have one already https://amzn.to/2pWf2NT
Stay Out of The Line of Fire
One of the biggest lessons I learned about woodturning is where to stand when turning a bowl blank or bigger. Never….never stand directly in line with the turning piece!
Remember this, always ….always….try to stand to one side or the other of your turning piece since if the wood blank blow apart it will probably shoot off 90° to the bedways, both toward the back and toward the front (where you are) If you get hit with a 2 or 3 lb cracked bowl blank, you will be going to the hospital.
Keep Your Body to One Side or the Other Of Your Spinning Piece of Wood
So, always stand off the one side or the other of your spinning blank or spindle. Even if it does hit you, it will be glance but for all that I have turned, standing to one side or the other has saved me. Sometimes that makes for difficult turning, but if you have a headstock that rotates you can make your turning a little easier.
Sorry…..I didn’t mean to go into such a discussion.
I was watching Mike Waldt’s video on “Woodturning-A Beginners Guide To Basic Safety” and I thought I should make mention of the importance of safety since we are growing fast as a group and there are some very new newbies. After all, I would like to see everyone stay safe and enjoy our hobby.
Watch Mike’s Video….it has some very basic information
And for all you experienced turners please take this serious and add some tips for newer turners to stay safe while learning how to turn wood!
Learn how to turn a basic bowl with woodturning expert Richard Raffin, learn what tools he uses and how he uses them. Also consider purchasing any of the books he has written on woodturning!
How to Turn a Basic Wood Bowl with Richard Raffan
Since this blog is about woodturning, and the basics of woodturning I am always looking for good articles, blogs and videos about wood turning basics.
Richard Raffan Shares Basic Wood Bowl Turning
Once you start turning wood for a while and watching videos you will
sooner or latter run across a woodturner by the name of Richard Raffan.
He is an older woodturner but very experienced. Richard Raffan has books
and video courses out where he teaches various basic and advanced
woodturning techniques.
Richard Raffin shows how to turn a basic wood bowl
Basic Bowl Turning Techniques with Great Photography
One problem is that he makes woodturning look so simple. But if you pay attention to his writings and his videos you will began to understand how a tool must be held. How to approach your work safely and how to accomplish your final outcome.
A Two Video Tutorial on Basic Wood Bowl Turning
Looks like Richard did a couple of basic woodturning videos for FineWoodworking:
How to Turn a Basic Bowl-Part I
How to Turn a Basic Bowl-Part II
Are You New to Woodturning…. Watch These Videos and Try to Duplicate Richard Raffan’s Efforts
You should watch these videos and take note of every move he makes, every tool that Richard Raffan uses as well as the instructions he gives. One problem with being an excellent and professional wood turner is that the things you take for grant it are new and unusual for the new woodturner. So you need to pay attention and se if you can pick up a tip of two to help you with your wood turning, whether you are an advanced woodturner or a beginner woodturner.
I hope you like the 2 videos. Better yet, I hope they help you become a better wood turner!
This comment puts a little perspective of the videos and the woodturner.
For the new turners out there – this is more of a Master Class than a how-to for new turners. Mr. Raffan is so skilled that he makes difficult (and catch-worthy) cuts look easy; Those shearing and pull-cuts with the spindle gouge on the outside of the bowl are (and I know from experience) very difficult to emulate. The man is amazing, but there are less demanding – less “fast and furious” – approaches to bowl-turning. (And he knew that bowl was perfect before he went to the bandsaw – he’s that good. Wish I was.) As the youngsters say – Respect.
You’ll see Richard use some hefty round nose scrapers. These are easy to use once you learn how to use them and will give you some great results. They are hefty tools and carry some mass so a newbie can control them, or a more experienced woodturner can extend further off the tool rest and get deep into your bowl, cut or other project. Richard Raffan is using a couple of Sorby scrapers, you can find them here:
I have a set of Hurricane scrapers. One is a round nose, the other two are a right and left curved scrapers. These, like the Sorby tools are 1-1/2″ wide and almost 1/2″ thick, they are massive and help you to control a situation when needed. The stell in the Hurricane Scrapers is not as good as the Sorby Scrapers but that just means you need to sharpen them more often. If you have the budget ….got for the Sorby scrapers. If money is tight, get the Hurricane Scarpers …..I really do love my Hurricane scrapers!
I see lots of questions on whether cottonwood or poplar can be turned. The standard answer for any wood is yes, it can be turned, how well it turns is a different story!
Cottonwood is not a very dense wood and has soft stringy fibers. When it is fresh cut or green, it holds a lot of water. So drying your logs and woodblanks might take some special care to avoid it drying too quickly causing cracks and checks.
As green cottonwood spins on the lathe it will spit water at you. It was a wet spring and summer this year so the wood held a lot of water, it did not matteral if you turned a spindle blank or a bowl blank, you were going to get wet.
Drying Cotton Wood for Processing
I cut my logs into 24″ logs. I read that these spring/summer logs hold a tremendous amount of water. Now, traditional drying preparation would involved painting/sealing of the log ends. Then laying them horizontally on the ground and stack them. Try to keep them in the sun but put something over the top of the log stack ….like a tarp, piece of metal roof or piece of plywood. They can now sit outside until you are ready to further process the cottonwood logs into woodturning blanks.
Dry the Log by Vertical Draining
Ebay is a Good Source of CottonWood Woodturning Blanks!
I learned a secret trick. Before you seal the ends and stack the wood, stand the logs on end for a day or so….as long as you can before you start to see any splitting or checking, gravity forces the water and nutrients to literally drain down the log into the ground. It will lose water weight quickly.
Once that water is drained it will want to start the cracking and checking process so you need to get out there and quickly seal the ends of those logs with Anchor Seal, Wax or some old paint (put it on thick) …Now they are ready to store outside or inside for further processing and drying.
Cottonwood requires sharp tools you might even consider trying carbide insert tools to hollowing and shaping. But check out this ebay listing. Lots of cottonwood blanks to chose from. Once dry, cottonwood is fairly light. It is not as dense as oak but it is stringy. Still, it makes for beautiful woodturning projects once you get to understand how to work the wood.
Did Some Drying Tests on
Smaller Pieces of Cottonwood
I grabbed some branches that were about 6 inches plus in diamter and cut them into 6 to 8″ pieces. I made myself about 12 pieces like that, I knew I was going to use 2 right away, the rest I slapped on some old paint sealer and set them aside.
End Grain Turning On Cottonwood Logs/Branches
I thought I would try some end grain turning. So I stripped the bark from the pieces and proceeded to turn the stock cottonwood to a round cylinder. Since these were rather short pieces I used a tenon instead of a recess. The tenon can be grabbed by the scroll chuck and not split the project apart, as might happen if you tried to use a recess or mortise.
First Attempt At MicroWave Drying
I was talking to some FB friends over on facebook.com/groups/woodturningbasics and they suggested drying the blank with a microwave. I had not tried that technique yet but I figured this would be a good first time.
I shaped the outsite of the vessel and gouged out the interior of the project. They say that the wall thickness should be 10% of the total diameter. So the project at this time is finished shaped on the outside and rough shaped on the inside.
Finishes…..What Should I use?
I wanted to finish the experior with a lacquer matte finish and the inside I was going to use a food safe epoxy finish that would allow the project to be used as a cup, soup bowl or maybe mortar and pestle.
I finished the ouside and sanded down to 1200 grit. Then I added some lines to the outside by using a thin wire while the project was rotating…..they look like dark lines.
cottonwood bowl, dried in mircrowave, lacquer on the outside and food safe expoxy on inside
Time For The Microwave Drying Test
I had some oak projects, hickory, and ash projects along with the cottonwood. The cottonwood took the longest to dry.
I put each project in the mircowave seperately on high heat for 60 to 90 seconds. I would let it cool between heatings and since it was late I might be able to give it 3 or 4 treatments. I’ll keep my comments to the Cottonwood. It took about 3 days of treatments to get it to the point where it would stop losing water. I weighed the pieces each day, when a piece stopped losing water it was done.
Next I applied Deft Lacquer Sanding Sealer to the outside of the piece and sanded down to 1200 grit. One more coat of deft sanding sealer. I like this sanding sealer because it literally dries in 5 or 10 minutes and if you apply it while the lathe is turning it will be dry in 60 seconds…..ready for another coat.
I applied a couple coats of Satin Lacquer finish on the exterior part of the cup/bowl. Lightely sanding in between. You should really let it set up for 6 to 8 hours before sanding again. After the fininal coat of lacquer let it dry 24 hours and buff it out with a soft cloth, either on the lathe or a dedicated buffing station. Be careful because, although it is hard to the touch it is still soft and a hard buffing will cause the finish to melt and get disfigured.
Finish Interior of Cottonwood Bowl/Cup
This is an endgrain turning on a piece of cottonwood to form a cup/bowl.
At this point the project should be at its final interior shape, sanded and ready for finish.
I chose to use a food safe Epoxy Finsh by Max Clear. It is clear, it is very hard and it is food safe. So I could turn this project into a mortar and pestle, or it could hold hot soup or hot coffee.
Final Thoughts On Using
Cottonwood for Wood Turning
Since both Poplar and Cottonwood are kissing cousins, both perform in a similar way for woodturning projects. It is a little stringy, you will need sharp tools and you will need to make your final cuts with traditional tools and know how to make them cut and not scrape. You can use scrapers to get the piece of wood in shape and then use your tradional turning tools to cut the fibers of this wood. Each woodturner develops his/her own technique for getting a project down, what tools work best with what wood. ….which machine is the best and even what finish is the best. Things we can only learn through time by experience or advice from fellow woodturners
However, if you can’t get clean cuts and you end up with some torn endgrain then it is time to start doing some sanding. Start off with 80 grit if you have to and get down to 500 or so. It was my experience that when sanding the wood when wet would really load up the sanding paper in seconds, so you must get the final sanding done when the wood is dry.
Apply Sanding Sealer on
Tough Stringy Wood
I usually use Deft Lacquer Sanding Sealer. And I dilute it with 25% to 50% Lacquer Thinner. It can be applied while the project is rotating on the lathe with a paper towl. You can do a quick sand after the first coat and give it one more, then let it dry …5 minutes do a light sanding and apply your finish of choice. Applying sanding sealer to the wood when it is dry will help you to sand it down to as smooth a finish as possible. At this point you can apply the final coats of lacquer finish.
Live edge bowl made from cottonwood log, beautiful colors and bark hung on tight
The inside of the project is a little trickier. It is a small project so you will not have a lot of room to work. I use a scotch pad wrapped in sandpaper and carefuflly sand the inside until it is ready to be finished.
I am now ready to apply the Food Safe Epoxy Finish . This is an art in and of itself. Apply a thin layer first and after it dries apply a thicker layer. I used a cheap rotisere motor to rotate the scroll chuck as the second coat is applied. Use a light spray of acetone to take out bubbles and a heat dryer will help to elimate the rest of the bubbless.
This last second is more art than skill. You’ll have to experiment in how to coat the inside or outside of a project with an epoxy finish. Ther are a lot of youtube videos on how different woodturnings set up their turning stations.
Should I Make This a Mortar and Pestle
By now you are tired of reading about my cottonwood bowl🙂
But I had a thought, this would make a perfect “Mortar & Pestle” the epoxy finish is hard, super hard and I could easily make a “pestle” for grinding herbs and the like into the cup. Keep in mind, you should apply the expoxy in layers….not too thick, let it dry 24 hours and apply another coat. You should need very little sanding. If you were to use it as a motar and pestle, let it sit for 3 to 5 days before attempting any heavy use.
I’m still torn between the cottonwood soup bowl and/or cup.
I guess the lesson here is that you never know what you are going to turn. What starts out as a bowl ends up being a kitchen utensil 🙂 On top of that, you never know what the wood is going to give you. Who would have thought that cottonwood would make a good turning blank. It ends up being an excellent piece of wood to turn, whether straight end grain or a log sliced into a bowl blank.
Since I will have about 50 blanks of cottonwood to turn I am going to experiment with dyes and resins……I might save that until this winter.
Rough Turned a live edge cottownwood bowl from a log, bark stayed on well, its now drying waiting for foodsafe finish
However I wanted to show you a bowl I’m in the middle of, its from the same tree, the bark has stuck solidly, I turned the rough shape and then started to sand, it clogged up any sandpaper I had so I let it sit for a couple of days to dry. The I finished the outside with deft sanding sealer, sanded the outside pretty good and sprayed on some satin lacquer. The beauty behind satin lacquer is that after a couple of coats, let it dry for at least 24 hours and you can buff out a beautiful deep low sheen finish.
Since it was so wet when I turned this bowl, I decided to let the inside stay unfinished for a couple weeks in the open air. I checked it on my scale for water loss and on with my moisure meter. I did lose 3 oz already and is now slowing down.
I love the way the bark shows on this piece. I’ll do a more thorough video on how I did this piece once I get my cameras set up again. …..getting close 🙂
Can I Use Cottonwood For Woodturning
Short answer…..you betcha. Turning it green makes for easy shaping. The bark sticks very good if you want to go for live edge. Once the outside and inside is dry, sanding is easy and finishing is a breeze.
I’m always looking for something different to do with my bowls and other turnings. Cottonwood could lead itself to some very nice designs by burning it with a torch as it spins on the lathe. Or, you might want to experiment with some stain, lightly stain the wood to bring out the wood grain. YOu would be best to see how this works by staining a flat piece of cottonwood or poplar and start off with a small amount of stain and work your way up so you might see what it would look like.
I wish I had a bigger lathe.
I have some huge hunks of poplar and ash and oak that I would like to turn some 24 inch bowls or sinks. Until then I will work with what I have and hopefully find out ways to turn cottonwood into some trophies 🙂
First Piece From A Portable
Bandsaw Yields [14] FREE 12″
Cherry Bowl Blanks
This article is kind of an add on to a previous post I did on collecting free bowl blanks by interacting with a variety of sawmilling people and businesses. If this post interests you please check out Free Source of Wood Blanks From Slabs.
We picked up some oak, hickory and cherry logs. A homeowner basically clear cut his yard to build a new home. I might mention that they were millennial’s from the city and they didn’t like trees. They wanted to move to the country and get out of the cement city. But they did not want trees for some reason. On one hand its sad to see some old growth forests taken down but on the other hand, it is either firewood, building timbers or free wood bowl blanks for me!
It was actually kind of tragic since whatever wasn’t to be used by us would get burned up in one big pile. And they did not want any trees in their yard….. so 200 year oak trees along with many other trees were clear cut so they could have a lawn!
Harvesting Logs for Woodturning
From New Construction Site!
I’m not a tree hugger, but I hate to see a forest, that is a 200+ year forest removed because some yuppie wants to build a house. I’m thankful that we were able to collect and use some of the wood for firewood and some of the trees were milled into lumber and some will be used for wood bowl blanks.
I have 2 interests when it comes to trees, logging and making things out of the wood you get from harvesting a tree ….my main excitement comes from the wood I harvest for turning bowls. I have been learning the best way to harvest this wood and the best way to dry it so I can share it with other wood turners.
first cut is called a slab and is a great source of free wood bowl blanks
What you see in this video is the first cut that comes off the log as it is on the bandsaw mill. The sawyer tries to cut a “cant” which is basically a piece of wood that is square or longitudinal. Once the cant is shaped he will cut it down to dimensional lumber or whatever you want. So the very first cut is the “slab” which is semi-circular on the bark side and flat on the cut side. You can usually get the “slab” for free or next to nothing and they make excellent bowl blanks!
Collecting Slab Cuts for Woodturning Bowl Blanks
Since I am kind of new at this I was interested in that first piece that is cut off of each side. Years ago I would go to the local sawmill and pick up these slab pieces for free and use them in my wood stove to heat my house.
Now I see another use for these “slabs” or first cuts. They are the perfect shape for bowl blanks!
If you can talk the “sawyer” into adding an inch or two to the first cut you will end up with some pretty awesome bowl blanks, you can do some pretty nice live edge work and even if they might not be as thick as you want they can easy make platters or shallow dishes. Of course if you hired him to cut a log then you can tell him how thick you want those pieces. Or better yet if you really start to get into making and collecting your own free wood bowl blanks you can get a small gasoline bandsaw mill for under $2000 and you’ll have enough bowl blanks for a lifetime. In fact, I plan on cutting up a few logs and harvesting these free bowl blanks and selling them at some point in time. There are lots of folks in my woodturning facebook group that are always looking for wood to turn …..so the market is there and I would be helping my fellow turners.
Up to Now We’ve Been Following The Bandsaw Around and Helping
Him For Some Free Bowl Blanks
Up to this point I have been talking about following the “sawyer” around and snagging the stuff nobody wants. It is a very good source of turning materials. Make sure you give the guy a couple of your nicest bowls 🙂
There is another option. And I’ve mentioned if briefly.
#1 Hire Out The Services of A
Local Sawyer and His Bandsaw Mill
You can find someone with a portable bandsaw mill that will come to your property and literally cut up a log into any size pieces you might want.
Let’s say a storm comes in and blows down a hickory tree. You can try to cut it up into wood-turning blanks with a chainsaw ….and that’s cool. You will end up with a lot of stock.
Or
You can have a portable sawmill come in and slice up every trunk, branch or whatever is available into the thickness you need for your turning projects. At this point you can dry the pieces for yourself or you might even consider selling some. Or perhaps share the cost with another woodturner or woodturning club.
Lets say you have a 12′ log on the band-saw mill. You can have the sawyer cut a couple of slabs that might be bowl blanks ….remember to tell him to make them bigger than normal ….tell him why and he will began to understand what you want. That log will give you 4 slabs at least 12″ wide and 4 inches deep. Then you can cut the middle of the log into lumber that could be used for spindles ….so 2 or 3″ thick and then you could cut some bigger bowl blanks 6+ inches thick. You would be amazed at how many blanks you will end up with. Just remember to treat them properly for drying so you don’t get checks and cracks.
Make sure you tell him how you want to handle the pith. You do not want that pith in the middle of your thick blanks.
Then tell him what size you want the tree to be cut up into. For instance, lets say you want some big bowls so you tell him to cut 6″ or 8″ thick slices. Once you get your slices you will need to quickly cut them into blanks sizes ….say 14″ and seal the ends. Then you need to dry them, either in shavings or a dehumidifier of some sort or commercial drying company.
One big tree could get you all the wood you every wanted for your woodturning needs. Or it might even set you off on another adventure where you collect, process and treat bowls blanks for others to use.
My FREE Woodturning Bowl Blanks
Cherry “slab” cut that I cut into 14″ long blanks.
This slab yielded me about 12 free cherry bowl blanks that were about to be cut down to 12″, each had a unique shape.
The slab had been sitting outside for a year so it was getting dry. The bowls I made from that piece where further dried in the microwave …..60 second blasts, maybe 4 or 5 times a day.
It was beautiful wood. I did some with live edges and the bark stuck hard, some of the bowls/platters were traditional and only took about 4 times in the microwave …..which I’m guessing would have been 4 months in a bag of shavings.
This picture was from one of the small cherry bowl blanks. It was a 12″ blank I cut on my bandsaw and about 4 inches thick. One thing you don’t want to do when turning these small and thin platters/bowls is to use a recess to mount your cut. That will eliminate the amount of wood that can be gouged out of the bowl. You should use a tenon, to turn the bowl and obviously cut the tenon off at the end of the project.
A bowl blank was taken from the first cut of a log called the “slab’ it was 14″ long and about 4” thick. The natural curvature of the outside of the first piece lent itself perfectly to the bowl shape.
My whole purpose of this post and video was to show you that there are many sources of wood that you can find and use to turn your creations. And, further processing can be expanded from buried in shavings to using a microwave to hurry the process so you can finish it and put it on the market.
This was on of my first microwave dries. I put it in the microwave about 6 times and varied between 60 and 90 seconds. If the bowl gets too hot to touch then you need to reduce the time. So far so good, I keep the microwave procedure going until my scale showed that weight loss had stopped. That means there was no more water to evaporate. I was please, no cracks or checks and I will getting a dedicated microwave for the shop! Thanks to Al Auth from the facebook group who encouraged me to give this procedure a try.
You will need a scale, I like this one …can actually weigh up to 90 pounds but I use it in the kitchen when I get the urge to whip up a gourmet dinner for my favorite wife 🙂
And its nice to have a moisture meter, this one works fine for me
I plan on doing a lot more on my woodturning blog, however, if you haven’t please check out my facebook woodturning group.https://facebook.com/groups/woodturningbasics you’ll find a great group of people there. Some are clueless as to how to start and what to use but then there are the guys that have been turning for 30 or 40 years and can answer any question you might want …..all very good people. I keep the facebook group clean. If you need to swear or make lude and crude jokes or just make fun of someone …..you will be deleted. I want this group to be a family affair. Some of my favorites are Guilherme Eduardo, Al Furtado and I see Capn’ Eddie just signed up…..I think Capn’ Eddie videos were some of the first I started to learn on….. great guy, great wood turner and he served our country, he lived enough life to throw some golden nuggets our way….wish he were my neighbor!
All 3 of those woodturners have excellent woodturning channels on youtube and if you get stuck, you might want to check them out:
I think this is a second channel Capn’ Eddie started, there is another one with a ton of videos on when he was feeling well and a little younger 🙂
You might want to visit his site to support him, he sells turning tools, equipment and has free tool plans and project plans ….you will learn a lot and he is someone who deserves the “pass it on” mentality http://eddiecastelin.com/
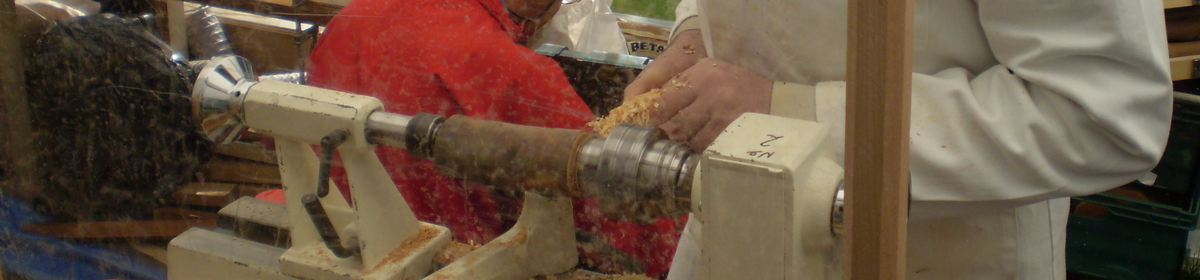


 I see lots of questions on whether cottonwood or poplar can be turned. The standard answer for any wood is yes, it can be turned, how well it turns is a different story!


 Short answer…..you betcha. Turning it green makes for easy shaping. The bark sticks very good if you want to go for live edge. Once the outside and inside is dry, sanding is easy and finishing is a breeze.


 The slab had been sitting outside for a year so it was getting dry. The bowls I made from that piece where further dried in the microwave …..60 second blasts, maybe 4 or 5 times a day.
 This picture was from one of the small cherry bowl blanks. It was a 12″ blank I cut on my bandsaw and about 4 inches thick. One thing you don’t want to do when turning these small and thin platters/bowls is to use a recess to mount your cut. That will eliminate the amount of wood that can be gouged out of the bowl. You should use a tenon, to turn the bowl and obviously cut the tenon off at the end of the project.