Custom Woodturned Anniversary Ash Flower Vase

Anniversary Ash Flower Vase

Ash anniversary vase from dead ash tree had problems hollowing the end grain
Ash Anniversary Vase setting on Oak base so I did not have the take the tennon off because I was not finished 🙂

Yesterday was the anniversary of 38 years of marriage to my wonderful and beautiful wife (Elizabeth), friend, grandmother to my grandchildren and mother to my children. Since I started woodturning I’ve done some sort of special project for special occaisions, at first bowls but eventually got down to usually a vase or some sort, I almost always usually finish it the night before …collect some flowers or green things 🙂 and put it on the table with a card. Neighbors must think I’m some kind of whacko ….since I am foraging plants to put in these vases at 2am or latter. When things are alive we have plenty to choose from. Winter, early spring and late fall provide little to chose from so they usually are dry flowers. I always try to throw a couple of cockleburs, thorns and other weeds to remind us that life hasn’t been easy. I will usually explain what the cocklebur represents or the ragweed ….sometimes an acorn or two. I suppose most women would have tossed me and the vases a long time ago ….but not mine….she is a keeper 🙂

Had An Ash Vase in the Works

My father in law had gotten very sick in the last 2 weeks….they did not know if he was going to make it, however he spent a week in the hospital and then was released to a convalescent facility where they would determine where he would go depending on his improvement. I guess I never had the perfect relationship with my wife’s family but I felt sorry for the old guy. He loves gardening, flowers and vodka. I came up with the idea of making a big enough vase that I could put some flowers in it and have a trap door on the bottom where I could hide a couple 1 ounce bottles of vodka. So I secretly started working on “Operation Nursing Home”  The guy is 92, has had a drink evey night after dinner for the last 20 or 30 years and now has been cut off…..I felt sorry for him. So, I had been working on this project for about 2 or 3 weeks. He had lost almost all his strenght and balance but still had presence of mind to be determined to make a come back, so I wanted it to be as easy as possible for him to get to the goods to take the edge off his situation ….when I told my wife, I do not think she approved …..but I pushed on 🙂

Well, I had some Trojan Vase design flaws. It had to be big enough to be a Trojan horse …holding the flowers and the vodka. He was weak, probably not as coordinated as he once was and I didn’t know if he would be able to remove the flowers to get to the trap door? I know, some of you will think I am terrible for doing this. But remember, he has lived his life, no medicines were changed and they had a “happy hour” on Friday’s where they could have a beer or wine. So I thought I was helping …..after all, he went in there cold turkey from the hospital, no alcohol for a week and he had to be going through withdrawls and since no one in my wife’s  family likes me anyway I wanted to help eliminate some pain and discomfort…..I had nothing to lose!

Never Finished the Nursing Home Project

Turned out I had hollowing problems while woodturning the vase. I also had one back surgery/procedure per week which affected me much more than I thought. I had 4 of these procedures so far and although it is amazing what can be done and my doctor/surgeon is the best it started to really affect me. Constant pain, constant sickness and I could barely move. So my good intentions still have not made it to my poor father-in-law.

Repurposed the Custom
Woodturned Nursing Home Vase

So, I found myself with one of the best shaped vases I have made in a long time. I just needed to figure out how to hollow the rock hard ash  end grain out so I could get the size I needed.

Had to Make a Quick Decision For
The Purpose of The Trojan Horse Vase

Sometimes things just work out. That night I was hurting from the surgery but had a half finished vase. I really wanted to give my wife something for putting up with me all these years so I repurposed the nursing home vase to an anniversary vase!

How Can I Become More Efficient
At Hollowing Endgrain

That’s the story. However it has put me on the hunt on how to become more efficient on hollowing. If I had $500 or more I would buy one of those hollowing systems …..I don’t have the cash so I need to figure out how to make something that can help me hollow. I would really like to do hollow forms without spending an arm and a leg. Furthermore, I would like to be able to hollow out a simple log end grain without having to spend all kinds of money and install some sort of expensive system. A quick check on Amazon reveals some of the most used hollowing systems or you can check Youtube for Hollowing Systems 

Guess I will be spending my next weeks and months doing some research on how to build a hollowing system myself.

Unless some of you who manufacture hollowing systems would like to send me your system so I can test it and do a review? I see this happening all the time, yet no one has approached me to test their products for a true and factual review.

Back to My End Grain Hollowing Problems On My Vase Woodturning Projects

I had been working on an ash vase for the last week, I had a terrible time hollowing it. The end grain was so hard my tools were taking forever to make any progress, in fact I think I took the temper off a forstner bit because it got so hot ….couldn’t even make it all the way down.

I have a ton of dead ash so I’d like to get a good system for working with with it, especially end-grain hollowing. Turning the outside was a piece of cake, cuts well….little tear out. I finished it with a couple of coats of Deft Lacquer Sanding Sealer and sprayed a few coats of Satin Lacquer from Watco.

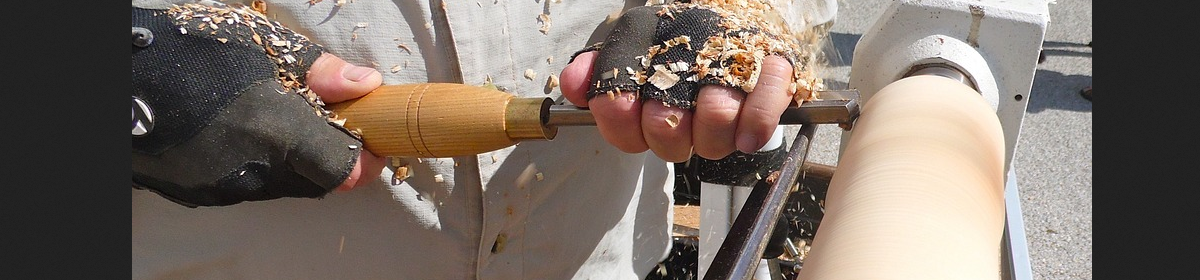
Hollowing An Ash Vase While Woodturning

First off, I am doing end grain hollowing. Secondly I knew this was gonna be tough because it was a big piece and I needed an average of 4″ diameter for the hollowing.

I figured I would start with a 1″ forstner bit, then 2″ bit and then a 2-1/2″ bit. I sharpened all bits and started. It was slow going with the one inch bit but I got about 10″ down into the vase. I put the next big on and only could get down to about 5 or 6 inches so I then tried the 2 1/2″ bit and got no where with it, maybe 2 inches before it got so hot I think it lost its temper.


So next I tried some gouges, I first tried the spindle gouge hollowing method. I just couldn’t do it. I tried a couple different size bowl gouges and it was catch city.

Carbide Cutter Tools for Hollowing End Grain Woodturning Projects

I turned to my trusty round carbide cutter tool. I think the cutter is 15mm and I could make that work but it was slow going. I just made another round carbide tool

Woodturning tools I use for hollowing end grain
these were some of the more effective tools I used for hollowing out my vase

with a 10mm cutter on it but the steel it was mounted to was only 3/8 or an inch and there was just too much flutter.

Using Big Hurricane
Scrapers For Hollowing

Next I tried my big Hurricane scrapers  and surprisingly they did very well. I couldn’t get a very good angle for shear cutting with them so I had to just scrape. These are big scrapers 3/8″ to 1/2″ thick and 1 1/2″ wide.


I had my custom built steady rest on the piece at all times ….otherwise I am sure it would have gone air born more than once, if that thing hit me in the head (even though I had my shield on) I probably would have gone down!

Anyway, I finished it with the scrapers and my homemade carbide tools. I could not hollow as far and wide as I wanted to so I need to find a solution, an inexpensive solution to the problem. Hopefully something I can make.

Making the Platic Insert for
The Wood Turned Vase

I was going to use a water bottle as the insert and I did. However, I had to turn the water bottle upside down and cut the bottom out because the vase hole was kind of tapered. In order to make that work I used some CA on the bottle cap and glued and sealed that into place.

Facebook Group, Wood Turning Basics for
Hollowing Ideas for Woodturners

I asked my facebook group, Wood Turning Basics what was working for others. Here is the copy of my post:

Best Hollowing Tools
For Endgrain Hollowing

Well, 8/28 is my wife and my anniversary….. 38 years, who would have thought 🙂

Seems like yesterday, time just flies by so fast ….good times, bad times …its all time and it seems the older you get the faster the days go by. My father told me that when he was alive and I really could not relate ….but his words were so true.

My wife and I raised 3 boys, all of which we are extremely pround of. We have 2 grandsons that are my reason for living ….don’t know what I would do without them. And we have one in the oven!

Anyway, I was working on an ash vase ….had problems, lathe broke, couldn’t hollow it correctly…..but I always try to make something for these special days. So, I hollowed the best I could…. it was designed to hold a plastic water bottle insert. Since the hollowing was tapered at the end I glued the cap on and cut the bottom off to fit inside the vase. It turned out pretty good, no leaks and almost got the whole water bottle inside the vase.

Since I was still working on it, I left the tenon on it and turned a piece of oak for the base. The oak platform has a recess that accepts the tenon from the vase and I hot glued them together. I was thinking that at some point in time I might finish it correctly and knock the base off, finsh hollowing and remove the tenon ….but if I know myself that propbably will never happen 🙂

I finished around 4am and then went out to look for some flowers to put in the vase. I found some geraniums, flocks, ferns, hostas, wild grape vines, some type yew I think, horseradish leaf and a few other miscellaneous plants.

We live a pretty simple life. Liz really enjoys what I put together. I’m blessed and lucky to have been married to her for all these years!

#anniversaryvase #ashvase #hollowingtools #hollowing #besthollowingtool

Can Woodturners Turn Cottonwood?

Small Cotton Wood Bowl or Cup

cottonwood leafI see lots of questions on whether cottonwood or poplar can be turned. The standard answer for any wood is yes, it can be turned, how well it turns is a different story!

Cottonwood is not a very dense wood and has soft stringy fibers. When it is fresh cut or green, it holds a lot of water. So drying your logs and woodblanks might take some special care to avoid it drying too quickly causing cracks and checks.

As green cottonwood spins on the lathe it will spit water at you. It was a wet spring and summer this year so the wood held a lot of water, it did not matteral if you turned a spindle blank or a bowl blank, you were going to get wet.

Drying Cotton Wood for Processing

I cut my logs into 24″ logs. I read that these spring/summer logs hold a tremendous amount of water. Now, traditional drying preparation would involved painting/sealing of the log ends. Then laying them horizontally on the ground and stack them. Try to keep them in the sun but put something over the top of the log stack ….like a tarp, piece of metal roof or piece of plywood. They can now sit outside until you are ready to further process the cottonwood logs into woodturning blanks.

Dry the Log by Vertical Draining

cotton wood bowl blanks
Ebay is a Good Source of CottonWood Woodturning Blanks!

I learned a secret trick. Before you seal the ends and stack the wood, stand the logs on end for a day or so….as long as you can before you start to see any splitting or checking, gravity forces the water and nutrients to literally drain down the log into the ground. It will lose water weight quickly.

Once that water is drained it will want to start the cracking and checking process so you need to get out there and quickly seal the ends of those logs with Anchor Seal, Wax or some old paint (put it on thick) …Now they are ready to store outside or inside for further processing and drying.

Cottonwood requires sharp tools you might even consider trying carbide insert tools to hollowing and shaping. But check out this ebay listing. Lots of cottonwood blanks to chose from. Once dry, cottonwood is fairly light. It is not as dense as oak but it is stringy. Still, it makes for beautiful woodturning projects once you get to understand how to work the wood.

Did Some Drying Tests on
Smaller Pieces of Cottonwood

I grabbed some branches that were about 6 inches plus in diamter and cut them into 6 to 8″ pieces. I made myself about 12 pieces like that, I knew I was going to use 2 right away, the rest I slapped on some old paint sealer and set them aside.

End Grain Turning On Cottonwood Logs/Branches

I thought I would try some end grain turning. So I stripped the bark from the pieces and proceeded to turn the stock cottonwood to a round cylinder. Since these were rather short pieces I used a tenon instead of a recess. The tenon can be grabbed by the scroll chuck and not split the project apart, as might happen if you tried to use a recess or mortise.

First Attempt At MicroWave Drying


I was talking to some FB friends over on facebook.com/groups/woodturningbasics and they suggested drying the blank with a microwave. I had not tried that technique yet but I figured this would be a good first time.

I shaped the outsite of the vessel and gouged out the interior of the project. They say that the wall thickness should be 10% of the total diameter. So the project at this time is finished shaped on the outside and rough shaped on the inside.

Finishes…..What Should I use?

I wanted to finish the experior with a lacquer matte finish and the inside I was going to use a food safe epoxy finish that would allow the project to be used as a cup, soup bowl or maybe mortar and pestle.

I finished the ouside and sanded down to 1200 grit. Then I added some lines to the outside by using a thin wire while the project was rotating…..they look like dark lines.

Food Safe Cottonwood bowl, lacquer outside food safe epoxy inside.
cottonwood bowl, dried in mircrowave, lacquer on the outside and food safe expoxy on inside

Time For The Microwave Drying Test

I had some oak projects, hickory, and ash projects along with the cottonwood. The cottonwood took the longest to dry.

I put each project in the mircowave seperately on high heat for 60 to 90 seconds. I would let it cool between heatings and since it was late I might be able to give it 3 or 4 treatments. I’ll keep my comments to the Cottonwood. It took about 3 days of treatments to get it to the point where it would stop losing water. I weighed the pieces each day, when a piece stopped losing water it was done.

This is the scale I used Weighmax Stainless Steel 90lb scale.

Next I applied Deft Lacquer Sanding Sealer to the outside of the piece  and sanded down to 1200 grit. One more coat of deft sanding sealer. I like this sanding sealer because it literally dries in 5 or 10 minutes and if you apply it while the lathe is turning it will be dry in 60 seconds…..ready for another coat.


I applied a couple coats of Satin Lacquer finish on the exterior part of the cup/bowl. Lightely sanding in between. You should really let it set up for 6 to 8 hours before sanding again. After the fininal coat of lacquer let it dry 24 hours and buff it out with a soft cloth, either on the lathe or a dedicated buffing station. Be careful because, although it is hard to the touch it is still soft and a hard buffing will cause the finish to melt and get disfigured.

Finish Interior of Cottonwood Bowl/Cup

End grain turning on cottonwood bowl/cup
This is an endgrain turning on a piece of cottonwood to form a cup/bowl.

At this point the project should be at its final interior shape, sanded and ready for finish.

I chose to use a food safe Epoxy Finsh by Max Clear . It is clear, it is very hard and it is food safe. So I could turn this project into a mortar and pestle, or it could hold hot soup or hot coffee.

Final Thoughts On Using
Cottonwood for Wood Turning

Since both Poplar and Cottonwood are kissing cousins, both perform in a similar way for woodturning projects. It is a little stringy, you will need sharp tools and you will need to make your final cuts with traditional tools and know how to make them cut and not scrape. You can use scrapers to get the piece of wood in shape and then use your tradional turning tools to cut the fibers of this wood. Each woodturner develops his/her own technique for getting a project down, what tools work best with what wood. ….which machine is the best and even what finish is the best. Things we  can only learn through time by experience or advice from fellow woodturners

However, if you can’t get clean cuts and you end up with some torn endgrain then it is time to start doing some sanding. Start off with 80 grit if you have to and get down to 500 or so. It was my experience that when sanding the wood when wet would really load up the sanding paper in seconds, so you must get the final sanding done when the wood is dry.

Apply Sanding Sealer on
Tough Stringy Wood

I usually use Deft Lacquer Sanding Sealer. And I dilute it with 25% to 50% Lacquer Thinner. It can be applied while the project is rotating on the lathe with a paper towl. You can do a quick sand after the first coat and give it one more, then let it dry …5 minutes do a light sanding and apply your finish of choice. Applying sanding sealer to the wood when it is dry will help you to sand it down to as smooth a finish as possible. At this point you can apply the final coats of lacquer finish.

Cottonwood live edge bowl
Live edge bowl made from cottonwood log, beautiful colors and bark hung on tight

The inside of the project is a little trickier. It is a small project so you will not have a lot of room to work. I use a scotch pad wrapped in sandpaper and carefuflly sand the inside until it is ready to be finished.

I am now ready to apply the Food Safe Epoxy Finish . This is an art in and of itself. Apply a thin layer first and after it dries apply a thicker layer. I used a cheap rotisere motor to rotate the scroll chuck as the second coat is applied. Use a light spray of acetone to take out bubbles and a heat dryer will help to elimate the rest of the bubbless.

This last second is more art than skill. You’ll have to experiment in how to coat the inside or outside of a project with an epoxy finish. Ther are a lot of youtube videos on how different woodturnings set up their turning stations.

Should I Make This a Mortar and Pestle

By now you are tired of reading about my cottonwood bowl 🙂

But I had a thought, this would make a perfect “Mortar & Pestle” the epoxy finish is hard, super hard and I could easily make a “pestle” for grinding herbs and the like into the cup. Keep in mind, you should apply the expoxy in layers….not too thick, let it dry 24 hours and apply another coat. You should need very little sanding. If you were to use it as a motar and pestle, let it sit for 3 to 5 days before attempting any heavy use.

I’m still torn between the cottonwood soup bowl and/or cup.

I guess the lesson here is that you never know what you are going to turn. What starts out as a bowl ends up being a kitchen utensil 🙂 On top of that, you never know what the wood is going to give you. Who would have thought that cottonwood would make a good turning blank. It ends up being an excellent piece of wood to turn, whether straight end grain or a log sliced into a bowl blank.

Since I will have about 50 blanks of cottonwood to turn I am going to experiment with dyes and resins……I might save that until this winter.

Rough turrned LIve edge cottonwood bowl
Rough Turned a live edge cottownwood bowl from a log, bark stayed on well, its now drying waiting for foodsafe finish

However I wanted to show you a bowl I’m in the middle of, its from the same tree, the bark has stuck solidly, I turned the rough shape and then started to sand, it clogged up any sandpaper I had so I let it sit for a couple of days to dry. The I finished the outside with deft sanding sealer, sanded the outside pretty good and sprayed on some satin lacquer. The beauty behind satin lacquer is that after a couple of coats, let it dry for at least 24 hours and you can buff out a beautiful deep low sheen finish.

Since it was so wet when I turned this bowl, I decided to let the inside stay unfinished for a couple weeks in the open air. I checked it on my scale for water loss and on with my moisure meter. I did lose 3 oz already and is now slowing down.

I love the way the bark shows on this piece. I’ll do a more thorough video on how I did this piece once I get my cameras set up again. …..getting close 🙂

Can I Use Cottonwood For Woodturning

small bowl made from cottonwoodShort answer…..you betcha. Turning it green makes for easy shaping. The bark sticks very good if you want to go for live edge. Once the outside and inside is dry, sanding is easy and finishing is a breeze.

I’m always looking for something different to do with my bowls and other turnings. Cottonwood could lead itself to some very nice designs by burning it with a torch as it spins on the lathe. Or, you might want to experiment with some stain, lightly stain the wood to bring out the wood grain. YOu would be best to see how this works by staining a flat piece of cottonwood or poplar and start off with a small amount of stain and work your way up so you might see what it would look like.

I wish I had a bigger lathe.

I have some huge hunks of poplar and ash and oak that I would like to turn some 24 inch bowls or sinks. Until then I will work with what I have and hopefully find out ways to turn cottonwood into some trophies 🙂

Thanks for reading 🙂

Turning BoxElder and Sawmilling Boxelder Beautiful Wood with Red and Blue Veins

WoodTurning Bowls from BoxElder

Another habit I’ve developed and really want to explore seriously is sawmilling. Portable sawmills come in many shapes and sizes and the purpose is to basically turn a tree into usable lumber. Could be framing lumber. Could be timbers for timber framing. Might even be slaps of varying thickness ….something I wanted to comment on here. Nothing like opening up a log to see God’s inner design, something that can be used to create a beautiful Woodturnig Project, bowls, knive handles, candle holders, pens, lamps ….you name it! Turning BoxElder on your lathe can create a beautiful project.

It turns out that Boxelder is releated to Maple. When we tapped maple trees for syrup we also tapped Boxelder ….I forgot all about that. There is literally no difference in taste of the syrup from boxelder or maple. ……no cost for that little side note!

BoxElder from Portable Sawmills

BoxElder used in wood turing and portable bandsawmills
BoxElder can be beautiful for wood turning and for slabs and other furniture

This guy posted some pics on facebook of boxelder, beautiful wood with red and blue tints running in veins throughout the wood. I watched a video by someone I’ve been following who did a box elder live edge bowl from a piece of boxelder that just turned out beaufifuly. I will try to post it here, not sure if I can find it as I am writing this.

I always considered boxelder garbage wood, no good to burn and certainly no good to use as lumber. Turns out box elder is a diamond in the rough. You can read the facebook comment I made below, and I think I will swipe the images he posted ….hope he doesn’t mind. They are pretty cool over at the sawilling group.

BoxElder Burls Used for Woodturning and Furniture Making

boxelder for woodturning
slicing boxelder for woodturning projects and furniture

One thing to look for in any tree for turning and especially boxelder are burls, these are outgrowths or deformities in a tree trunk that make beaufiful turnings. You can cut boxelder burls with a portable bandsaw mill, you can use a lucas slabber and depending how big you can get slaps from these burls that are just beaufiful and can be used for countertops to bowls, lamps and furniture ….check out this video on some boxelder pepper mills.

Here’s the facebook post about boxelder milling and slabbing you can find more info on.

Scott Parat wow, nice looking slice of wood, wonder how long the red will stay red or if it will fade away?

when I first got my woodburning stove, 30+ years ago the first wood I had to burn was boxelder, burns fast and burning it green makes for nice chimeny fires 🙂 ….I had boxelders falling all the time, never had any idea it looked so good when milled. Wish I had my mill, still run into boxelder.

BoxElder used in wood turing and portable bandsawmills
BoxElder once consider junk wood is actually very beautiful, easy to work with and great for bowl turning and othe projects

thanks for the pics! Planning on redoing out kitchen, thinking of concrete tops but then showed my wife some of the slabs here in the group ….she loved em, if the color can be stablized I even think I might consider something like sliced up.

Wonder if anyone used boxelder for tops?

I do some wood turning, really just learning. There are a couple of guys who cranked out some beautiful live edge bowls from boxelder ….some of the most beautiful I’ve seen. Funny how something that was once garbage, looked at a different way is now a diamond.

Thanks for sharing!

Check this out for a BoxElder Bowl Blank!

Woodturning a bowl with a boxelder bowlblank
The possibilities are endless with boxelder with turning bowls using boxelder bowl blanks!