Have you ever had to drill down the center of a wood blank on your wood lathe?
Most of us figure out that it is fairly easi to get a drill chuck on a morse taper and install it in the tailstock of your wood lathe and then push it into the piece of wood you are turning to drill a hole. That almost always works and gives the best results. However when you want to drill longer holes or larger holes it becomes a problem on the lathe ….especially if you are turning into endgrain.
But there comes a time when you would like to stick your project on the drill press and just drill down that piece and get it over with. I don’t know if you ever tried that with ash or oak and using a 2″ or 3″ forstner bit but chances are you will get smacked in the head, hand, arm or body because those things can be wild. The piece you are drilling has to be properly anchored and you won’t be able to do that with one hand while the other hand is cranking down on the drill bit…….. guaranteed to take flight!
Verticle Drilling on Your Drill Press for Your Woodturning Projects
I thought I would post this video for those of you looking to do some vertical drilling. I know normally we chuck up the piece on the lathe and on the tailstock install a drill chuck and do our drilling that way.
At times it would be easier to do this on drill press. Or maybe you don’t have a MT mounted drill chuck for your tailstock.
Vertical Drilling for Forming
A Woodturning Chuck Recess
One of my favorite connections for my lathe chuck is the recess. I can drill a recess and leave it in the finished project if I want. I can chuck it back up if it moves too much, cracks or checks and refinish it. It is also a good area to put your logo or signature of some sort.
Recess in wood bowl bottom for scroll chuck
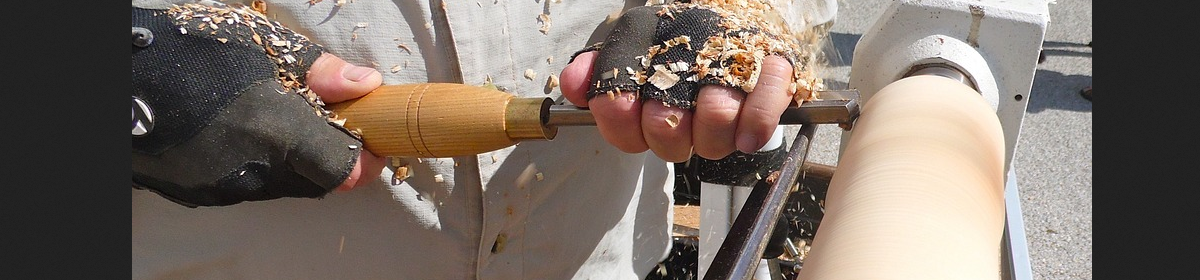
So when I first get a piece of wood ready to put on the wood lathe I will find centers on both ends and use a forstner bit that fits my jaws to drill a 1/2″ to 3/8″ hole on one end. I then simply chuck it up on the lathe and most times pull the tailstock up and I am turning in less than 5 minutes. So a jig that would hold my piece verticle could really come in handy when getting a piece of wood ready to turn with a recess.
Up until now I have held on to the piece with my hands …..doesn’t always work too well. I have used big wood clamps to hold the wood piece to be turned but then have to clamp down the clamp to the drill press table. …….so, I’m hoping I can come up with some sort of variation of the method that is explained in this video …..hope it can help you too!
Hickory firewood piece gets drilled for recess for Nova Chuck 2″ jaws
Vertical drilling on a drill press can get pretty hairy …not to mention not very accurate. The guy in this video came up with an easy solution for vertical drilling a dowel and I thought we might be able to apply it to some of our projects in some form.
This gives me some ideas on how to take cylinders I have turned and need to drill a hole down the center for a rod ….lets say for making rolling pins. Or even for wood turning tools I’m making and forgot to drill the hole before turning the tool……ALWAYS REMEMBER TO DRILL THE TOOL HOLE FIRST 🙂
Or if I am making a coffee cup and want to start the hollowing process with a forstner bit. Although I do that now on the lathe, I think it might be easier if I had a dedicated station for drilling down the center of the cut or vase while it was in the verticle postion. Gravity, plumbness (verticle postion) could all be checked easily.
If drilling a turned piece on the drill press I would leave the tennon on. I would make the tennon larger than usual and clamp it into the piece of wood.
I’m gonna have to give this a try and see how stable it would be and how big a hole I could drill.
Modify the Holding Jig to Hold the Bottom of the Piece and New the Top to Keep it Stable and in Control
Short pieces like the dowel in the video should work fine but if you were doing a 6″ cut or 12″ vase you might want to set up the jig to hold the bottom and someplace in the middle to the top.
Also remember that most drill presses have a hole in the center of the drill press table which would allow you to drill center holes in 3′, 4′ or larger pieces.
Sorry for lack of details, but I wanted to throw this out for you guys to see if you could use any part of the jig or process or have it be a source of some creative juices for something you might build or need.
Ash Anniversary Vase setting on Oak base so I did not have the take the tennon off because I was not finished 🙂
Yesterday was the anniversary of 38 years of marriage to my wonderful and beautiful wife (Elizabeth), friend, grandmother to my grandchildren and mother to my children. Since I started woodturning I’ve done some sort of special project for special occaisions, at first bowls but eventually got down to usually a vase or some sort, I almost always usually finish it the night before …collect some flowers or green things 🙂 and put it on the table with a card. Neighbors must think I’m some kind of whacko ….since I am foraging plants to put in these vases at 2am or latter. When things are alive we have plenty to choose from. Winter, early spring and late fall provide little to chose from so they usually are dry flowers. I always try to throw a couple of cockleburs, thorns and other weeds to remind us that life hasn’t been easy. I will usually explain what the cocklebur represents or the ragweed ….sometimes an acorn or two. I suppose most women would have tossed me and the vases a long time ago ….but not mine….she is a keeper 🙂
Had An Ash Vase in the Works
My father in law had gotten very sick in the last 2 weeks….they did not know if he was going to make it, however he spent a week in the hospital and then was released to a convalescent facility where they would determine where he would go depending on his improvement. I guess I never had the perfect relationship with my wife’s family but I felt sorry for the old guy. He loves gardening, flowers and vodka. I came up with the idea of making a big enough vase that I could put some flowers in it and have a trap door on the bottom where I could hide a couple 1 ounce bottles of vodka. So I secretly started working on “Operation Nursing Home” The guy is 92, has had a drink evey night after dinner for the last 20 or 30 years and now has been cut off…..I felt sorry for him. So, I had been working on this project for about 2 or 3 weeks. He had lost almost all his strenght and balance but still had presence of mind to be determined to make a come back, so I wanted it to be as easy as possible for him to get to the goods to take the edge off his situation ….when I told my wife, I do not think she approved …..but I pushed on 🙂
Well, I had some Trojan Vase design flaws. It had to be big enough to be a Trojan horse …holding the flowers and the vodka. He was weak, probably not as coordinated as he once was and I didn’t know if he would be able to remove the flowers to get to the trap door? I know, some of you will think I am terrible for doing this. But remember, he has lived his life, no medicines were changed and they had a “happy hour” on Friday’s where they could have a beer or wine. So I thought I was helping …..after all, he went in there cold turkey from the hospital, no alcohol for a week and he had to be going through withdrawls and since no one in my wife’s family likes me anyway I wanted to help eliminate some pain and discomfort…..I had nothing to lose!
Never Finished the Nursing Home Project
Turned out I had hollowing problems while woodturning the vase. I also had one back surgery/procedure per week which affected me much more than I thought. I had 4 of these procedures so far and although it is amazing what can be done and my doctor/surgeon is the best it started to really affect me. Constant pain, constant sickness and I could barely move. So my good intentions still have not made it to my poor father-in-law.
Repurposed the Custom
Woodturned Nursing Home Vase
So, I found myself with one of the best shaped vases I have made in a long time. I just needed to figure out how to hollow the rock hard ash end grain out so I could get the size I needed.
Had to Make a Quick Decision For
The Purpose of The Trojan Horse Vase
Sometimes things just work out. That night I was hurting from the surgery but had a half finished vase. I really wanted to give my wife something for putting up with me all these years so I repurposed the nursing home vase to an anniversary vase!
How Can I Become More Efficient
At Hollowing Endgrain
That’s the story. However it has put me on the hunt on how to become more efficient on hollowing. If I had $500 or more I would buy one of those hollowing systems …..I don’t have the cash so I need to figure out how to make something that can help me hollow. I would really like to do hollow forms without spending an arm and a leg. Furthermore, I would like to be able to hollow out a simple log end grain without having to spend all kinds of money and install some sort of expensive system. A quick check on Amazon reveals some of the most used hollowing systems or you can check Youtube for Hollowing Systems
Guess I will be spending my next weeks and months doing some research on how to build a hollowing system myself.
Unless some of you who manufacture hollowing systems would like to send me your system so I can test it and do a review? I see this happening all the time, yet no one has approached me to test their products for a true and factual review.
Back to My End Grain Hollowing Problems On My Vase Woodturning Projects
I had been working on an ash vase for the last week, I had a terrible time hollowing it. The end grain was so hard my tools were taking forever to make any progress, in fact I think I took the temper off a forstner bit because it got so hot ….couldn’t even make it all the way down.
I have a ton of dead ash so I’d like to get a good system for working with with it, especially end-grain hollowing. Turning the outside was a piece of cake, cuts well….little tear out. I finished it with a couple of coats of Deft Lacquer Sanding Sealer and sprayed a few coats of Satin Lacquer from Watco.
Hollowing An Ash Vase While Woodturning
First off, I am doing end grain hollowing. Secondly I knew this was gonna be tough because it was a big piece and I needed an average of 4″ diameter for the hollowing.
I figured I would start with a 1″ forstner bit, then 2″ bit and then a 2-1/2″ bit. I sharpened all bits and started. It was slow going with the one inch bit but I got about 10″ down into the vase. I put the next big on and only could get down to about 5 or 6 inches so I then tried the 2 1/2″ bit and got no where with it, maybe 2 inches before it got so hot I think it lost its temper.
So next I tried some gouges, I first tried the spindle gouge hollowing method. I just couldn’t do it. I tried a couple different size bowl gouges and it was catch city.
Carbide Cutter Tools for Hollowing End Grain Woodturning Projects
I turned to my trusty round carbide cutter tool. I think the cutter is 15mm and I could make that work but it was slow going. I just made another round carbide tool
these were some of the more effective tools I used for hollowing out my vase
with a 10mm cutter on it but the steel it was mounted to was only 3/8 or an inch and there was just too much flutter.
Using Big Hurricane
Scrapers For Hollowing
Next I tried my big Hurricane scrapers and surprisingly they did very well. I couldn’t get a very good angle for shear cutting with them so I had to just scrape. These are big scrapers 3/8″ to 1/2″ thick and 1 1/2″ wide.
I had my custom built steady rest on the piece at all times ….otherwise I am sure it would have gone air born more than once, if that thing hit me in the head (even though I had my shield on) I probably would have gone down!
Anyway, I finished it with the scrapers and my homemade carbide tools. I could not hollow as far and wide as I wanted to so I need to find a solution, an inexpensive solution to the problem. Hopefully something I can make.
Making the Platic Insert for
The Wood Turned Vase
I was going to use a water bottle as the insert and I did. However, I had to turn the water bottle upside down and cut the bottom out because the vase hole was kind of tapered. In order to make that work I used some CA on the bottle cap and glued and sealed that into place.
Facebook Group, Wood Turning Basics for
Hollowing Ideas for Woodturners
I asked my facebook group, Wood Turning Basics what was working for others. Here is the copy of my post:
Best Hollowing Tools
For Endgrain Hollowing
Well, 8/28 is my wife and my anniversary….. 38 years, who would have thought 🙂
Seems like yesterday, time just flies by so fast ….good times, bad times …its all time and it seems the older you get the faster the days go by. My father told me that when he was alive and I really could not relate ….but his words were so true.
My wife and I raised 3 boys, all of which we are extremely pround of. We have 2 grandsons that are my reason for living ….don’t know what I would do without them. And we have one in the oven!
Anyway, I was working on an ash vase ….had problems, lathe broke, couldn’t hollow it correctly…..but I always try to make something for these special days. So, I hollowed the best I could…. it was designed to hold a plastic water bottle insert. Since the hollowing was tapered at the end I glued the cap on and cut the bottom off to fit inside the vase. It turned out pretty good, no leaks and almost got the whole water bottle inside the vase.
Since I was still working on it, I left the tenon on it and turned a piece of oak for the base. The oak platform has a recess that accepts the tenon from the vase and I hot glued them together. I was thinking that at some point in time I might finish it correctly and knock the base off, finsh hollowing and remove the tenon ….but if I know myself that propbably will never happen 🙂
I finished around 4am and then went out to look for some flowers to put in the vase. I found some geraniums, flocks, ferns, hostas, wild grape vines, some type yew I think, horseradish leaf and a few other miscellaneous plants.
We live a pretty simple life. Liz really enjoys what I put together. I’m blessed and lucky to have been married to her for all these years!
Reuse Old Food/Condiment Bottles For All Your Woodturning Finishes
Maybe you have already thought of the ideas I will share regarding using emptied food or utility containers for your woodturning projects. That is, these can help you get organized, they don’t cost anything and you can make them a one time use or they might last for months or even years. One of my favorite is the Catsup bottle, mustard bottles and salad dressing bottles. I particularly like the clean bottles so I know the condition of the finish or glue that is inside the bottle.
Storing woodturning finishes in catsup bottles. The top screws on tight and the flip top snaps tight eliminating evaporation of the finsh.
I was mixing up some special finishing mixes for my woodturning projects when I thought it might help others to know how and where I store these finishes. It might seem like a simple thought and for the most part when we buy a finish it comes in a can or bottle.
When you mix your own finishes you need to store it in something and hopefully it can also be a container that you can use to apply your finish …..I mean like, squirt it out onto a rag or the project or a paint brush.
Although this isn’t game changing information …it is practical information that you can use to help store and apply your finishes.
Ketchup and Mustard Bottles for Storing Woodturning Finishes
And make use of food jars and bottles when emptied. I’m on a low budget so I’m always thinking how I might be able to use this bottle or the next bottle or can. Some work out pretty good, others ….not so good, so in the long run you just need to experiment with different containers.
I can tell you I prefer glass containers. One big downside to glass is that it cracks to pieces when hitting the concrete floor 🙂 I use mason jars of various sizes for a lot of things and I break a lot of mason jars because they were left too close to the edge of the bench and hit the floor.
Use Big Plastic Bottles to
Keep Paint Brushes Clean
I keep my cheap paint brushes in a big plastic bottle with some lacquer thinner, the brush hangs in the thinner and is always clean and ready to use when apply different sanding sealers and woodturning finishes.
I found some big pretzel bottles that were perfect for hanging paint brushes in with a little lacquer thinner on the bottom. I drilled a couple holes in the top and hot glued a dowel that I hang paint brushes on. I just use some baling wire to make some S-hooks and hang the brush into the lacquer thinner …..or course you could use whatever thinner you want…..I found lacuqer thinner cleans just about anything,
Capn Eddie’s Thoughts On finish Storage
I remember watching some Captn Eddie Castelin videos on how to mix OB Shine Juice and then apply it. He also was just as interested in how to store the finish you just made up and how to keep it in the right proportions since some of the ingredients will evaporate over a period of time, thru use or just through the plastic storage bottle itself.
Capn Eddie recommended using some squeeze bottles from Harbor Freight for storing and applying his finish but made the distinction that the DA (Denatured Alcohol) will evaporate over a period of time and you will then not have the proper amount of separate ingredients in the OB Shine Juice formula.
The long and short of it is that the alcohol evaporates from the bottle through the bottle and through the snap on top. Over time, you then need to calculate how much alcohol has evaporated and add the necessary Denatured Alcohol to get the formula back to the original recipe.
Capn Eddie recommended some plastic squeeze bottles from Harbor Freight, I purchased some and they didn’t last long. I found a good variety of Plastic Squeeze Bottles to store your finishes and other solutions….pretty cheap, Click Here.
Storing Your Custom Made Woodturning Finishes
So, over the last couple of years I have been using a variety of different food or condiment containers to store and apply woodturning finishes, glue and keep paint brushes on hand.
Reuse Old Plastic Squeeze Mustard Bottles
Mustard bottles make excellent glue storage and applicators. Buy your wood glue by the gallon and fill your old mustard bottles with the glue, the cap stays pretty tight and you can use it over and over. I use several types of wood glue so I ended up with about 3 mustard bottles filled with food safe woodglue …..works great . Mustard bottles are not the greatest for finishes because most do not seal very well. You have a screw down cap and a snap cap. The snap cap often times is loose fitting and will allow finish to evaporate …..but they are excellent for wood glue like the different formulas of titebond and other woodglues you can easily have 4 or 5 bottles of glue laying around the shop for easy use or easy to get to.
Finishes like OB Shine Juice require air tight bottles. First I want a clear bottle so I can see how the individual components of the OB Shine juice seperate. Next I want to find a bottle that has an “air tight” seal at the screw in top and the snap on top. It becomes a trial an error method ….some work, some do not. I found Catsup bottles pretty good, salad dressing bottles are also good.
Remember you are looking for a bottle that is clear, the top is easy to screw on and seals tight (no leaks) and a flip top that seals tightly ….again, no leaks!
Recycled Plastic Food Bottles
for Temporary Storage
Once again, I try to reuse things before they hit the trash!
Cottage cheese containers come in handy when woodturning, whether storing parts and pieces, finishes, or filling up with coffee grounds they help you stay organized.
Large cottage cheese containers are perfect for holding parts while working on a project. They can also be used to clean paint brushes or glue brushes ….I also use them for mixing up special finishes in small batches. We go through at least one container a week ….when you are done using it, just toss it, doesn’t get any easier!
With any of these containers you can use them for long term storage if needed, with or without a lid. For instance I have a lot of 2″ sanding disks, they get used or the backing breaks off. I just keep one container for each grit. I’ll also throw in small square sandpaper sheets that aren’t completely used up.
You can use yogurt food containers for casting small resin woodturning projects
Yogurt and Cottage Cheese
Containers for Resin Molds
Plastic food containers make excellent resin molds. Anything from the size of a gallon plastic milk or water bottle to small yogurt containers. One serving size yogurt containers are perfect to experiment with casting turning wood and resin projects.
Storing and Using CA
Glue For Woodturning
Since most woodturners use CA glue in some form, whether it be thin or thick CA …you often get it in bigger bottles that the top gets clogged or the cap is lost causing all kinds of problems. Some CA’s come with very thin and long applicator tips ….these get lost, clogged and eventually have nothing left. Once you start using those applications you realize how handy they are.
CA by the way refers to Cyanoacrylate Glue or Superglue.
What to Use CA for When Woodturning
I use CA mostly for gluing purposes when woodturning. I will use it to fill cracks or crevices. You can pack a crack with sawdust, coffee grounds, shavings and then apply some CA to it, usually you will want to use thin CA because it will soak into the material you packed in the crack and it will bond with all material it touches ….there fore helping to keep the bowl or turning project together and not flying apart.
Use a small amount of mica to fill holes, cracks and crevices in your woodturing projects
You can also mix a little mica color with the CA, in this case you would want to use the medium thick to thick CA to give the crack a color that either blends with the wood or is in start contrast with the wood. I also use a 5 minute epoxy for this, you get more time to work the material and most times it looks better.
CA For A Finish On Your Woodturning Projects
It would be remiss of me if I didn’t mention the fact that CA is a very popular finish for many woodturners. Many wood pen turners use CA for a glossy finish on their pens. Although CA isn’t used on bigger projects much, smaller stuff like handles, eggs, wands, billy bats etc look great with a CA finish…..some turners will use CA on bowls and cups but I’m not so sure that it is food safe even after it cures.
Although I do not use a lot of CA for finishes some turners do and will buy larger bottles of thin CA. This is where you would want to keep most of it in the freezer and split it up into smaller bottles for your use. Like I mentioned, some say you can keep it in the freezer for 2 years or more.
Storing Your CA
Depending on how much woodturning you do, your CA could go bad if not used in a reasonable period of time and kept in the right conditions. Therefore if is advisable to store your CA in a refrigerator/freezer until you use it. I know of some woodturners who use a lot of CA for their projects (CA can be used to give a bright glossy finish) and they purchase larger amounts of CA and by keeping it refrigerated it will last up to three years.
Kit for storing and using your CA glue more efficiently
I mention CA, storage and application because you can purchase kits that contain smaller dispensing bottles, a couple hundred applicator tips and other pieces to help make the most of your CA.
I purchased this CA Accessory Kit and am very happy with it. I did it mostly for the CA applicator tips but ended up using the smaller bottles and refrigerating my thin CA, Medium Thick CA and Thick Ca. Something you should consider if you use any CA at all, the applicator tips are golden. They help direct the CA into cracks and crevices and keep the CA from bleeding into the surrounding wood which cause discoloration.
Final Woodturning Storage Thoughts
Coffee cans are good for one time use or storage of parts and pieces ….good to a few at hand!
I hope I might have opened up your eyes to finding new and unthought of methods of storing your glues, finishes and other woodturning related products. Just keep your eye out for empty spray bottles, coffee cans, condiment bottles and other disposable food containers and you just might get a little more organized in your woodturning shop!
I have a couple of garbage bags filled with empty plastic and metal containers. Some I probably will never use but others can really make life easy in the shop….. and coffee cans, whether metal or plastic are always of use and can be easy one time containers that you’ll be glad you had around 🙂
Plastic Bottles for Vase Inserts
As I write I keep thinking I should mention other purposes for used containers. One of the most important ones for me is using a plastic water bottle for a vase insert. It holds water, won’t leak and is easy for a client to replace. Smaller vases can use medicine bottles or other pill bottles.
Empty drinking water bottles provide excellent inserts for woodturned vases and are easily replaced.
Wood vases are really cool, I enjoy turning them but it becomes expensive to epoxy the inside to make it water proof so you simply have to make it big enough to hold a drinking water bottle that has had the top cut off. When turning a wood vase with a water bottle insert in mind I usually make it at least 1/4″ wider than the plastic bottle ….sometimes even a 1/2″ bigger. You want to make it bigger because the hole will either shrink or get deformed if water is dropped into the untreated vase interior.
Locating Specialty Wood Sources for Woodturning Projects Such As A Beaver Chewed Branch Laying On The River Bed
Like any wood turner I am always looking for new sources or different sources of wood to turn. This summer we spent a lot of time by the river doing some fishing, seining and swimming with our grandsons. They kept pulling out big branches and sometimes logs that were water logged and laying on the river bed so I though …..why not try to turn some of this!
Always Looking for New Sources of Wood for Woodturning
What to turn with a beaver branch?
woo
Good prices on woodturing blanks on ebay!
I am always looking for new sources of wood for woodturning. It might be types or species of wood or just shapes of different wood. Like crotches, branches ….dried or rotted pieces or a small slingshot type piece that would make a nice small bowl or jewelery dish. Any type of unusual piece of wood in a tree ….whether it has grown that way or gotten its shape from laying on the ground.
Often times its not how big the piece of wood is but rather the shape, then its left to your imagination.
If you need a quick blank or two you can always check out ebay for wood turning blanks ….you can usually find some decent deals there.
Water Logged Beaver Chewed Branch
The kids dragged a whole bunch of water logged branches from the river this summer…..some were chewed up by beavers and probably muskrats. I thought they were pretty cool looking and wondered what I could make out of them, what could I turn from a beaver branch 🙂
Beaver Bowls?
I could see doing a couple of bowls on the fat end of it. Maybe a few vases with the beaver teeth (chewing) left in the side. These might be ugly and worthless to some but for those who enjoy wildlife they can own a bit of natural history ….for those that live on or new Fox River they can own a part of geographical history near to them.
Should I turn a bowl from this beaver branch?
Develop a Woodturning Selling Strategy
For those who like to turn wood and sell it you need to come up with a Unique Selling Proposition such as a beaver vase …..although that can be serious and interesting to the “naturalist” it might be a joke for someone who is a bit of a “pervert” and looking for a gag or practical joke type gift. You never know what causes someone to buy your stuff.
You might want to take that piece and slice it into 50 or more pen planks and sell them as Fox River Beaver Pens ……get the idea!
Sure, everyone loves wood bowls, vases, cups, pizza cutters, pens, billy bats, clubs and on and on…..nothing like a custom turned piece …..however, if you can tie into an emotion or memory you will have more sales and get more money for your turnings.
If you stumble on this post and have some ideas ….please let me know!
Beaver Wood Facebook Post
I did a Facebook post asking my group what they thought I could turn out of this piece of wood. Since I am writing both the blog post and FB post at the same time I have no idea what kind of response I will get. I’m assuming since it is “Beaver” wood, I will get the worse of the worse ….gonna be pretty hard for those folks to not make a few perverted comments ….but we’ll see 🙂
Here’s the Beaver Chewed Branch post:
OK, I know I’m asking for trouble when I throw this question out!
I’m looking for suggestions on what type of unique or interesting project I might be able to turn with this piece of wood. My grandson pulled it out of the river, it was chewed up by beavers and either sunk or floated downriver.
What to make from a beaver branch?
My grandson is 4 years old mind you, I call him Thor because the kid is a beast!
It was waterlogged, heavy but had 3 or 4 places where the beaver chewed into the log to either try to make it fall down or just eat it. Anyway, it has been sitting on the pier and drying out for a week or two and I thought I would really like to make something nice out of it.
I was hoping to turn a piece with the beaver teeth marks in it. I keep coming up with a blank …..my creativity has vanished 🙂
Check out the pics and video and let me know what you would do!
This video shows the beaver chewed log a little closer …hopefully it will give you some food for thought and I hope you will share that with me below.
#Best Wood For Wood Turning Rings, #Cutting Wood For Woodturning, Exotic Wood For Woodturning, Good Types Of Wood For Woodturning, How To Prepare Wood For Woodturning, Sealing Wood For Woodturning, Types Of Wood For Woodturning, Where To Buy Wood For Woodturning, Wood Blanks For Woodturning, Wood For Woodturning, Wood For Woodturning For Sale, Wood For Woodturning Supplies, Woodturning Wood For Sale Near Me
What Type of Moisture Meter Should I Purchase For Woodturning?
This question comes up again and again. Somehow when we start turning wood, we are trained to think we need to either turn dried wood or we need to dry our wood before we turn it. That simply is not true! Furthermore everyone tells us to buy a moisture meter and the problem is solved ….again….not true!
Yet we find ourselves always trying to get the perfect piece of wood to turn and that requires a dry piece of wood. So how do we dry the wood or should we dry the wood before we turn it. That is what moisture meters and scales for measuring water weight will help us figure out.
However it’s a good idea to know what type of wood you are working with and how much moisture it contains. This will help you further process the piece of wood you are turning and how to deal with it. And you might ask yourself …do I want to apply a finish over dry wood or can I apply a finish over wet wood. Those answers will vary and we won’t discuss them here.
So do I really need a moisture meter to ascertain the moisture in the piece of wood I am turning or is this just needless information?
Wet or Dry Wood ….Good Question!
This is always a good question to revisit …especially for all the new woodturners out there.
One of the members over at www.Facebook.com/groups/woodturningbasics asked what type of moisture meter should he purchase. A good question but a question that can only be answered after knowing a few more facts. Such as:
1. Why do you want to know how wet your wood is?
2.What type of project are you going to turn?
3.Do you need dry wood or are you just wanting it dry because that’s what it seems like all woodturners turn ….dry wood?
4. Do you understand that a moisture meter can only give your moisture readings as far as the pins go into the wood ….maybe a little further?
How Should A Moisture Meter Be Used?
When I first started turning I ran into a suggestions for moisture meters and how they should be used. Most said basically stick the pins in the wood and you get the average moisture content of the blank or bowl you have turned.
To some degree that is true but it is only accurate in a limited way. I have purchased at least 3 maybe 4 moisture meters over the last 3 or 4 years ….in fact, I just got a new one Good Moisture Meter. Its good if you want to find out the average moisture in a 3/4 to 1.5″ piece of wood. It will give you a good idea of what the moisture content is.
The most accurate method of measuring moisture in wood is with a scale. First you weigh the piece of wood then you dry it ….whatever method you use…..microwave, bag of shavings, sitting on a shelf, kiln or oven ….after a period of time you weigh it again and the weight loss is water loss. Keep on doing your drying method and weighing for correct moisture content.
Wood Blank Will Acclimate Itself to Existing Humidy Conditions
Keep in mind….if you are drying a piece that started at 24 ounces and you get it to 12 ounces and it stops loosing weight you have a dry piece of wood. However, if you put that piece back up on a shelf before it is finished it will acclimate itself. That is, if will either keep on drying or it will absorb moisture until it comes to equilibrium with current shop or air moisture …..at that point it will gain in weight!
So, in my humble opinion, moisture meters will give you an idea of the general moisture content of the piece of wood or woodturning that you are working with. That’s helpful if you want to further dry the piece after you rough turn it.
I Turn Almost All Green Or Wet Wood
I turn almost all green/wet wood. I check the blank before I turn a bowl to see how wet it is. Then I rough turn it with walls that are at least 1″ thick. I then will check the moisture via moisture meter and then weight it. At this point I will either stick it on a shelf, or in a bag of shavings or dry it further in the microwave……I plan on making a small kiln to slow the drying process …hopefully eliminating some of the cracks and other deformities.
How you deal with moisture in the wood you turn is an ongoing learning experience from many aspects. First is to understand and know how to find out how wet the piece of wood you are turning is.
Sure, you can turn green wood ….set it to dry or finish it. If the project is for you that’s fine but if you intend on giving it away you should know what will happen with the wood if its too wet when you finish it….will it crack, deform or just fall apart. This is something you will have to experience as you learn about the moisture or water that is in the wood you turn!
Here’s a moisture meter that I just got it seems to have a few more features than the others but it can be used to find out if your wood is really wet, average or very dry. https://amzn.to/3fsfFCM


 Also remember that most drill presses have a hole in the center of the drill press table which would allow you to drill center holes in 3′, 4′ or larger pieces.


