I was feeling a little low, problems with my garage/shop permit and problems with my health and switching of insurance agencies ….turns out that they lost me or deleted me from the system and now I have no health insurance!
So, thought I would share some thoughts that I shared with the facebook group …basically my way of dealing with stress and problems of this world. Sometimes you just can’t beat it and if you can stick a piece of steel into a turning piece of wood……for a short time your problems go away!
Sharing Some Woodturning Pictures
Thought I share some pics.
This is what I do when I want to turn, but just don’t have it in me to set up a bowl blank or some other more complicated woodturning project.
I turn tool handle blanks!
Learn how to make your own woodturning tool handle for a carbide turning tool
I know, that probably sounds dumb, but its really easy to do, I’m turning something so I’m feeling a little usefull and I’m making shavings 🙂 I love making new woodturning tools so I’m always in need of some woodturning tool handles.
From Branches to Tool Handles
The trick is to cut up some fairly straight branches that are at least 24″ long and anywhere from 3 to 5″ wide. I try to use hardwood, but I use anything I can get my hands on. So at this point I have about 25 branches cut to around 24″ and I keep them outside. I probably should paint the ends but most of it is ash and oak which have been dead for a couple of years.
I don’t know how many of you mow your own lawn, and those that do how many of you look at it as a pain in the ass or think of it as a time to empty your brain ….and just cut grass. That’s how it is for me to turn some handle blanks….. I suppose I could apply the some train of thought to bowl blanks, but handles are a lot easier.
Making Tool Handles for Woodturning Tools
I like making tools so the handles always get used. I give some away and I’m planning on selling some of them, carbide tools and HSS parting tools and scrapers for now. I hope 2018 to be the year that I set up a website and can sell a few tools per month, helping me, helping my fellow turners!
Clear My Head By Turning Tool Handles
But, to place a branch on the lathe and start turning is the fastest way for me to empty my brain, or just feel like I accomplished something for the day……it has all kinds of theraputic purposes! Its a lot healthier than taking some type of sedative or other mind altering drug, better than pounding down a bunch of beers. Sometimes I’ll go out to the shop when I can barely walk, I throw one of those limbs between centers, scrape off the bark, get down to the wood and see what God has designed for me today. No limb or branch has ever been the same and the beauty of wood is something that never, never ceases to impress me.
Turning a New Oak
Woodturning Tool Handle
Was feeling a little low today so I threw an oak limb on the lathe, between centers and created kind of a funky shape only because the bark went deep into the wood, doesn’t matter I might make 2 handles out of it, or one long one with a unique shape 🙂 I also practiced my skew skills a little, using both the flat skew and the oval skew…. didn’t do too bad, but I need some practice, I need to sharpen the skews….probably would have done a better job, but I didn’t feel like setting up the shapening jig.
If you’ve read this far….good on you! For the new people, I really don’t like showing too many pictures because a tree fell on my roof, been waiting for the insurance and county so I can get things started. I’m trying to put a 12/12 pitch on this thing ….back in the day I could do it by myself. Gonna be tough now. Plus just talked to the county and they changed their building code standards and this whole thing has become a bigger pain in the ass. I live in the most expensive county in Illinois, they have taken me to court a couple of times but the problems have always been their fault, now I have to redraw plans!
This is why there is boxes, wood, shavings and debris all over the place. I don’t have a roof over my head, just a bunch of tarps.
Sorry, I don’t mean to bring you guys down. We all have our problems, life sucks and if you don’t think that you haven’t l;ived long enough. Its how you deal with the sucky part that matters.
Check out the hunk of oak, that will be a beautiful handle some day.
Here’s a couple of pics to look at. Will try to post a video also
Yee Haw finally got out to put chisel to wood! You know you’re addicted to woodturning when you are sitting around with your family eating dinner or watching TV and thinking….. “I really want to put that new piece of oak on the lathe….when are they going home”! I love my family, I love being with them but I just want to turn wood!!!
Haven’t done much woodturning since Christmas, been feeling pretty rough. I never know when it’s gonna hit me so I treasure the moments I have that I’m feeling well enough to do something outside or in the shop. I like to call it my shop, guess it is ….but really just an old garage with a couple of additions that had an oak tree come down and take off the roof. The roof has been off and covered with a tarp for over 5 years, the first problem was with insurance, the second problem was with getting a permit. Getting close though might get everything straightened out by this spring.
So, I’m cool and call it my shop 🙂
Still not feeling that hot, but it was around 1 am, decided I would go out there and clean up.
Made A Wood Handle for A
Robert Sorby 3/8″ Spindle Gouge
As I was putting things away, I purchased a Sorby 3/8″ spindle gouge , just the tang and gouge, in other words, a tool without a handle. I had been using it stuck in something I turned that looked like a dildo…sorry, really would like to keep this family friendly but there’s no other way to describe it.
If money is tight, most manufacturer’s will offer the tool without a handle, just turn your own and you might save 50 bucks.
So, I figured ….heck with cleaning up. This thing needs a handle. As I was turning billy clubs before Christmas I turned about 15 ash, oak and beech blanks. They were anywhere from 3″ in diameter to 24″ long. Actually, I was practicing my spindle turning, using different tools. Mainly trying my Benjamins Best Roughing Gouge. I turned extra because I knew I wanted to make some tools and would need some handles.
Moral of this Woodturning Story
I say all this to encourage you to turn some blanks and have them laying around ready to use. For me, I was able to turn a handle, make a copper ferrule and …sand and but a couple coats of OB Shine Juice on it.
I didn’t glue the tool in, but the hold is drilled. Just need to mix up some epoxy and glue in the tool and copper ferrule.
If I didn’t have the blanks, I would not have done the tool. I would not have got the enjoyment of turning again, I would have just cleaned up my messy shop….how boring is that.
Turning a natural edge wood bowl, mounting on wood lathe the Wrong WAY!Maple log cut into a bowl blank, ready to be attached to a faceplate and will be turned into a live edge or natural edge wood bowl.Turning a natural edge wood bowl, mounting on wood lathe the Wrong WAY!
I think I’m gonna try to make 10 or 20 bowl blanks so I can have them on standby. That way, when all I can manage to do is chuck up a bowl, and start gouging….I’ll be ready to go. Guess I was never that organized in my lifetime….never too late.
Facebook Member Looking for
Bowl Gouge Purchase Advice
Someone in our woodturning facebook group was asking about what type of bowl gouge he should buy, he was a new turner and was getting some conflicting information. Since I already spent an agonizing year or more trying to figure out what to purchase I thought I would write a dissertation on what type of woodturning gouge to buy.
Yes, I did it again. Just starting babbling on and on ….really, I was just trying to help. Anyway, thought if anyone stumbled on the topic in the woodturningbasics.com blog, they might benefit from it so I reposted the facebook post here.
====================
Hey Mike …I’ll be glad to give ya my 2 cents worth 🙂
Actually a really good question but has 100 answers or more! I would like to do a blog post on my experience with tools, but I’ll share what happened to me.
I’m assuming you’re pretty new to turning wood.
When I first started the only way for me to do it was with a harbor freight lathe and the expensive (60 bucks) set of harbor freight turning tools.
I’ll stick to the tools.
The harbor freight (HF) tools were really junk. A terrible way for me to start. I turned a little candle holder and a small bowl. I had no idea that in my set of tools there wasn’t a bowl gouge! Somehow I turned a bowl with the woodturning tools that came in the set, probably used the scraper the most and I used the spindle gouges on the bowl ….A BIG NO NO you can get hurt really bad doing that.
Let me back up and say, if money isn’t an issue. Get D-way woodturning tools from www.d-waytools.com Dave is the owner, good guy and will help you.
Carbide Turning Tools
Are The Best For Beginners
Then get a set of carbide turning tools like the Easy Wood Tools get a square scraper and a round scraper and a detailer. You get many uses from a carbide tip and when it gets dull just screw on a new carbide insert.
Easy Wood Tools Pro Easy Rougher Carbide Lathe Turning Tool 3200 New
These tools are almost foolproof and you don’t spend time sharpening woodturning tools, you just change the carbide tip. I made my own carbide tool and found myself using it on a piece that I was unsure of when using a turning gouge. In other words, when things got tough ….I switched to the carbide woodturning tools.
Start With a Cheap Set
Of HSS Woodturning Tools
But if money is an issue, get a HF set of turning tools or a Set of Benjamins Best from PSI. I know everyone makes fun of them, but read some of the reviews, some of these guys won’t buy anything else ….so it might be worth a try if you have a tight budget….a nice way of saying, “you’re broke”. The cheap price allows you to have a set of woodturning tools. More importantly is that you can use these cheap tools to learn how to properly sharpen your woodturning turning tools.
Sharpening Your Woodturning Tools
You can try freehand sharpening your bowl gouge and other woodturning tools if you want, but sooner or latter you will want to get a Oneway Wolverine Grinding Jig, you’ll need these two pieces:
Best way to sharpen your woodturing tools, gouges and chisels is the oneway wolverine sharpening jib
Woodturning Tools I Would Start With
Now, after some practice on your cheap turning tools, when you get a Sorby or Dway turning tool, you won’t grind away half of the tool metal or more to learn how to sharpen. Like I said before, if money isn’t an issue …go with to expensive tool and learn everything with it, I’m sure your total experience will be more pleasant, but your expensive tool will be gone in no time unless you are a natural at sharpening woodturning tools!
My first choice would be D-way tools, second choice would be Sorby
I mentioned PSI, Penn State Industries before they have a set that includes everything to get you started, its on the cheap side …the metal is HSS, but still will need to be sharpened frequently so it is good for practicing. These are the specs for this kit. https://www.pennstateind.com/store/LCSIXW.html
If a high quality large, HSS steel turning tool set has been on your wishlist, now is the time to buy. Includes a Spindle Gouge (1/2″ Dia, 22-3/8″ length), Diamond Parting Tool (3/16″ dia, 16-3/4″ length), Round Nose Scraper (3/4″ dia, 17″ length), Bowl Gouge (3/4″ dia, 16-3/4″ length), Roughing Gouge (7/8″ dia, 19″ length)and Oval Skew Chisel (1″ dia, 18-3/8″ length)
Hope that helps ….I say this for you or anyone getting started. Rmember you need to learn how to sharpen your tools, dull tools are dangerous. So… why not get a set of cheap tools, get a sharpening jig, practice sharpening until you know you can put an edge on your tools and then buy the good stuff.
If I had the money to buy the good stuff, that’s what I would do. I would not take my advice and would have purchased a 200 dollar bowl gouge and then probably spend the next 3 to 6 months grinding it away to nothing ….I never listen to anyone, you would think after all these years I would 🙂
But…..
Remember, I didn’t have any money…so I didn’t waste good tool steel LOL
Ok, unless you are brand spanking new there’s no trick to this process of making woodturning tool handles.
Basically you grab a 3×3 square blank of your favorite wood and turn it into the lenght and shape you need for your desired tool.
Or…
Grab a straight piece of a tree limb or tree trunk, find the centers and turn it between centers. Use your turning roughing gouge to get the branch cylindrical and then put a shape for the tool you need. Then finish with oil or something like OB shine juice.
DIY Wood Handles For
Turning Tools Video
You can watch a video I put together called “How to Make Wood Handles for Wood Lathe Tools”, it involves taking a small dead tree trunk and turning it into a cylindrical blank to be used for a wood lathe tool handle, club, mallet or whatever you might desire!
Where I live I have 2 lots on a river. Not very big lots but we left a lot of it naturalized so, after about 25 years, we had a lot of young trees of every sort. There were lots of Ash and Beech trees, a few oaks and some hickory, lots of young mulberry and catalpa and also some sumac, there are even som walnut and black locust. I found a bunch of wild cherry trees and a good 5 or 10 I couldn’t identify. Oh, I forgot …a couple of willow trees, maple, popular and cottonwood. Did you ever see cottonwood or popular seeds flying in the summer. Some call it a nuisance, to me, its a reminder of summer and all my memories of my childhood fishing on the river with the cottonwood seeds floating through the air like snow and sticking to my fishing line as I reeled in my pole.
Our Own Forest For Making Your
Own Woodturning Tool Handles
My wife and I are not like most people. We don’t clear cut everything so we could have a nice green lawn. Drives our kids crazy! We do have some areas that are mowed and you could say they are grass but in reality it is just green weeds….. looks pretty good when cut 🙂
Getting ready to turn an ash log into a woodturning tool handle!
As a result of our yard planning we have a whole bunch of trees. They create a haven for wildlife of every sort. We even had a mama deer give birth in a small section we called the forest. The mom came out and then following her was this little small dog sized deer that was all wet and wobbling, it was awesome to see. We didn’t know it but she had another one that was left in the forest, somewhat hidden in some brush but apparently not strong enough to move. Four or Five hours latter it was up and moving and mama was right there.
Save A Tree and Rescue Some Animals ….
Your DIY Handles Can Remind You of That
If I tried to remember how many animals we rescued over the last 30 years or so I know I would leave some out. Birds of every sort, squirrels, raccoon families….at least 3 litters of little raccons. Just saved a possum I caught in the chicken house!
Trees are wonderful creations of God. They give shelter to wildlife. Provide material to build homes and shelter. I marvel at their beauty and massivness. We have one oak tree that is close to 6′ in diameter at it’s base. You know that had to start growing at the time of the revolutionary war or even before then.
I’m not a tree hugger but I do appreciate them. That’s why I’m sad to see so many killed by foreign beetles and fungus, moths and who knows what else. Trees that are like statues and guardians from the time of my youth are now taken down by foreign invaders. Or maybe someone from the city comes in and thinks the leaves are a nuisance….. sic!
Three Oak Trees Down, Lots of Bowls, Cups and Handles to be turned! or Should I Just Give In And Cut Some Firewood?
I have 3 oak trees down right now. I really wanted to be able to get a portable bandsaw to make lumber out of them. They’ve been laying around for a while and except for a few pieces I’m afraid they will become fire wood.
Sorry for the rabbit hole! But I realize not too many are Blessed like we are to live in an arboretum or nature center. If I want to turn a bowl, I look for a decent dead branch, cut it and go to work.
I said all this to say, I have a lot of dead trees now. If you catch some of the smaller ones within a year after they die and they are 4 to 6 inches in diameter you can use them to turn some very nice wood handles for your tools. You can use the bigger ones for lamps or candle stick holders and I’m sure you could think of other projects.
Dead Trees Make Nice Turning Tool Handles
and Come with Worm Holes,
Coloring From Fungus Growth Called Spalting
The longer it is dead, the more worm holes and spalting you get. But the Ash, Oak, Hickory and Beech trees are particulary suited well for making handles for your custom made woodturnig tools, or should I saw… homemade woodturning tools and others would call DIY woodturning tools.
My harbor freight lathe has several steel bar levers used to tighen down the center stock or the tool rest. I’m making a few small handles that I’ll slip over the round metal lever to give me a little more leverage, I’m just using a hunk of conduit now and it keeps falling off 🙂
Handle for my center stock or maybe for a customer disc sander!
With the bigger branches I can make some small baseball bats that my grandsons can use to whack balls around and my son’s can use a self defense weapons…. in fact I might keep one stashed by the front door! Crazy times we live in, at one time I was the strongest in the room…. now I’m old and sick…easy prey so you need to do whatever you need to do to protect your family…. or at least die trying.
Ash Trees the Choice of Bat Makers
As Well As Tool Handles
Did you know Ash was the wood of choice for making baseball bats? Did you know almost all the Ash forests are gone from the emarld ash borer beetle? That’s what killed all my ash trees, you can see the trails under the bark. Seems as though they can kill a tree in a matter of weeks …really sad. My little forest is so bare now.
But, we as woodturners can use this distressed wood to make some awesome projects. Bowls, spindles, candle stick holders, walking sticks and anything that requires a handle.
Most of the dead ash trees that I use have been dead for a long time, at least 3 years and in this time the 4″ and below are pretty dry. However, the first 1/2″ to 1″ of the branch or log is usually very soft. But you can clean it up until you get down to hard wood. The grain is tight and really is beautiful. Often times you’ll find worm holes, or beetle holes throughout. The wood sometimes will be spalted. Usually Ash is a very light colored, with an oak type grain but with spalting fungus makes its way into the wood and will add color in the form of different shades and often lines of color.
If you have a bigger piece, that is 6″ in diamter and up you can run a 24″ section through your bandsaw and make 3 x 3 square blanks that you can turn whenever you get a free moment or the need arises. I haven’t had to do this yet because I have so many smaller diameter trees that are dead.
So what am I turning these custom wood handles for?
I have a 3/8 Sorby Spindle Gouge I purchased with just the blade and tang, no handle. Right now I just have it stuck into a piece of wood 🙂 because I needed to use it right away. I need to make a permanent handle and epoxy the tang into the handle with a brass furle at the end. I’ve been using copper for the furl but I think I’m going to purchase a brass tube from onlinemetals.com and use the brass for a furl making myself look like the big guys!
I really haven’t used the spindle gouge much…. Need to spend some time learning how to use it. The Sorby spindle gouge cuts very nice but my technique is a big off 🙂 The one I got was not very sharp out of the box, kind of surprised at that. But, that’s not a deal killer since I have the Oneway Wolverine Grinding System, makes quick work of dull woodturning gouges and chisels.
Wood Handles For Woodturning Disk Sander
I have a little 2″ disk sander I want to set up. I think I watched a Cap’n Eddie Video or two about how to make one of these sanding tools. Basically you turn a handle, drill a 3/8″ hole in the end of the handle, drill a 3/8″ hole at a 45 degree angle and my modificaition is to drill another 3/8 inch hole 90 degrees to the wood handle. Once again, I have a makeshift handle that I turned quickly and looks like a malformed sex toy, I drilled the holes as per above and it works great…… just that the 2″ sanding pad keeps falling out. It only costs about 10 bucks and comes with an assortment of pads, if you think you like it, then get about 100 additional sanding pads from 80 grit to 3000 grit. My problem with this little gadget is that the foam keeps coming apart. I had to use some CA glue to glue the “hook” pad back on. It would be easy enough to repair with some more dense foam if you really liked the setup. In fact that is what I’m going to do.
Turning Handles for
Pro Version of The Disk Sander
So…..
Now the 2″ sanding pad uses velcro to attache the sandpaper and foam pad and is attached to a mandrel with a 1/4″ metal/steel shaft. To make a “Pro” version of this hand sander, you drill a 3/8″ hole in the wood handle because you want to push in a 3/8″ round disk magnet ********** to the end of the hold (glue it in) and then glue in a 3/8″ brass tube down to the magnet. Use CA glue.
When you push the steel shaft of the sanding pad into the brass shaft it will bottom out on the magnet and stick to its location by the 3/8″ disk magnet that you first glued in.
This thing works like a charm. You don’t have to have the sanding pad on a drill, the rotation of the object being sanded causes the sanding pad to rotate on its own and thus “sand” the project. I find this tool comes in handy with bowls and especially cups or hollow forms that need some sanding inside. Does an awesome job sanding the interior of bowls, cups and vases.
Dedicated 2″ Sanding Disk Station
The only thing I need to do is buy about 4 or 5 of these 2″ sanding pads****** and an additional supply of 2″ round sanding disks*****. The constant tearing off of the sanding paper from the foam tends to destroy the velcro on the foam pad. So I saw one guy create a station that holds as many disks as he needs and now has dedicated 2″ sanding pads starting with 80 grit up to 1000 grit, think he had about 5 of them in a a hunk of wood by his lathe. Just drill a 1/4″ hole in your favorite wood and stick the mandrel of the sanding disk in the hole …..set it on a shelf or hang on the wall next to your lathe. If you try these things you’ll fall in love with them
Wood Handles for My Custom
Made Woodturning Tools
I have some home made woodturning tools and plan to make many more ….or at least experiment with more of them. I was watching Reed Gray, the robohippy on youtube and that guy has a tool for every corner or should I say every radius. I guess you never quite figure out what you really like until you try a bunch of tools. Reed has made a lot of his stuff and it seems like he purchased some of the cheaper tools and reshaped them. Same thing with a guy by the name of Al Furtado, the guy makes working woodturning tools out just about any piece of metal that crosses his path and turns some beautiful projects.
New Category ….Great Woodturners!
I think I’m going to created a category called “Great Woodturners” and then have a subcategory for each of the woodturners I follow and learn from. If anything, it will help readers of this blog to glean important and usefull information rather than trying to comb through the tons of videos and webpages.
DIY Wood Handles for Benjamin’s Best
A lot of guys will buy turning tools from Penn State Industries, the tools are called Benjamin’s Best and then they rip off the handle and make their own custom handle. You can certainly do that with a nice branch or small tree trunk of just about any type of wood. Make the tool nice and long, hefty and fitting your hand. Or…;.make it small for detailed work if you are a woodturner who turns wood pens and needs smaller woodturning tools.
Woodturning Wood Handles for
Your Custom Woodturning Tools
I think I posted some of the homemade tools that Al Furtado made called Make Your Own Woodturning Tools ….its a pretty good introduction to Al :), I would like to try and duplicate some of those ……consequently, I will need handles for these tools. The easiest way is to drill a hole in the center of the newly turned wood handle that will accept the tang of the new turning tool and epoxy it in.
Drill or Daddo For the Turning Tool Tang
Some guys make tools with larger square tangs which makes it harder to drill a hole and push the tang in …has to do with geometry. Anyway, they start with a square blank and cut it in half. Then they use a router to route out a section of wood fitting the tang on both halfs. After dry fitting and making sure the tool tang fits they will then epoxy the wood handle sections together, making sure not to get any epoxy in the routed section. Then they turn the blank after it has dried into their desired shape …. Let me see if I can find a video of somone doing this ……….************
I also have some carbide cutters (inserts) mounted on steel bars …I need to make handles for these tools. I must have watched the video on how to do this 15 times and I was quite proud of myself once I actually did it, in fact, I got the concept down and made the cutter and steel work together in my own way…. remember, I’m not a metals guy, never have been but willing to learn anything I don’t already know how to do ….lots to learn with metals. Anyway, I think I will use a 3/8″ cutter on a 3/8″ bar and make a straight cutter, radius cutter tool and I will cut the bar with weld it so that the bar has the cutter and it has a 45 degree offset for doing hollowing on bowls and cups. Let me see if I can do a drawing or sketch and post it here, just can’t do a straight 45 degree ….so they saw. Maybe since they say that I’ll try it 🙂 ***********
I found that the big carbide cutters at 5/8″ are good in some cicumstances and 3/8″ are better for others. The big cutters can be agressive if you are not careful, the smaller carbide cutting tools are nice when you can’t see inside your cup or bowl ….it isn’t as big and can be foriving when it comes to catches. I need to experiment with differnt angles…I could see where a 90 or 45 degree bar would have a good outcome…… because basically you’re in there cutting blind, you have to “feel” your way through the cut. In this case, starting with a smaller cutter makes more sense.
Recap For Woodturning Custom
Hardwood Tool Handles
So, if I didn’t paint a picture well enough. Here’s the gist of what I’m trying to do with handles.
You don’t need to use good dried lumber glued up or just squared up to turn a woodturning tool handle.
You can find limbs and branches from trees in your area, strip the bark and turn an awesome looking handle. The wood should be free and you can get it from any municpal dumping area for firewood and woodchips. Talk to some of your local tree services and tell them what you’re looking for, they’ll probably dump a truck load off in your driveway!
I think this week I’m going to turn anywhere from 15 to 20 limbs, branches, from 2″ to 4″. I’ll just get them to round, cylinder shape. Probably have to either seal the ends and/or place them in bags of shavings so they don’t crack up on me. I’m thinking it would be best to seal the edges with something good since I went through the hassle of harvesting the wood and turning it. Wax on the ends would work or “anchorseal” ********** would be better than just paint.
If I have 10 or 20 round blanks that are 20″ to 24″ in length, I could make any tool I need or want over the winter and into spring. It will save me some time. I like making the tools, but to start with shaping the metal and then finding a handle…. well, I cut out one step if I have handles ready.
So, I want to make a fluetless gouge.
Carbide Tipped WoodTurning Tools
I want to make about 4 more carbide tipped (insert) tools, each having a dedicated cutter. Right now if I want a square cutter on my carbide tool I have to take off the round cutter…. a big pain in the butt. So having a set of carbide cutters would be a big plus. If I had the cash I would definitely purchase a set of cabide tipped woodturing tools from Easy Wood Tools. I saw a set at the local Woodcraft Store and they were impressive looking. Big, big handles and big cutters. The cutters were mounted on some hefty steel bars. They might cost more than most, but from my experience, I can almost guarantee that anyone that is new and entering into woodturning will have some fantastic results when using these carbide tipped tools. In my opinion they are a place to start, but sooner or latter I can almost guarantee you will want to try some of the traditional woodturning tools, such as bowl gouges, big scrapers, small scrapers, spindle gouges, parting tools and every type of woodturning tool. For me, and may woodturners, it becomes addicting. You always want to see what you can turn, more complicated projects. Different finishes. How to use tradional tools. How to effectively use the carbide tipped tools, or more accurately the woodturning tools with carbide inserts. It doesn’t matter how you start, it matters “that” you start. There are many frustrations in woodturning and for most, it creates a challenge. I know that’s how it is for me. I think on one bowl I must have had 100 catches, that’s why I call myself “Catch”. I can’t believe my chinese tools didn’t snap in half 🙂 ….every new project is a learning experience for me. And….maybe because I’m older, I can’t retain what I used to. I need to watch a tutorial a whole bunch of times and then go out and give it a shot. I even print out screenshots of how a gouge cuts into a bowl on the outside and on the inside.
I found that in most new approaches to woodturning you need to learn it good enough that you don’t have to think about it. Kind of like operating a backhoe, framing a house, drawing plans, runing plumbing, laying out for a foundation, setting forms or wiring an electrical service panel. You just do it, not a lot to think about. You learn the basics and then do the job….. same with woodturning. Understand how the tool cuts and then try to make it do what you know it can do.
I little aside here, I almost feel like carbide woodturning tools are cheating, if only because they are so easy to use. I use them in circumstances where I am not sure or confident in my ability to use a traditional gouge, scaper or whatever. As long as you enter the spinning hunk of wood slowly you usually won’t get in much trouble. The most forgiving is the circle cutter, the next is the radius cutter and the square cutter has its place and can be very effective. but remember these are all mostly used as scrapers, thus tearing out the grain, leaving all those fuzzies. When you get brave, hold the carbide cutter at a 45 degree or so angle and actually slice the wood…. it will come out like a glass surface. It takes time, many catches but I enjoy learning how to use these new carbide tools and they are my go to tools when I’m a little freaked out. However, my goal is to learn how to use all the traditional woodturning tools, such as woodturning gouges and chisels.
Easy Wood Tools makes some of the best carbide tipped woodturing tools!
Whatever you do, do something!
Turning Wood is fun. It can be scarey and dangerous. Just remember, every time you turn a project you learn something. You carry that wisdom to the next project and it builds until you are turning all kinds of crazy stuff.
I had no idea woodturning would be so time consuming, so addictive and such a learning experience. I mention in other places that I’m pretty much a natural when it comes to anything construction related. I’m not bragging, its just the way it is …I seem to catch on fast.
Woodturning and being a woodturner has humbled me greatly. I’m surprised my lathe still works after stopping it so often with all my catches. My tools were terrible in the beginning. I’m fortunate that nothing has hit me in the head.
Somebody mentioned, “practice, practice” ….that is the only way you’ll learn how to turn wood. The more you turn the better you’ll get. The more open you are to different methods, tools and supplies… the better you’ll get.
Belive it or not, all I wanted to say and
encourage you to do is to……….
So….grab a tree branch. Turn a handle or two and make some tools. Of course you can make that tool handle into a little baseball bat and go into the self defence market.
You can find more articles on making your own woodturning tools at:
What does a broken 1/2″ drill bit, a cold chisel, a 1/2 x 1/2″ pc of steel from home depot, a 1/2″ pc of round bar from home depot and carbide cutting bits (carbide inserts) have in common?
Well, properly shaped and machined …then add a nice wood handle and you have all the tools you need to turn just about anything. On top of that once you figure out how to use these materials to make your own turning tools you have the basis to make just about any type of turning tool you might need.
Al Furtado Shows You How to
Make Your Own Woodturning Tools
All makes simple carbide insert woodturing tools.Monster bowl gouge from an old cold steel chisel!
My Desire to Buy Every
Woodturning Tool Available!
For me, its easy to get caught up in a Sorby tool catalog or just searching on Amazon or Ebay for woodturning tools and I get lost for hours ….thinking “man, I need 1/4″ bowl gouge, 3/8″ bowl gouge, 1/2″ bowl gouge, 5/8″ bowl gouge, 3/4″ bowl gouge and a 1″ bowl gouge all with a fingernail grind …..then I need that same set with a standard grind and I need the same sizes in a spindle gouge both standard and fingernail grind ….oh ya, I need a parting tool ….how about a couple of different sizes of parting tools. Yep, I need a full set of scrapers and then I need some of those skew gouges for perfect finishes I see the masters making, can’t forget a roughing gouge….I mean, 1/2″ 3/4″ 1″ and at least 1 1/2” maybe bigger….I need all these, right?
Woodturning Is Addictive
I know you know what I mean. This hobby of woodturning is more addictive than crack cocaine! You think more tools, the best tools will make you a better turner …maybe so, but who has the cash for all these pieces of hardware because we haven’t even started talking about the wood lathe you have and the woodlathe you want to get, not to mention all the wood lathe accessories you’re gonna need!
Make Your Own Woodturning Tools
Well, one of the things that really got me excited was making your own woodturning tools, that’s right you can be a DIY woodturning tool maker 🙂 I think there is actually a subculture out there of guys making their own tools out of anything from old screwdrivers, files to auto or truck leafsprings.
The problem for me is that I’m not a metal guy. I can draw a house, building or shoppoing center and I can build that same drawing doing everything myself …..but I never learned how to work with metal. The closest I ever came to working with metal was aluminum siding, electrical wire and rebar for concrete….. well, ok, nails for my nail guy and screws for the screw gun 🙂
Been Sick, No Money for Expensive Woodturning Tools
Truth is I’ve been very sick for quite a while. When you’re sick you can’t work, I hate sitting or laying around so by “The Grace of God” I discovered wooodturning. Not too physical. I could find a low cost wood lathe at Harbor Freight and I could also find a cheap set of Chinese turning tools at Harbor Freight. That’s how I started.
I read as much as I could online and watched a ton of youtube videos. I learned much from Cap’n Eddie and too many others to mention. So, I thought I would share some of my journey in these pages.
My Woodturning Tools Were Junk!
The one thing I quickly found out was that my turning tools were really bad. I hand sharpened them till I totally screwed them up. Then the first investment was a Oneway Wolverine Sharpening System. I learned to sharpen my turning tools properly starting at that point.
Next, once I figured my tools really were junk and I needed something better. I stumbled on some DIY woodturning tool makers.
That’s when I discovered the many different ways of making your own woodturning tools. In these pages I hope to bring some of these methods to you. Some I will have tried, others I will just pass along because I’m just too sick to try everything I see but plan on doing it or trying these DIY tool building methods soon, however, you need to know now how to make some of this stuff.
I finally did learn that I could regrind the cheap tools that I had into a more useful grind or simply something that actually worked.
Started Making My
Own Woodturning Tools
Since I did not have much money I figured I could buy a piece of 1/2 x 1/2″ steel and a piece of 3/8 x 3/8″ steel from online metals, I could get some carbide cutters for a couple bucks a piece and then figure out how to grind a small platform for the cutter, tap the steel to attach the carbide cutter and make a wooden handle. My first attempt turned out pretty good, in fact, its one of my go to tools when I’m working with a tricky piece of wood.
My CARBIDE Woodturning Tool
My first homemade woodturning tool was a carbide insert turning tool taking both square and circle shaped carbide inserts and it cuts like a dream, great for the times you might be a little apprehensive about sticking that new bowl gouge into an irregular spinning piece of wood!
I made a square and circular carbide scraper using 5/8″ carbide square and circular cutters. You can find them online but you should make sure they are for cutting wood. The square cutters are fairly cheap and you can even get a 4 sided radius carbide cutters, they are a little less likely to grab, but grab they do!
I did make a 1/16″ parting tool from a reciprocating saw blade with a metal handle. That was fun, I learned a bunch and use the tool all the time. It’s very satisfying to make your own tools!
I made a very effective parting tool from a recirocating saw blade …expoxied between two pieces of wood. Works great for cutting and designing. I used brass rod for the rivets and pinged them to expand the brass….. solid as a rock 🙂
However…..
Didn’t Know Anything About Metal
Then I wanted to make a 1 1/2″ wide scraper so I picked up a piece of steel from home depot and ground down an edge on the steel, I didn’t have a handle yet but I wanted to try the tool out. It ended up burning the wood more than cutting, I tried different angles ….same thing, just wouldn’t cut. I was stumped, thought I would be cranking out all kinds of turning tools …but remember when I said I didn’t know anything about metal 🙂
Turns out there are a whole bunch of different types of steel. And then you have the hardening process, have to heat it in a special oven, air cool it or oil cool it, heat it again to get a temper ….I almost put an end to my woodturning tool making adventures!
Sorry, I got a little long winded talking about making your own woodturning tools ….only because I know you might like doing that type of thing and you might be in the same position I was in regarding not having enough cash to have all to good tools you’d really like to have!
Enter Al Furtado.
I’m not sure how long Al has been turning, but I know he really enjoys it and he enjoys sharing his projects and his tools!!! Al seems to be a frugal guy or maybe he’s just strapped for cash like a lot of us…..so, he makes do with what he has and he makes a lot of his own woodturning tools and accessories.
Al made a type of bowl gouge that is perfect for himself from a 1/2″ drill bit that was broken. He played around until he got the grind correct and now it is his “go to” tool when turning bowls. The big secret is the metal that the drill bit is made from, it is already hardened and when shapened it keeps a nice sharp edge for a long time. You don’t have to heat treat it.
Woodturning bowl gouge from an old 1/2″ drill bitMake Your Own Bowl Gouge from Steel cold ChiselProfiles of custom made woodturning bowl gougesAl makes his own hollowing tool with home depot steel and carbide insert cutter
Al takes a common sense approach to making woodturning tools that will save you a ton of money. In the video below he shows you some of his favorite tools and how he made them from either old, broken or leftover tools that are made with hadened steel and all you need to do is put an edge on the tool and make a handle for it.
The video quality isn’t the best but if the content doesn’t get your creative juices flowing …..then nothing will!
Enjoy
My shop made wood turning tools By Al Furtado
Al’s tools are not the prettiest, but they work and you can do exactly what he did. I can testify that the carbide cutters work like a dream and I look forward to making some gouges from old drill bits and cold chisels ….as far as that is concerned ….go down to Harbor Freight and get some of their tools and bits …they are all hardened steel and should work just as Al has show us.
Just Placed An Order for
Some Needed Woodturning
Tools and Supplies
First let me say that I would rather support my local woodturning supply store ….if I had one nearby, and if they had prices that were reasonable.
There’s a Woodcraft store about 30-45 minutes from me and I would really rather give them my business than Amazon …simply because I know what it takes to run a small business and when I had one, I really appreciated when local folks used us instead of someone from the city or 2 towns over. That being said, today all businesses including Walmart have to fight with Amazon and Amazon crushes most of them.
Amazon for WoodTurning
Tools and Supplies
Let’s face it, Amazon usually has the best price for woodturning tools and if you join their Prime club you basically get free shipping and the best deals on many products. That’s really hard to ignore when you don’t have a lot of money. Regardless of what I think of Jeff Bezos’ and his politics!
It’s hard to keep politics out of the conversation these days, you know what they say if you don’t stand for something you stand for nothing …just something to think about.
Anyway, I still get excited when the UPS guy pulls up and drops a box at my front door. I try to look cool, like it’s no big deal but I kind of feel like a kid at Christmas even if I paid for it myself 🙂
And Amazon has some pretty awesome deals, you can get extended warranties if needed and their support is second to none. If I buy a bowl gouge from the local Woodcraft store and find out I don’t like it….they probably won’t take it back. With Amazon if a woodturning tool breaks, I send one email and I get my money back and I can try something else.
Bottom line….I want to support the local guy. But the local guy sells his stuff for full list price and that really doesn’t help me save any money. If we’re going to…. or I should say, if the paradigm is changing and there is going to be 2 or 3 suppliers of the goods I want, guess I’ll just find the cheapest and go with that!
Sorry for the babble.
My New Woodturning
Tools and Supplies
I was excited because I just placed an order to Amazon for some woodturning tools and supplies I’ve needed or wanted to try. Want to see what I ordered and have coming in the next week? Check it out
First up. I’ve been wanting to try an epoxy finish called alumilite but I ran into Max Clear Grade Epoxy System. It’s food safe once it’s cured, you can use it on bowls and cups. I have a mug and after reading some of the revies I found several guys using it on cups and mugs. I also saw one guy turning wood sink bowls and coating it with alumilite but this appears to be the same thing. I’ll do a review on it once I give it a try. You can get some here if you want to try it.
Hurricane Turning Tools,
Woodturning Round Nose Scraper, High Speed Steel, 1 1/2 Inches Nose
I’ve never had any or used any Hurricane turning tools, I’ve read a ton of reviews and I really needed or wanted a big bowls scraper. So, I got a 1 1/2″ inch round nose scraper. It’s a nice beefy scraper at 3/8″ thick and should help me get in some of the deeper bowls and cups. They had a set of 3 scrapers, the big round nose, right side and left side but I really didn’t have the cash to dish out so I thought I would see how this scraper works and then grind down the left edge about an inch and a half or so. Anyway, once again I will do a review and video on how this thing works. I was going to get one from Penn State because it was cheaper ….however, it was slightly under 3/8″ thick and I really wanted something beefy. I think my 3/4″ chinese round nose is about 1/4″ thick and it jumps all over the place. Anyway, if you think you need a big bowl scraper … check this one out
Uvex Bionic Face Shield with Clear Polycarbonate Visor (S8500)
I guess I’ve been testing my luck by not having a woodturning face shield of some sort. Just didn’t have the extra cash laying around so I tried to be careful, always tried to stay out of the line of fire and keep my turning speed as low as I could. However, I really didn’t want to test my luck much further so I ordered a Uvex Bionic Face Shield. I did so after see some pictures of a bowl that would rather fly than spin. I saw some nasty accident results mainly to the head, that would be the face. I have enough problems so I ordered one of these. Now I just have to get used to wearing one. Check out what others are saying about it, click the link below.
Robert Larson 800-2875
Plastic Center Finder
I’ve got along until now without a center finder gadget. Seems like a lot of people use one and I can see how you might be more accurate and quicker at finding centers …..anyway, I thought it was time for a center finder like this ….lots of good reviews. Can find centers in the following:
Round stock capacity 8”
Octagon stock capacity 8”
Hexagon stock capacity 5 3/4”
Square capacity 8”
Handy for all woodworkers
Starbond EM-02 Super Fast Thin,
PREMIUM Instant CA
(Cyanoacrylate Adhesive) Super Glue
When I first started turning wood I was surprised how many woodturners used CA or superglue for their projects. I was surprised how many different uses there were and then I was surprised how many different types of superglue that was. Starbond seems to be the superglue of choice for woodturners. Up until now I used those small tubes of superglue, in face I got about 10 little tubes for 10 bucks, I used them for fixing bowl cracks mostly, you mix it up with saw dust or shavings to fill voids ….works great and sets up fast. If you use an accelerator it will even set up faster. One big purpose for CA is for finishing pens and bowls. I’ve never tried it but would like to. I saw someone comment that a CA finish doesn’t last that long…..first time in reading a couple 100 videos and watching a ton of videos ….I suspect he didn’t apply correctly or prepare the surface correctly.
I soon discovered there are different viscosities of superglue or CA. The thin is like water and soaks into the wood. I had a bowl that was just about done and I found a bunch of cracks coming off a branch area. I soaked the cracks with CA glue and everything worked out fine.
I tried to use the thin CA with shavings and saw dust but it requires a little work to get it right. So I thought if I got some of the thicker CA glue, I thought it would be more like epoxy and I could more easily mix saw dust, shavings or coffee grounds and fill larger voids. For the really big ones you need to use epoxy. Anway, I got a couple of different kinds of CA glue so that I might be a little more proficient in my woodturning and woodturning repairs.
Sure, you can buy a Parting Tool for $25 to $50 but there’s noting like making your own parting tool. It gave me a lot of satisfaction once I figured how to grind the right angle on the tool tip. I actually took my design from the Sorby Parting Tool. Although Sorby has a wide selection of parting tools to meet your needs I tried to make mine look similar to this Sorby 1/16″ Parting Tool.–
Description of DIY
Parting Tool Project
I feel like I’m writing a term paper here but let me give you a quick description of the project. I wanted a parting tool with a 1/8″ blade. The idea is to turn an old used sawzall blade into to tool, make a handle of wood and used some epoxy and brass rod for rivets or whatever they are called in knive handles. Shape it a little on the disk sander and fine tune the cutting tip. That’s it…. BA DA Bing BA DA Boom!
Starting On Parting Tool Project
I started off with a sawzall blade, I think it was 1 1/4″ wide and 12″ long. Unfortunately I did not take a picture of it before I cut it.
I took a 4″ thin grinding wheel and cut the shape on the end of the sawzall blade and then I cut the teeth off. It cut pretty easily, I’m not a metal guy…. in fact, what I know about metal I probably learned on youtube 🙂 I remember watching someone on a video make something like mine, so its not an original idea.
Something possessed me to purchase a 12″ disk sander a while back and I have used that thing for so many tasks I can’t believe I’ve lived all these years without one. You can sand just about anything, metal, wood, figerglas and fingers 🙂
Parting Tool Blade Almost Ready
Anyway I sanded the blade to clean it up and take off any remainine paint. Coolest thing, the piece of metal looked like it was just shipped from Amazon, all nice an shiney. I was pretty proud of myself right about then.
So at this point I have the profile in the front, teeth cut off and all polished up. I need to trim up the end that goes into the sawzall ….just square it off. I have it in a vice, ready to cut off in the pic below.
Using a sawzall blade for a parting tool blade, shaped and in a vice ready for more cutting
DIY Parting Tool Wood Handles
Next I plan to cut and prepare the handles for attachement to the parting tool blade. I had some mulberry that had been drying for a year or so, it is very, very hard and finishes very nice. Who would have thought. But I find myself looking for a kinds of different wood types and the stuff that would end up on the burn pile …..ends up on the wood lathe or gets squared off on the band saw to be used for different projects.
PICTURE OF bandsaw WITH HANDLE HALFS *********
So I ripped down a couple of pieces 3/8″ x 5″ to use for the parting tool handles. I wanted the handles to be wood on wood when glued together so I traced the blade on one handle and chiseled out the shape at the thickness of the blade. In other words the blade sat flush in that half of the handle. Before I forget, that a small 1/8 or 1/4″ chisel and cut some grooves into the other handle half…..the purpose is for the epoxy to have someplace to grab on the wood.
Wood handles ready for epoxy
Gluing the Parting Tool Handles
and Blade Together
At this point I mixed up some 5 minute epoxy, spread the expoxy on both handle sides, placed the blade in the cut out space, put more epoxy on the top of the blade and then clamped the whole thing together. Instead of 5 minutes I let it stay clamped overnight 🙂
Handle blanks, one is chiseled out to hold the sawzall blade and the other is chiseled out to hold some of the 5 minute epoxySetting sawzall blade into the 5 minute epoxy
Clamping parting tool blade and wood handles with 5 minute eposy.
Next I needed to put a couple of rivets thru the wood and the blade. Since it is just a shop tool I could have used a 16 penny nail, but I ended up using 1/4″ brass rod. The idea is to make the pin about 1/8″ longer on each side and the “peen” the pin on both sides. This mushrooms out the pin on both sides and keeps it in place. Here’s what I did.
I took my parting tool with the handles glued to the blade with epoxy and then I drilled three holes thru the handle, 2 or which went thru the metal blade. I started with 1/8″ drill bit on a drill press and as soon as it hit the steel it started smoking and sputtering! I knew right then I screwed up.
Next time I will drill the hole thru the parting tool blade seperately and then thru the handles. I ended up breaking about 3 bits and had to use cutting oil which soaked into the wood but I did get the holes drilled 🙂
So….next I cut the 1/4″ brass rod a total of 1/4″ longer that the width of the handle. First I added some 5 minute epoxy to the hole before driving in the pin. I peened the pin on both sides until it started to mushroom over the handle. The I hit the last pin one too many times and got a small crack in the wood….just added some CA and saw dust as a crack filler to be sanded latter.
Shaping and Sanding Parting Tool Wood Handle
Since everything was square I went over to the 12″ monster disk sander and sanded both sides flush. This gets down to clean wood and it evens out the brass pins. Then I used the disk sander to round off the corners and the wood end of the parting tool. Took it over to the 1″ belt sander, cleaned up the blade a little more and fine tuned the wood edges.
Using My New Parting Tool
Being excited, I went to the wood lathe to try out the new parting tool. I was working on a handle for a gouge blade. It was about a 4″ ash tree trunk that had died from the beetles. As it was spinning I slowly entered into the wood and ………it moaned and groaned and burned!
Urgh, I was devastated! It cut like crap !!
After taking 5, I took a look at the Sorby parting tool that I was modeling I was modeling and noticed my angles were off. I reground both the top and bottom angle and tried it again. Voila! It cut like butter and ash is pretty hard.
Finished Parting Tool, 2 Wood Blanks for Handles, Hunk of Mullberry I cut the handle from and 1/4″ brass rod used for handle rivets
So if you try making one of these pay attention to the grind angles and pay attention to how you grind the angles. Try sharpening/grinding both angles remembering which one you did first, then try reversing the order. Then try sharpening only on side, try just touching the bottom up, and try just grinding the top angle.
Now I have mine set up so I just touch the grinding wheel on the bottom angle.
Want to see how the big boys sharpen their tools….. here’s one big boy, Sam Agelo….. I have learned a lot from him and he sharpens his thin parting tools on a belt sander ….you could also use a disk sander. He doesn’t use a grinder because he has CBN wheels on them and he was afraid the thin parting tool would ruin them….. very expensive, anyway check out his sharpening technique for parting tools.
REMEMBER always use a platform when sharpening on a grinding wheel, take your life into your own hands if you try to free hand!!
If you’re interested here’s a really good video on all the different methods of pinning that knife makers use. I might even invest in a special rivet for making knife and tool handles called a “Cutlery Rivet” they are in 2 pieces and on slides into the other and expands as it does. Pretty much a no brainer.
I really want to turn some nice projects, bigger bowls mainly.
So I need some new tools and a new wood lathe!
Today I was looking for a good quality Skew Chisel, they say it’s one of the most difficult tools to master and I would like to take a shot at it because it leaves behind a beautiful finish.
Considering A Crown
251 1-Inch Oval Skew Chisel
Check out the quick video on the skew chisel for woodturning.
If you follow any of the woodturners online they will tell you that you should never buy “sets” of woodturning tools but purchase the ones you think you will need and like.
But….how do you know what you need or like if you never used any woodturning tools before?
So…..I purchased some chinese tools and I turn chinese bowls …and my nickname is “catch” because my tools don’t sharpen, or they don’t stay sharp and I can dislodge just about any piece of wood you give me from a faceplate, scroll chuck or between centers !!!
Ya, I’m kind of joking but my tools are crap …so is my lathe. So I thought I would start looking around and see what type of tools and lathe I might really want to get. Amazon has a really nice feature where you can create lists and make them “public” kind of like a wedding registry 🙂
Maybe one of my son’s or wonderful and beautiful daughter-in-law might see my public list for lathe tools and fulfill my wishes……or maybe I’ll win the lottery 🙂 Better yet, I would get healthy and spend the rest of my years working, building, drawing or building websites and making money for myself….. oh, how I pray things would end that way!
So, I figured I would check out some of the tools available online. Buy them if I could and do a review of the tool. If you buy the tool from my link, I’ll make a small commission. If not, at least you got an honest opinion.
Woodturning Gouges I Need!
I really need and would like the following:
a 5/8″ bowl gouge with fingernail grind
a 1/2″ bowl gouge with traditional grind
a nice beefy 3/8″ thick 1″ wide or better round nose scraper
a nice beefy 3/8″ thick 1″ wide or better left side scraper
a set of spindle gouges
a set of detail spindle gouges
a 1 1/4″ roughing gouge
a 1/8″ parting tool
a 1″ or 1 1/4″ oval skew
Oval Skew Chisel
As long as I’m wishing…..I’m sure I will add more to the list.
Importance of Good Quality Woodturning Tools
At this point in my woodturning experience I have come to understand the importance of good quality equipment. In woodturning, this probably means more than any other trade or hobby I’ve been involved with. For instance, you can spend 300 bucks on a fishing rod and reel but still catch some pretty good fish with a Zebco $25 dollar special.
Even in construction. Sure a Bosch demo hammer is 1500 dollars and will probably last a long time but a harbor freight demo hammer will get the job done and if you baby it, the thing will last a long time and you spent a 1/4 of the price.
Spend More Money and Be A Better Turner
But with woodturning tools and equipment, you just can’t get past the fact that spending more money will get you good tools and equipment that will make you a better turner.
I want to master the Skew Chisel so I’m looking at a Crown Skew Chisel or a Sorby Oval Skew Chisel.
However, if you’re just getting started, don’t let that fact stop you. Spend what you can afford and go from there…..heck, you might even not like woodturning. But if you do, you can start adding pieces one at a time, save your money and buy a $100 dollar bowl gouge. You’ll be amazed at the difference.
Here’s my dilema.
I need to make some money and I do that with a variety of websites where I compare and recommend products. But I’ve never do it with a site that I’ve been so passionate about, like woodturning!
I want to provide the best information I can to help anyone who reads this to make a well informed decision about what they should buy and use. To do that, I need to buy and use the products to let you know what works and what is the best.
So I will probably be buying products from places like Rockler, ebay, or Amazon. They all carry brand name, high end products. Most of these sites have some type of review system and I won’t purchase anything that has a bunch of negative reviews. So I look for the best, make an informed decesion to buy and then tell you what I think of that product. If you purchase thru my link, as I mentioned I make a very small commission…. but they will add up over time. I hope!
US Manufactured Skew Chisels
My problem is in approaching differnet products this way I leave out those manufacturer’s and suppliers that do not have affiliate programs that I can enroll in. Most of these are small stores or small manufactures but offer high end, very good products. I feel obligated to tell you about them as I discover them but since they don’t have affiliate programs, in all honesty, I probably will not purchase the products from them so I can’t give you a first hand testimonial of their products.
As time goes by, I will mention these sources and give you links to their sites. I’ve visited www.D-waytools.com many times and would love to purchase some of Dave’s tools …..watched his videos on sharpening and how to use the tools …really good stuff and Dave seems like an all around good guy. He’s a small business man in the US and fighting the daily battles to build his own business. I would much rather support him than someone across the pond. There are a handfull of others out there and I will talk about them as the circustance dictates.
I really didn’t plan on getting this far into the weeds …..but I really wanted you to know where I’m coming from.
Bottom line is I want to help any woodturner find good information on how to be a better woodturner!
One more time, check out how easy this guy makes cutting with a skew, the shavings just slice off….. wish I could do that! If I had a Crown 251 1-Inch Oval Skew Chisel …. bet I could 🙂
Maybe I Should Consider
A 1-1/4″ Robert Sorby
#809H Oval Skew Chisel
I really wanted a skew chisel wider than 1″ inch. Sorby has a Oval Skew Chisel that is 1 1/4″ wide. So, after looking a little further the Sorby Skew Chisels look really nice, especially the 1-1/4″ Robert Sorby #809H Oval Skew Chisel.
I’m going to make it my goal to master the skew chisel, after watching so many turners produce glass smooth finishes, I know I can do it. Like with all woodturning …..it takes practice!!!
After cranking out 3 stairway spindles that really look the same, I tried to do a slicing cut with the skew chisels have….the ones from China and besides the fact that they are square edged I just couldn’t make that slicing cut in a piece of oak. Could be me, I’m finding out that the China tools will actually cut if you sharpen them correctly, maybe I need to work on the edge of the skew.
Bottom line I want to get a good oval skew chisel, whether Sorby or Crown. I’m not quite ready to purchase their super expensive super duper metal that holds an edge forever type turning tools. Although I’d really like to try one out to see what the difference is, I need to work on my sharpening skills.
A steady rest is a device that attaches to your lathe bed and helps to stablize a long piece for turning or a bowl or vase.
Let’s say you have a 30 inch x 1″ broom handle you want to turn some decoration in. If you place that broom handle between centers, and you try to turn something in the center of the piece it will start to vibrate and actually bend away from your turning gouge.
a steady rest centers and stablizes a project as it turns on a wood lathe
On the other hand you might have a vase or other shape you want to hollow out and it is in your chuck but not reinforced by the tail stock on the other end. If the turning project starts to wobble and lose its center you will need a “steady rest” to keep the turning project running “true”.
As with so many other things “woodturning related” I really didn’t know when or if I would ever need a “steady rest“. As it would happen I found myself in need of a steady rest and thought I would just buy one. Holy cow…those things are expensive. If you want to buy one, Rockler has a nice one Click Here
You can always buy a steady rest from Rockler if you have some extra cash!
I Really Needed A Steady Rest
Here’s what happened.
One of my friends is a contractor who needed some stair balasters or stair spindles duplicated.
Although I’ve turned some handles, candle stick holders and lamps ….I really never did anything long like a stair spindle, balaster or newel. So, I told him …”NO problem, I can crank out those stair balasters for you!”
Well, first I needed some oak. The base of the stair newel was, at it’s biggest 1 1/4″ X 1 1/4″ square.
Oak Ripped for Stair Spindles
I found some clear oak 2x6x4′ at Menards, the stair spindles I needed to duplicate were 33 inches, so I ripped 3 pieces that I needed on my Jet table saw that now has a rusted top because my roof leaked because the insurance company and building department are a nightmare to work with…..but that’s another story!
Next I mounted them on the wood lathe between centers and started working on the tapered rounded part. Since my chinese tool set did not come with a roughing gouge, I had to use what they called a spindle gouge….. that was a big mistake because it almost ripped the piece from the lathe.
Rounding the Square Stock
for the New Spindle
So I tried to knock the corners off and round it out with my custom carbide insert tool.
That worked pretty good, but it mostly scraped and I tried every tool I had. The spindle vibrated and bounced, there was no way I was going to turn that spindle without some additonal support.
Youtube For Learning How to Turn Wood
Next I turned to my favorite place to learn some woodturning lessons…. youtube! After a while I thought a steady rest would solve my problems and there were plenty of tutorials on how to build a steady rest ….man, I just didn’t have the time to do that…..but I seriously considered making a steady rest!
I found a bunch of tutorials on how to make your own “steady rest” a device that provides additonal support for turned projects, whether it be a balaster, broom stick, spindle or vase. The additonal support helps you to make clean cuts and proper coves and beads as needed in your project….or in my case just to taper the spindle.
steady reast stabalizes a turning project, could be a vase bowl or spindle
The problem I was having was once I got in the middle of the spindle and tried to reduce the diameter, you could see the spindle being pushed out, I was actually afraid it would break or come off the live centers.
Should I build a steady rest? Really didn’t have the cash to buy one …check out these steady rest plans and watch the video
I saw it on Rockler Woodworking and Hardware
Lathe Steady Rest Downloadable Plan — $7.95
Here’s an innovative, adjustable rest for holding spindles steady. It just may give those dusty, discarded in-line skates a second shot at useful life-in the shop!
Building A Steady Rest
I don’t have time to build a steady rest right now but I think I will in the very near future! You can get a set of plans on how to build a steady rest from Rockler click on Steady Rest Plans.
And you should watch the video below from someone who I have followed for a while on youtube, his name is Stephen Ogle, click on his name for the youtube channel he has lots of good stuff. Watch Stephen’s video below, as he shows how to build a very nice “steady rest“, however I would change the wooden wheels for some roller skate wheels, I think it would be a little easier on the project you are turning, a little cheaper and a lot faster! Anyway, check out his video, he goes into great detail …if not pick up the rockler plans.
Steady Rest Or Better Tools?
Well….
I didn’t have time to build a steady rest and I wasn’t going to buy one!
I thought if I had a couple of better tools I might be able to pull this off. I did some searching online and found a new Woodcraft store in my area and took a fast trip to the new store. I purchased a 3/8 spindle gouge (blade only) and a 1/2″ bowl gouge with a fingernail grind from Sorby. I really wanted to get some other tools online but I needed to get this done now!
I’ve read that a good 1/2″ bowl gouge with a fingernail grind can be used for many things including turning spindles.
I was shocked at how good these tools cut the red oak blank. The finish was perfect and I didn’t even sharpen them yet! I really wanted to get a 5/8 bowl gouge from D-Way, Carter or Thompson but the 1/2″ Sorby will have to do, it definitely is a step up from the crappy tools I’ve been using.
D-way’s 3/4″ Bowl Gouge has a “U” shaped flute. An excellent gouge for roughing, and with the full radius flute it makes a great shearing cut for finishing the inside of bowls and platters.
This is a wood eater
I WANT ONE !!!!!
I’m retired (not by choice), actually on disability so my income is below poverty at this point. Otherwise I would probably have 2 or 3 of every tool I needed or thought I needed!
Make Money Turning Stair Spindles?
However, I planned on supplementing my income with some of my bowl turnings amongst other things. A little job like turning some stair spindles could bring some extra bucks but what couild I really charge for 3 spindles? If you were able to buy them from some of the big box stores they might cost anywhere from between $5 and $10 each for an oak stair balaster or spindle.
My friend’s problem was that he was unable to find the profile he needed to replace 3 stair balasters. So he needed someone to custom turn the stair spindles to match the profile he had.
It cost me $40 bucks for the oak, $32 dollars for a 3/8 spindle gouge, and $98 dollars for a 1/2″ bowl gouge. So, what do I charge him for 3 spindles….it would be nice if I could get $40+$32+$98= $170 !
That doesn’t even include my time, figure at least 2 hours a balaster, that’s 3 balasters …so a total of 6 hours at 40 bucks an hour equals $240.
So, I have $170 + $240 = $410 into a stair spindle project. Ha, ha ….what a joke. I’ll never get that and wouldn’t try…..I might as well go put them in for him too 🙂
Do you think I could get 400 bucks for 3 custom balasters? …..Ha, ha ….I’d be luck to get 100 bucks….if I do it will go toward my collection of tools and experience.
Next time I will use a steady rest and hopefully have a few more good quality tools.
It’s been a while since I’ve added to my woodturning blog …..haven’t been feeling too well so I haven’t been working with my lathe. I’ve been cleaning up and trying to work on my garage roof plans and I’ve spent some time with the prototype’s for my carbide insert woodturning tools. Seems like there are a handfull of options out there if you want to buy a completed set of carbide tools but a full set could cost you anywhere from $400 to $600 dollars. I’m trying to develope 3 woodturning tools made with carbide inserts that will do everything you need and the entire set would cost somewhere around $250…..or about $85 each…. Going to take some time to get the prototypes finished and I might end up creating and selling just 10 sets or so a year ….and at $60 or so dollars…. just to help new turners get started. These carbide tools are really easy to use!
I know when I first started, if I could purchase a carbide tool for 60 bucks I would have jumped on it. I had so much trouble when I first started with Chinese wood turning tools. More on this latter….
Anyway…..I tried a little Wood Hardener Experiment for Woodturning Bowl Project
I had some wild cherry wood that was cut down a couple of years ago. I cut it myself, on my mothers property after a storm, thought I would be using for fireword or for the “smoker”. The logs were about 2 feet long and up to 20″ wide, sitting outside uncovered and no treatment for the ends, that is I did not seal the ends of the log or the endgrain.
The piece I decided to work with was at the above dimensions, it looks pretty good and I split it down the middle and found it to be very dry. I can only turn 12″ on my lathe so I figured I could cut off the outer soft material on the bigger piece and get a nice piece to turn ….looking for a good size bowl.
Next I created my blank and rounded the corners on my bandsaw. I really need to get a new blade so I can cut corners easily. In a perfect world I would have a dedicated bandsaw and blade set up just for cutting blanks!
Mounting the Cherry Bowl
Blank for Turning
I started my project with my Nova 2 Chuck fitted with a worm screw, it seemed to hold pretty good and pulled up nice and tight to the chuck. Next I pushed the tailstock into the other side of the blank and it went in rather easy, in fact, the outer layer was pretty soft in this spot. I decided to press the tailstock in tight and give it a try.
Everything seemed to hold tight. I did not find any more soft wood yet 🙂 So I shaped the bowl, with a tenon for the chuck to be on the tailstock side of the bowl blank. Shaping went pretty good but when I started to shape the blank for the chuck tenon I ran into more of that soft squishy wood! I decided I would finish shaping since I put this much work into it.
I really didn’t want the blank to spin off and hit me in the head, I don’t have a face mask yet, so I’ve tried to turn carefully and slowly.
I tried out my new carbide tools, a square carbide insert and a 15mm round insert, both worked excellently. Then I spend some time trying the get a handle on turning with a bowl gouge. I have a 1/2″ bowl gouge by Woodstock with a traditonal grind… up until now I’ve earned a new name…..”CATCH”, that’s right, I was the captain of catches and I was close to giving up. I thought it was the tool, the lathe and/or the wood but in reality it was just my technique! I’m really surprised a bowl hasn’t flew across the room and/or hit me in the head at some point because I’ve had so many catches.
Tradional Grind for My Bowl Gouge
Well I decided to give it another shot after waiting a couple of weeks. I reground my bowl gouge with a traditonal grind according to many experts, I’ll try to put up a pic. Not only did I regrind the tool, but I put a secondary grind on it for more clearance. As they say, “ride the bevel” seems my tool always got it the way causing me to have a catch or two or 10 🙂
Well, wouldn’t you know. My bowl gouge was cutting as good if not better than the carbide tools. I was “making shavings” as Capn Eddie says, and was that an awesome feeling. I didn’t care what the bowl looked like, all I cared about was watching the shavings fly just like the utube videos I’ve been watching. I had complete control of the side walls, inside the bowl and the outside shape!
Ran Into A Patch of Soft Wood
I stopped to examine my work and was proud of my turning! I finally got a bowl gouge to work right, I have to say it was the grinding on the original tool that probably messed things up, after using the oneway grinding jig I put a more desired grind on the bowl gouge and I could actually make it work. That’s what wood turning is all about. Finding these little changes or techniques that open the door to other methods and surprises 🙂
Well, as I was looking at the bowl I noticed a section that was off color and soft enough to push my finger through. I thought, great…. finally I turn my first bowl like a pro and its rotten. Then I remembered the soft tenon, it was the same type of wood, white and soft.
Experiment With Wood Hardener
I probably should have thrown it away, but it was my pride and joy. I wanted to hang it on the wall or something but because of the soft wood I was screwed.
I remember watching a video where the turner had the same situation and used a “wood hardener” so I did some searching and found some more info on different wood hardeners and thought I would experiment with my trophy and see if I could get a decent bowl out of it by using this “wood hardener”. I found a “minwax wood hardener” and ANOTHER wood hardener in a pint container at “Menards Home Center”, I know Home Depot has the Minwax Wood Hardener, a google search will give you some other sources for a wood hardener.
You might think you could use an expoxy? The problem with most expoxies is that they do not penetrate the wood. If you know of an expoxy that penetrates the wood…. I would feel comfortable trying it.
Basically you just soak the soft spot with the hardener and let it dry. It soaks deep into the wood and hardens after a couple of hours. I also found 2 cracks and a chip. So I used some CA glue and poured it into the cracks, inside the bowl and outside the bowl. I also used CA and woodshavings and dust to form a paste to push into the cracks and chips.
I turned the bowl again, the wood hardener I used on the soft wood by the tenon worked great. It has keep the tenon solid and the wood chuck seems to be holding tight. As I turned the bowl the other soft spot turned nicely but after more shaping I found I needed to apply the hadener again.
Is A Wood Hardener Worth It?
You might think, “hey, don’t waste more money and time….throw the bowl away and start again!” I thought that initially but I really wanted to see how well this “wood hardener” works and if I have a bigger project would it be a possible solution should I run into rotted or soft wood? At this point I would said it is definitely something worth trying. It cost about 10 bucks for a pint and I only used, maybe a 1/5 or 1/6 or it ….so maybe I used a dollar or so of hardener. In my opinion, that would be worth the cost if you have an hour or more into the project.
BEFORE Woodhardener was applied, see white soft area in front of bowlAFTER wood hardener applied to woodturned bowl
I still think my chinese tools are half my problem when it comes to turning. I’d love to try an American made bowl gouge from D-Way, Thompson or Carter & Sons. All American made, and they seem to slice through wood like butter. Most of the guys doing high quality video turtorials always mention they are using these tools ….in fact Cap’n Eddie was just showing off one of his D-Way bowl gouges with a fingernail grind ….he gives it high praises!!!
Good to see Eddie returning to scene after his health problems!
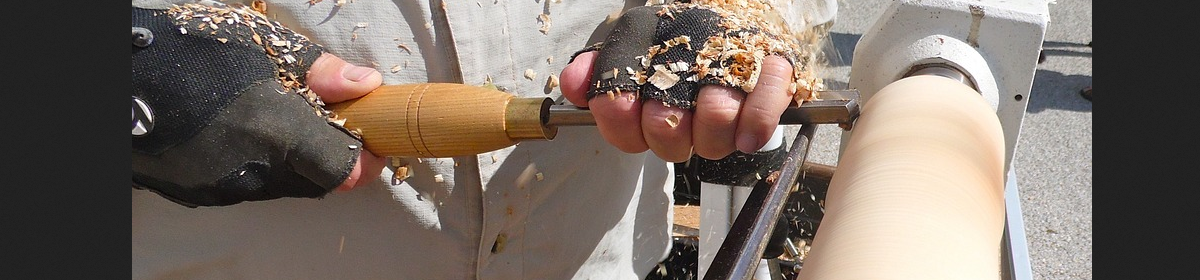


 Hope that helps ….I say this for you or anyone getting started. Rmember you need to learn how to sharpen your tools, dull tools are dangerous. So… why not get a set of cheap tools, get a sharpening jig, practice sharpening until you know you can put an edge on your tools and then buy the good stuff.


 Well, as I was looking at the bowl I noticed a section that was off color and soft enough to push my finger through. I thought, great…. finally I turn my first bowl like a pro and its rotten. Then I remembered the soft tenon, it was the same type of wood, white and soft.

