I was feeling a little low, problems with my garage/shop permit and problems with my health and switching of insurance agencies ….turns out that they lost me or deleted me from the system and now I have no health insurance!
So, thought I would share some thoughts that I shared with the facebook group …basically my way of dealing with stress and problems of this world. Sometimes you just can’t beat it and if you can stick a piece of steel into a turning piece of wood……for a short time your problems go away!
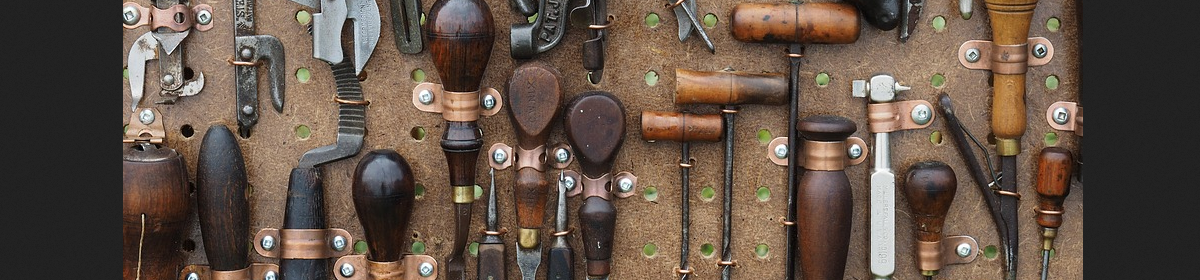
Sharing Some Woodturning Pictures
Thought I share some pics.
This is what I do when I want to turn, but just don’t have it in me to set up a bowl blank or some other more complicated woodturning project.
I turn tool handle blanks!
Learn how to make your own woodturning tool handle for a carbide turning tool
I know, that probably sounds dumb, but its really easy to do, I’m turning something so I’m feeling a little usefull and I’m making shavings 🙂 I love making new woodturning tools so I’m always in need of some woodturning tool handles.
From Branches to Tool Handles
The trick is to cut up some fairly straight branches that are at least 24″ long and anywhere from 3 to 5″ wide. I try to use hardwood, but I use anything I can get my hands on. So at this point I have about 25 branches cut to around 24″ and I keep them outside. I probably should paint the ends but most of it is ash and oak which have been dead for a couple of years.
I don’t know how many of you mow your own lawn, and those that do how many of you look at it as a pain in the ass or think of it as a time to empty your brain ….and just cut grass. That’s how it is for me to turn some handle blanks….. I suppose I could apply the some train of thought to bowl blanks, but handles are a lot easier.
Making Tool Handles for Woodturning Tools
I like making tools so the handles always get used. I give some away and I’m planning on selling some of them, carbide tools and HSS parting tools and scrapers for now. I hope 2018 to be the year that I set up a website and can sell a few tools per month, helping me, helping my fellow turners!
Clear My Head By Turning Tool Handles
But, to place a branch on the lathe and start turning is the fastest way for me to empty my brain, or just feel like I accomplished something for the day……it has all kinds of theraputic purposes! Its a lot healthier than taking some type of sedative or other mind altering drug, better than pounding down a bunch of beers. Sometimes I’ll go out to the shop when I can barely walk, I throw one of those limbs between centers, scrape off the bark, get down to the wood and see what God has designed for me today. No limb or branch has ever been the same and the beauty of wood is something that never, never ceases to impress me.
Turning a New Oak
Woodturning Tool Handle
Was feeling a little low today so I threw an oak limb on the lathe, between centers and created kind of a funky shape only because the bark went deep into the wood, doesn’t matter I might make 2 handles out of it, or one long one with a unique shape 🙂 I also practiced my skew skills a little, using both the flat skew and the oval skew…. didn’t do too bad, but I need some practice, I need to sharpen the skews….probably would have done a better job, but I didn’t feel like setting up the shapening jig.
If you’ve read this far….good on you! For the new people, I really don’t like showing too many pictures because a tree fell on my roof, been waiting for the insurance and county so I can get things started. I’m trying to put a 12/12 pitch on this thing ….back in the day I could do it by myself. Gonna be tough now. Plus just talked to the county and they changed their building code standards and this whole thing has become a bigger pain in the ass. I live in the most expensive county in Illinois, they have taken me to court a couple of times but the problems have always been their fault, now I have to redraw plans!
This is why there is boxes, wood, shavings and debris all over the place. I don’t have a roof over my head, just a bunch of tarps.
Sorry, I don’t mean to bring you guys down. We all have our problems, life sucks and if you don’t think that you haven’t l;ived long enough. Its how you deal with the sucky part that matters.
Check out the hunk of oak, that will be a beautiful handle some day.
Here’s a couple of pics to look at. Will try to post a video also
In general, spindles …that is, a piece between centers (not bowls) you need to turn at higher speeds. But only if you are comfortable with that speed. So if you are turning wood pens or turning a candle stick holder you can use lathe speeds over 2000 rpm
Wood Lathe Speed for
Turning Tool Handles
For instance, if I’m making some tool handles I will use a tree limb, or small tree trunk, generally around 3 inches wide and put it between centers. I use the roughing gouge to start and a speed of 600 rpm or so until I knock off all the high points. Then you can turn the speed up and make your handle blank at a speed of 1000 to 2000 rpm.
That’s what I’m comfortable with …considering my skills, my tools and my lathe!
Wood Lathe Speed for
Turning Wood Bowls
When turning a bowl there are all kinds of options to consider when turning your bowl blank. Is your bowl blank balanced or is it out of balance. If you have an odd shape piece of wood on the lathe you can’t turn it fast or else the lathe will walk across the floor.
Type of Lathe Determines Lathe Speed
Wood lathe speed is also determined by the type of lathe you have. Is it strong and heavy, or small and light. Often times you need to weigh lathe down or bolt to the floor.
Wood Type Will Determine Lathe Speed
Don’t forget wood type and condition. Dry wood is usually hard and difficult to shape. You almost have to use a higher speed, but in my experience, dry and hard wood at a fast speed causes more accidents. So, I keep the speed low and if a bowl gouge doesn’t work, I try a big scarper.
Proponent of High Speeds for Wood Lathe
I remember watching a video of a guy turning some bowls. He was an experienced turner but he was a proponent for using fast…fast…turning speeds. He said the tool works best and you have a better experience. Well….not me, I was just beginning and common sense tells me not to let that piece of wood go as fast as I could (use slow speed), and that I should use extreme care when pushing the tool into the wood …..at any speed, but certainly not a fast speed.
Variable Speed Wood Lathe
If you have not yet purchased a wood lathe, you should consider getting a wood lathe with a variable speed control. That will give you the most control of your woodturning speeds. Otherwise, you will be stuck with one speed or changing belts to get different speeds.
I recomend Laguna Tools MLAREVO 1836 Revo Lathe, 18″/36″, Black a solid lathe with variable speed control. But if you are purchasing a new lathe compare the features of the Laguana Wood Lathe with anything you might be buying.
Laguna Revo 1836 Lathe a good step up if you are looking for a good wood lathe!
This is just my opinion on Lathe Speeds.
Adjust your speed according to your experience and your comfort.
I would suggest to anyone to start off slow and safe. Then increase your speed as you are comfortable and your turning is productive and efficient.
Ok, I’m turning a new bowl and something just didn’t feel right.
My back was killing me, I tighened my back brace. Still, something wasn’t right.
I figured out what was the problem and did a quick post to my Facebook Group at https://www.facebook.com/groups/woodturningbasics
8″ Makes a Difference When
Standing at Your Wood Lathe!
So, December I went crazy making bowls, bats, vases, cups and pizza cutters and fire starter kits. I also turned a bunch of bowl blanks and probably 15 or more tool handle blanks.
I went back out to the shop, been busy with other stuff and wanted to clear my head. I started turning a bowl/dish from some willow that floated on my beach. It was dry, I put a faceplate on and began to turn.
Something wasn’t right
with my WoodTurning!
My back was killing me, I was having a hard time seeing and positioning myself while turning this project. It was really uncomfortable, I didn’t even want to put a camera up because something was wrong.
Dummy me! Clean Your
Woodturning Shop 🙂
I’m somewhat of a slob. I’d rather do or make than clean up.
I had been planning to clean up and put all the shavings in some of the old chicken feed bags and give my chickens and turkeys some new nesting materials.
If you haven’t figured it out, I had anywhere from a 6 inches to a foot of shavings and sawdust on the floor. It caused my lathe to be 12″ lower than normal ….just was totally uncomfortable.
Lesson learned, clean up after yourself while woodturning !!!!!
Yee Haw finally got out to put chisel to wood! You know you’re addicted to woodturning when you are sitting around with your family eating dinner or watching TV and thinking….. “I really want to put that new piece of oak on the lathe….when are they going home”! I love my family, I love being with them but I just want to turn wood!!!
Haven’t done much woodturning since Christmas, been feeling pretty rough. I never know when it’s gonna hit me so I treasure the moments I have that I’m feeling well enough to do something outside or in the shop. I like to call it my shop, guess it is ….but really just an old garage with a couple of additions that had an oak tree come down and take off the roof. The roof has been off and covered with a tarp for over 5 years, the first problem was with insurance, the second problem was with getting a permit. Getting close though might get everything straightened out by this spring.
So, I’m cool and call it my shop 🙂
Still not feeling that hot, but it was around 1 am, decided I would go out there and clean up.
Made A Wood Handle for A
Robert Sorby 3/8″ Spindle Gouge
As I was putting things away, I purchased a Sorby 3/8″ spindle gouge , just the tang and gouge, in other words, a tool without a handle. I had been using it stuck in something I turned that looked like a dildo…sorry, really would like to keep this family friendly but there’s no other way to describe it.
If money is tight, most manufacturer’s will offer the tool without a handle, just turn your own and you might save 50 bucks.
So, I figured ….heck with cleaning up. This thing needs a handle. As I was turning billy clubs before Christmas I turned about 15 ash, oak and beech blanks. They were anywhere from 3″ in diameter to 24″ long. Actually, I was practicing my spindle turning, using different tools. Mainly trying my Benjamins Best Roughing Gouge. I turned extra because I knew I wanted to make some tools and would need some handles.
Moral of this Woodturning Story
I say all this to encourage you to turn some blanks and have them laying around ready to use. For me, I was able to turn a handle, make a copper ferrule and …sand and but a couple coats of OB Shine Juice on it.
I didn’t glue the tool in, but the hold is drilled. Just need to mix up some epoxy and glue in the tool and copper ferrule.
If I didn’t have the blanks, I would not have done the tool. I would not have got the enjoyment of turning again, I would have just cleaned up my messy shop….how boring is that.
Turning a natural edge wood bowl, mounting on wood lathe the Wrong WAY!Maple log cut into a bowl blank, ready to be attached to a faceplate and will be turned into a live edge or natural edge wood bowl.Turning a natural edge wood bowl, mounting on wood lathe the Wrong WAY!
I think I’m gonna try to make 10 or 20 bowl blanks so I can have them on standby. That way, when all I can manage to do is chuck up a bowl, and start gouging….I’ll be ready to go. Guess I was never that organized in my lifetime….never too late.
Facebook Member Looking for
Bowl Gouge Purchase Advice
Someone in our woodturning facebook group was asking about what type of bowl gouge he should buy, he was a new turner and was getting some conflicting information. Since I already spent an agonizing year or more trying to figure out what to purchase I thought I would write a dissertation on what type of woodturning gouge to buy.
Yes, I did it again. Just starting babbling on and on ….really, I was just trying to help. Anyway, thought if anyone stumbled on the topic in the woodturningbasics.com blog, they might benefit from it so I reposted the facebook post here.
====================
Hey Mike …I’ll be glad to give ya my 2 cents worth 🙂
Actually a really good question but has 100 answers or more! I would like to do a blog post on my experience with tools, but I’ll share what happened to me.
I’m assuming you’re pretty new to turning wood.
When I first started the only way for me to do it was with a harbor freight lathe and the expensive (60 bucks) set of harbor freight turning tools.
I’ll stick to the tools.
The harbor freight (HF) tools were really junk. A terrible way for me to start. I turned a little candle holder and a small bowl. I had no idea that in my set of tools there wasn’t a bowl gouge! Somehow I turned a bowl with the woodturning tools that came in the set, probably used the scraper the most and I used the spindle gouges on the bowl ….A BIG NO NO you can get hurt really bad doing that.
Let me back up and say, if money isn’t an issue. Get D-way woodturning tools from www.d-waytools.com Dave is the owner, good guy and will help you.
Carbide Turning Tools
Are The Best For Beginners
Then get a set of carbide turning tools like the Easy Wood Tools get a square scraper and a round scraper and a detailer. You get many uses from a carbide tip and when it gets dull just screw on a new carbide insert.
Easy Wood Tools Pro Easy Rougher Carbide Lathe Turning Tool 3200 New
These tools are almost foolproof and you don’t spend time sharpening woodturning tools, you just change the carbide tip. I made my own carbide tool and found myself using it on a piece that I was unsure of when using a turning gouge. In other words, when things got tough ….I switched to the carbide woodturning tools.
Start With a Cheap Set
Of HSS Woodturning Tools
But if money is an issue, get a HF set of turning tools or a Set of Benjamins Best from PSI. I know everyone makes fun of them, but read some of the reviews, some of these guys won’t buy anything else ….so it might be worth a try if you have a tight budget….a nice way of saying, “you’re broke”. The cheap price allows you to have a set of woodturning tools. More importantly is that you can use these cheap tools to learn how to properly sharpen your woodturning turning tools.
Sharpening Your Woodturning Tools
You can try freehand sharpening your bowl gouge and other woodturning tools if you want, but sooner or latter you will want to get a Oneway Wolverine Grinding Jig, you’ll need these two pieces:
Best way to sharpen your woodturing tools, gouges and chisels is the oneway wolverine sharpening jib
Woodturning Tools I Would Start With
Now, after some practice on your cheap turning tools, when you get a Sorby or Dway turning tool, you won’t grind away half of the tool metal or more to learn how to sharpen. Like I said before, if money isn’t an issue …go with to expensive tool and learn everything with it, I’m sure your total experience will be more pleasant, but your expensive tool will be gone in no time unless you are a natural at sharpening woodturning tools!
My first choice would be D-way tools, second choice would be Sorby
I mentioned PSI, Penn State Industries before they have a set that includes everything to get you started, its on the cheap side …the metal is HSS, but still will need to be sharpened frequently so it is good for practicing. These are the specs for this kit. https://www.pennstateind.com/store/LCSIXW.html
If a high quality large, HSS steel turning tool set has been on your wishlist, now is the time to buy. Includes a Spindle Gouge (1/2″ Dia, 22-3/8″ length), Diamond Parting Tool (3/16″ dia, 16-3/4″ length), Round Nose Scraper (3/4″ dia, 17″ length), Bowl Gouge (3/4″ dia, 16-3/4″ length), Roughing Gouge (7/8″ dia, 19″ length)and Oval Skew Chisel (1″ dia, 18-3/8″ length)
Hope that helps ….I say this for you or anyone getting started. Rmember you need to learn how to sharpen your tools, dull tools are dangerous. So… why not get a set of cheap tools, get a sharpening jig, practice sharpening until you know you can put an edge on your tools and then buy the good stuff.
If I had the money to buy the good stuff, that’s what I would do. I would not take my advice and would have purchased a 200 dollar bowl gouge and then probably spend the next 3 to 6 months grinding it away to nothing ….I never listen to anyone, you would think after all these years I would 🙂
But…..
Remember, I didn’t have any money…so I didn’t waste good tool steel LOL
One of the members in my facebook group was excited about building a website, he purchased a domain, I presume a woodturning related domain and wanted to put up a website to sell his woodturnings, ie a Woodturning Website. I thought that was pretty cool, becaue these days most people will go to one of the free platforms and start blogging. Bad idea because you don’t have control over that free site and could lose it at any moment.
Woodturner’s Need
Their Own Website
So, I was thinking. A woodturner really does need their own website and it doesn’t matter whether or not you want to use it to make money woodturning. Think of it this way, use the woodturning website/blog to chronicle your progression in woodturning. Think how many people that would help. What if you purchased a new tool and it just sucked, it was the worse…. you could do a review. What if you purchased a lathe that was the best and you just love it….you could do a review ….a continuing review. If you were smart, you could try and find an affiliate program for that product and suggest the other woodturners might want to purchase and put a link in your article….you’ve done a service and now you can make a few bucks …so you can purchase your next tool or piece of equipment.
I started this woodturning website/blog to document my woodturning experience and thinking ahead, I would like to set up a store so I can sell some of my woodturnings in hopes of getting a better lathe, better tools and just to have some extra cash. Lots of ways you can accomplish this along side the website. If you chronicle your progress or your projects with video you can start posting on youtube. That does many things when it comes to website traffic and money making potential.
Anyway, I thought I would post my facebook woodturning comment here. I’m sure someone on the group won’t approve …but you can’t please everybody all the time 🙂
Woodturner makes a good decision to have his own woodturning website to sell his turnings
Facebook Post About
Woodturning Websites
Here’s my facebook woodturning post:
I’ve been building websites since around 1998 when you actually had to learn HTML coding!
I remember reading an article where the author predicted a time when websites would be able to be built as easy as one can use “Microsoft Word”
That time has pretty much arrived. However, there are many more aspects of building a website that you should consider if you expect to sell your products and services.
I tell clients that their website can be as simple as a business card. In other words, it makes you look more professional and you might add some contact info on the website, maybe some pics.
OR
You can use your website as an “authority site”, teaching and informing people regarding your products and services. This requires a lot of content, consistent content, images and videos.
Not only that but there is a method of building your website that helps to bring more visitors to your site and it is called SEO, or search engine optimization. You want your website on page one of google for whatever it is you are selling or the service you are providing.
Sounds like you want your website put up to sell your woodturnings?
Here’s what I would do to get a web or online presence.
Buy a domain ….you did that.
Get it hosted ….not sure if you did that yet.
Once the site is hosted, start adding content to it immediately.
-you need to pay attention to keywords, for instance, if you are turning and wanting to sell wooden rolling pins, use the keywords “rolling pins, rooling pin, french rolling pin etc”
-a quick way to get your pages indexed and on page 1 or 2 of google is to add geo modifiers, that would be something like “rolling pins in Seattle” you can go broader and “rolling pins in Washington State”
-you should try to post links back to your website, the home page and internal pages whenever and whereeever it is allowed.
-I don’t mind if people do that on our woodturning group www.facebook.com/woodturningbasics as long as they do it responsibly, no spamming. post away if its relevant.
There really is a lot to learn, unless you have a bunch of time on your hands you should have someone help you with the poject.
WordPress for Woodturning Website
I would suggest that you use a content management system (CMS) called WordPress for your woodturning website. Once installed, it is almost as easy as Microsoft Word to use, I just started a blog or website using WordPress ….everything is very basic and free at http://www.WoodturningBasics.com
There are 1000’s of free wordpress plugins that you can use to perform different website related tasks, there are 10’s of thousands of free wordpress themes that can make your site look different in a matter of minutes. Of course there are themes and plugins that you invest your hard cold cash in, often times these things do amazing things to help you get your website rated so you can sell more or get more eyes on your website.
You can quickly learn how to make a post, add an image or video. Then you would customize it with a storefront for your woodturning projects. The beauty with using WordPress is that everything works together.
For instance, lets look at the rolling pin example.
You would want to use the “Blog” part of the website to post articles about rolling pins. Basically, I would document the process with some text, add some images and a video or two….make several blog posts. At the end of each blog post you would want to include a link back to your woodturning store in the rolling pin category.
Using these methods will help you get some organic search engine traffic.
You could buy some cheap facebook ads or google adwords, or any other number of online advertising….but this costs money, the best way as far as I am concerned is to build a website. Fill it with content and let it start “cooking”, that is the search engine robots find your site and take notice, they determine whether your site is good enough to send rolling pin searchers to.
It does get complicated, like anything else ….it can be overwhelming in the beginning…. thus the need for some help.
In my opinion though, you have made a good choice regarding the desire to build a website. Some folks will use free platforms like facebook, blogger, wordpress.com etc and will add content for years only to do one thing wrong and have their sites completely removed and/or deleted.
It’s like my facebook group www.facebook.com/woodturningbasics ….if I make a religious comment facebook doesn’t like, or I make a political comment or a LGBT comment ….the site could be deleted and gone forever. If you have your own website, its yours to keep and no one can delete it! When working on the internet always keep in mind that you have limited control over many things, build your business accordingly.
If you need some help getting your domain hosted and wouild like wordpress installed PM me and I should be able to help you in the next couple of days. There are plenty of free wordpress courses that teach the basics if you have never used it before. I don’t have it done yet, but I’ve been working on a template for woodturners, it will be able to be customized so your site can be unique. But for now, you can use one of the free wordpress themes to get you started.
I’m not sure how much I would charge yet. However I would suggest, never use free hosting and always make sure you have some sort of way to backup your site, either you do it or have the hosting provider do it.
I might add, there are many website building portals that have sprouted up. The ones I’ve come across have always had some type of problem. I’m sure some might be acceptable but there is almost always a problem when it comes to html coding, they will use some proprietary stuff that hinders the transfer of the site if you would like to move it and they might use methods such as “flash” to build the site and flash makes it very difficult if not impossible for the search engines to find and rank the site.
I had a tree guy drop off some maple for firewood. I have some room at my house so every now and then a tree guy will dump a load of wood! Lucky me 🙂
I split most of it and do some treasure hunting on the pile before I start splitting the wood. I found a few nice pieces I though would make nice bowls and vases. Truth be known, if I had my way I would probably save every load of wood that got dropped off for turning….. of course I would have to turn 1000’s of bowls or my wife would be a little upset that it was cold in the house 🙂
Natural Edge Wood Bowl Video
I have 2 videos for you. The first one is just a series of stills that I narrate and the next video is an edited video of me turning a natural edge bowl from the maple wood blank.
Turning a maple live edge or natural edge wood bowl.
I have an excellent digital slr camera, but need to figure out how to get some really nice and clear video. This will do for now but I will upgrade soon.
I wanted to turn a live edge bowl or as some call it a natural edge bowl. That would be a bowl with a bark edge or natural edge of the piece of wood for the top edge of the bowl. This is one woodturning project that I’ve been wanting to do for a long time!
I experimented with a piece of Maple that someone dropped off for firewood. I burn all kinds of wood, anything really, in my wood stove and that’s how we heat our house for the winter. Been doing that for 30 some years now.
Maple log cut into a bowl blank, ready to be attached to a faceplate and will be turned into a live edge or natural edge wood bowl.
Natural Beauty of A Natural Edge Bowl
The funny part is both my wife and I will always look at a piece of wood and wonder what’s inside, what does it look like. Only recently did I get a Laguna 14″ SUV bandsaw with enough horsepower to rip throough some of the wood, and it’s all I can do to keep myself from dragging all the firewood into the shop to cut it open. It’s kind of like a God secret. Looks like firewood from the outside but underneath all that is a diamond worth shining and keeping.
This led me to desire 2 different types of machines to work with wood. I really want one of those portable bandsaws that allows you to cut a log into useable lumber. Same thing, rip open a log and it’s like a piece of heaven.
Haven’t gotten the portable bandsaw yet, but I did get a wood lathe. Which was next on my list of desired woodworking toys …I mean tools 🙂
Getting Started In Woodturing
I’m not sure how or why I got interested in turning wood, I haven’t been a woodturner since highschool and I barely remember that. I don’t think I even read anything about woodturning. Maybe I watched a youtube video or something. Whatever it was, I caught the woodturning bug!
Big problem though, I was …stil am, pretty broke from being sick for a long time. I couldn’t afford a $1000 for a lathe, much less $4000 or $5000 for a good lathe.
I went the China route. Got some basic equipment from harbor freight, just had the lathe and some HF woodturning tools. I had a faceplate and centers that came with the lathe. That’s basically how I started and learned woodturning.
Live Edge Bowl Experiment
Sorry, not sure how I fell down that rabbit hole. I really just wanted to share some quick facts and pictures of doing a live edge and the experiment I did to keep the bark in place.
Turning a natural edge wood bowl, mounting on wood lathe.
First mistake I made was I used a faceplate on the wrong end and I ended up with screw holes in my live edge bowl. I’m really getting tired of screw holes showing up in my projects, not sure why I can’t keep that part of it straight 🙂
Anyway, I cut a round blank from the maple log and mounted it on my large faceplate. It was a pretty big piece, as big as my lathe could handle, about 12″. It really helped using the circle jig on the bandsaw to cut the blank round and allowed me to make the biggest bowl possible. And….the lathe didn’t walk across the floor 🙂 I really need to show you a picture of this circle jig for the bandsaw, like most things I do …. it was a quick bugger job, but it works perfectly!
****************
I had some new woodturning tools I was trying and the project took shape fast. My natural edge bowl was starting to take shape. Then it happened. Totally my fault, I stuck my Sorby bowl gouge a little too hard into the live edge, that is the bark, and a huge piece went flying! Man, I was so disappointed. Everything was going so good and the bowl actually looked great. Now it was missing a huge piece of bark.
Well, I didn’t swear. I prayed that I might find the piece of bark and God answered that prayer because I found it immediately! Normally, I would have cussed up a storm and thrown some tools around and maybe even kicked the lathe ….yep, I have a little bit of a temper. Guess they call that “Anger Problem” these days 🙂
Another Bowl Turning Experiment
With A Live Edge Bowl
I found the piece of bark and figured this was going to be another one of my experiments because I never saw anyone attempt to repair a live edge or natural edge bowl and then finish turning it. I’ve seen some woodturners attempt to do a natural edge bowl and have the bark fly off …at that point they trash the project or just turn a regular bowl.
Repair Of A Natural Edge Bowl
I took the piece of bark that broke off and epoxied it to the bowl edge. I used a 30 minute 2 ton epoxy and let it dry overnight. I figured the real test would be if I could finish turning the rough out of the bowl. After 24 hours I turned on the lathe and bravely stuck my round insert carbide homemade turning tool into the spinning bowl, slowly, every so slowly it started to cut the bowl and bark.
Much to my surprise the piece I epoxied in place held fast. I was able to turn the bowl and finsh the rough out of the natural edge maple bowl. However, the bark was coming loose in some other areas and it looked like it wasn’t going to stay on.
I should have tossed it at this point, but I enjoy fixing things and doing things that others won’t do. So I thought about the different ways I might keep the bark on. I saw one guy use 2 ouces of CA glue and that worked, a little expensive I thought. This wasn’t a special piece of wood and I did not want to waste my CA glue on the bark of a maple bowl.
Alumilite Epoxy Finish
Then I remember seeing someone use “alumilite” to coat a big bowl for a sink. Then he used it for some of his other bowls for a nice glossy finish. Looked like some awesome stuff to finish woodturing projects with, but I found out latter that it required some special effort and there was definitely a learning curve if you wanted a perfect finish.
To keep the bark on the roughed out live edge bowl I used an epoxy resiin like “alumilite” to seal and glue the bark to the bowl. (I used an epoxy resin called Max Clear) I went down into the bowl on the inside and outside with the epoxy.
I purchased some epoxy resin called Max Clear, similar to alumilite from Amazon. I applied a good thick coat to the bark and an inch inside and outside the bowl. The thought was to use the epoxy to hold everything together, that is to keep the bark from seperating and when the bowl was to be finish turned ….hopefully the narrow live edge would hold and keep the bark in place. At this point I was thinking that I would epoxy the entire bowl after the final turning of the live edge bowl.
Epoxied Live Edge Bowl Sat For a While
My natural edge bowl project ended up sitting for longer that I planned. The bark edge along with a small part of the inside and outside top of the bowl was epoxied and thoroughly cured. However, it was wet wood when I started and it moved pretty good with the grain as it dried over a couple of weeks, so it was a bit oblong . My bad….I should have stuck it in a bag of shavings …but, that’s my life. I get sick and sometimes can’t make it out to the shop for days or weeks…sometimes a couple of months. The bowl still had the recess for the Nova Chuck ****** although a little out of whack, I was able to chuck it back up to the lathe.
The bowl didn’t crack though, and the bark was nice and glossy. I chucked up the bowl and started gouging out the inside. I really wanted a live edge bowl, a thin live edge bowl. I wanted to get the sides and bottom down to a 1/4″ or so. This was an experiment so I didn’t care what happened, if it exploded…so be it! I thought for sure the bark would fly off and the bowl would crack.
Epoxied Natural Edge Bark
Bowl Held Together
Much to my surprise, as I pushed the 5/8″ bowl gouge into the bowl, the bark held together! In fact, I used a couple of different tools to shape the natural bark edge of the bowl. I used the big 1 1/2″ scarpaer, the small 3/4″ scraper and the round carbide insert scarper tool. As I shaped the inside of the bowl the bark stuck togeher perfectly. Then I went to the outside and had to really rework the outside of the bowl because of the shrinkage, and once again the bark of the natural edge maple bowl help together perfectly!
This scraper can give you confidence, just enter the wood slowly and make gentle movements and you can clean up just about anything or even shape the entire bowl. Great for newbie and expert alike! I always turn to this big piece of metal when I’m not sure of using the bowl gouge and don’t want to screw something up 🙂
Not a piece of bark fell off the bowl. I got the top of the bowl thinned down to 3/8″ or so, I was OK with that. I tried to do some shaving cuts on both outside and inside. That worked out good, in fact the project was a huge success!
Then it happened!
Live Edge Bowl Disaster!
I had the speed up. I’m still a little paranoid with high speeds on the lathe. I feel like I need one of those bubble suits 🙂 I wanted to see if I could clean up the bark edge of my live edge bowl so I grabbed my bowl gouge ****** with the ellsworth grind, really need the practice with this, and I clumsily jabbed at the turning bowl! To my horror, I saw pieces flying! My project, almost a perfect natural edge bowl ….finished for all intensive purposes was getting destroyed because I was being anal. This time I swore, threw stuff, and kicked stuff…. hurt my toe with the ingrown toenail. I was so so so so pissed at myself! Why couldn’t I just leave well enough alone 🙁
But….
Natural Edge Bowl Saved From Disaster!
I must have been seeing things because the bark was all there except for a tiny, maybe 1/4″ piece that was missing. I thanked God for saving my bowl and asked for forgiveness for being such a jerk 🙂 At this point it was about 3 am. I should have quit at aleast an hour ago, but I was having fun making shavings, turning a bowl and experimenting on how to save a live edge bowl. Yep, I was really enjoying making a mess of things, fixing things, making some shavings and doing some sanding.
I sanded my bowl down to about 600 grit usinng a 2″ disk sander ****** with velcro sanding pads. They don’t last too long but I tried to use a piece of sand paper and the live edge almost took my hand off. Tried sandpaper again, worked for a while but anytime I got next to that live edge or natural edge of the bowl, the bark would grab the paper and rip it from my hands and almost take my hand along with it.
So I used the 2″ sanding pad on my electric drill. Tried it first on my cordless drill, but didn’t feel right and I really don’t want to burn up my DeWalt cordless drills, so I used an electric drill. Beware, caution …..using a corded drill is dangerous when you are around the lathe. Any mishap could cause the drill to get caught in the lathe and make a mess of everything including you!
Sanding A Live Edge Wood Bowl
So, I sanded the natural edge maple bowl starting with 80 grit down to 600 grit. The paper got ripped up when I got next to the bark edge but it worked on the rest of the bowl and to sand down to 600 grit for me is a milestone. I hate sanding, but….. sanding makes the finshe. Ask Cap’n Eddie about sanding. He preaches the need to sand down to 1000 or so and says you just got to do it, otherwise you will have an ameture finish on your bowls and woodturning projects.
How To Finish a
Natural Edge Wood Bowl
Maybe I should say, what kind of finish should I put on my live edge wood bowl. Remember the bark already is finished with Max Clear epoxy resin, similar to alumilite. So, the bark is glossy. I originally thought I would use the epoxy on the entire bowl, however, after using it on another project I can see that it requires some thought, effort and work to look good. This is the stuff that is put on table tops or bar tops and people will inlay pictures, shells or other objects and put multiple layers of epoxy over it.
After thinking about it, I thought I would save my epoxy finish for a special project. In fact, the stuff I have is food safe. It could be used for cups, bowls or mugs. Although this bowl is turning out nice, not sure I want to put in the effort to finish it with epoxy.
So…..
So, I decided since I sanded it down to 600grit, filled all the screw holes and had my life edge bowl looking pretty good. I thought I would use my “Salad Bowl Finish” by General Finishes. I really love this stuff. First of all, it’s advertised as being “food safe”, and although I have said it multiple times before, I’ll say it again. I think all finishes are food safe as long as you allow he finish to “cure” not “dry” but cure. That means the chemical processes are complete. But you do what you feel comfortable with.
I like the “Salad Bowl Finish” because you can apply it to the project while on the lathe and you can spin the project and use a wadded up paper towel to push the finish into the wood and to buff it. I found that you could get away with one coat on some woods and up to 3 coats with others. I think this live edge maple bowl will require 3 coats, the end grain seems to soak up the finish as fast as I put it on, but after one coat it might just seal the bowl and allow the other coats to build up and protect the bowl.
I’ve almost been using the salad bowl finish exclusively on my bowls. It looks great, builds up and has a shiney luster to it …and as they say, it’s food safe.
Some of my bowls I applied “ob shine juice” as a finish, a couple of coats. I’ve also used straight clear shellace and on a couple I’ve applied a sanding sealer first, you need to find a “clear” sanding sealer and then I have applied the “salad bowl finish” over these. So far, the finishes have all worked out great, applying the sanding sealer or ob shine juice keeps the salad bowl finish from soaking into the wood and allows you to get away with 1 or 2 coats of “salad bowl finsh”. At least that’s what I found!
Turning a maple live edge or natural edge wood bowl.
So, up to this point I have one coat of salad bowl finish over the bare wood. I think for the live edge bowl, I’ll end up with at least 3 coats of “salad bowl finsh” and then, it will be ready for a Christmas Gift!!!++++++
Natural Edge Bowl Redone
Looking back, my biggest mistake was the way I attached the bowl blank to the lathe. I used a faceplate on the flat surface of the log. I should have used the worm screw and mounted the log with the bark facing the lathe motor and attached with the worm screw. Or, I could have flattened out a spot to attach a smaller faceplate to the bark side of the log. Or, I might have been able to use a forstner bit to drill a recess for the Nova Chuck in the bark side.
Turning a natural edge wood bowl, mounting on wood lathe the Wrong WAY!
Once attached I could turn between centers and cut a tenon or recess on the flat side of the log. Come to think of it, I probably should have just drilled a 2″ recess on the flat side and mounted it in the chuck and that would have been the bottom of the bowl.
I guess there are many different ways to approach a project, you need to do what works for you. Do what you feel safe with and then experiment a little!
Live Edge Bowl, Live Edge Bowl Blanks, Live Edge Bowl How To, Live Edge Bowl Lathe, Live Edge Bowl Turning, Live Edge Burl Bowl, Live Edge Salad Bowl, Live Edge Wood Bowl, Live Edge Wooden Bowl, Turning A Live Edge Bowl
Finishing A Natural Edge Bowl, How To Make Natural Edge Bowl, How To Turn A Natural-edge Bowl On A Lathe, Making A Natural Edge Bowl, Natural Edge Ash Bowl, Natural Edge Bowl, Natural Edge Bowl Blanks, Natural Edge Bowl Finish, Natural Edge Bowl Greenwood, Natural Edge Bowl Images, Natural Edge Bowl Instructions, Natural Edge Bowl Turning, Natural Edge Cherry Bowl, Natural Edge Oak Bowl, Natural Edge Walnut Bowl, Natural Edge Wood Bowl, Natural Edge Wooden Bowl, Natural Edge Wooden Bowls For Sale, Rough Turn A Natural Edge Bowl, Sanding A Natural Edge Bowl, Sanding Natural Edge Bowls, Turning A Natural Edge Bowl, Woodturning A Natural Edge Bowl, Woodturning Natural Edge Bowl
Different Methods of How
To Sharpen Your
Woodturning Parting Tool
As a woodturner you need to know how to sharpen your woodturning tools. It can be a bit intimidating at first but after some practice, you’ll get the hang of it. I found a couple of good videos that talk about sharpening your parting tool and thought it might help you get the best use of your thick or thin parting tool.
I jokingly but seriously talk about my Chinese Tools, my first set of woodturning tools. I’m glad I purchased them now because I used them to help learn how to sharpen woodturning tools. The fact is, you grind down a lot of steel before you become very effective when sharpening your woodturning tools and, might as well use up cheap steel instead of a $100 woodturning gouge.
I found this video by Sam Angelo, he has some excellent advice on how to sharpen your parting tools and spends a few minutes showing us. I really enjoy Sam’s teaching and will share his material where appropiate. In other words, sometimes its hard to find what you need on youtube, I hope to create categories on my blog that will help you to quickly find the information you need regarding woodturning. I find it difficult myself to find the information I need, for instance, I watched some of Cap’n Eddie’s videos on sharpening and I know I saw a video on sharpening and making a parting tool ….but I can’t find it. So, my webdesign and seo experience will help me with my passion, woodturning, and help you by making the information you need regarding woodturning easy to find.
I recently wrote an article and made a video on how to make a parting tool for woodturning from a sawzall (reciprocating saw) blade, what I did not cover was how to sharpen the parting tool. Sam does a better job than I, it’s really very simple but will greatly increase the efficiency of your parting tool.
Maybe you don’t want to make a parting tool. I have purchased Sorby Woodturning Tools and they are of very high quality. You can purchase the one below for under $30 and if you purchase through that link I will make a small commission…. really small commission, but that’s how I pay for keeping my website up and the tools I need to keep it going. So I appreciate your help!
How To Sharpen Parting Tool, Sharpen A Parting Tool, Sharpen Lathe Parting Tool, Sharpen Parting Tool, Sharpen Parting Tool Metal, Sharpen Thin Parting Tool, Sharpen Wood Lathe Parting Tool, Sharpening Parting Off Tool, Tormek Sharpen Parting Tool
I really enjoy making my own woodturning tools, if for any reason, just to see if I can do it! So I thought I would make my own parting tool for woodturning.
I’ve made a couple of turning tools with carbide cutters, and some with HSS cutting blanks, all turned out to be very useful. It’s very rewarding for me to make my own tools…. although, there’s nothing like an expensive bowl gouge made with the best metal and sharpened properly.
I had a parting tool with my cheap set of chinese tools. It was about 1/4″ wide and works well, even if I have to sharpen it often. But I needed a thin parting tool for my woodturning projects and something that I could hold in my hand. I was looking for a parting tool with a 1/16″ to 1/8″ blade and found a couple out there costing anywhere between 20 and $30 dollars.
Sorby Parting Tool
Sorby makes a really nice parting tool and I probably would have purchased it if I didn’t get the urge to make my own parting tool. I remember watching a capt’n eddie video about making a parting tool http://www.woodturningbasics.com/make-your-own-parting-tool-diy-parting-tool-plans/ so I thought I would try it mysyelf.
DIY Parting Tool Marterials
I used an old Lennox Sawzall or Reciprocating Blade for the blade of my wood lathe parting tool. I must have throw a couple hundred of those away throughout my lifetime. My wife gives me a hard time about saving stuff, I think I thru a whole box of old blades away thinking I would never sharpen them or use them again….. never fails, as soon as you throw something away you figure out you need it!
Double Angle Sorby Thin Parting Tool
I shaped the end of the blade like the Sorby Parting Tool, double angle look. I then cut the end of the blade off to square it off and I cut and ground down the teeth.
Next I took the blade over to the disk sander and ground it down to bare metal. I got it looking nice and shiney, looked pretty good. Since I’m not a metal guy, I was starting to impress myself 🙂
Making Handles For DIY Parting Tool
I cut some 1/2″ handle halves from some Catalpa Tree wood I had laying around that was pretty dry. The stuff is hard as nails. I then traced the location of the blade on each wood handle half. Then I took out a sharp chisel and chiseled out the traced area on both sides so the blade would sit in the chiseled out area and the wood halfs would meet together flush.
You want to chisel out the handle a little deeper than the blade thickness to allow for some epoxy to get between the blade and the wood handle on both sides. I think I used a 30 minute epoxy to glue the handles together. You can get 30 minute epoxy …yep just click on that link or check out your local big box store.
Make sure you clamp up the handles nice and tight, wipe off any excess epoxy that oozes out from the handles being squeezed together. Its easier to clean it up now that after it gets hard.
Attaching Handles to Your
New Woodturning Parting Knife
I followed the steps above and then took the clamps off. It looked good and I probably could have gotten away without having to add rivets to the handles. But, I thought it would look cool with some brass riviets. You can buy special rivets from knife making suppliers, there are 3 different types, check out the video I put on at the bottom of the article on Make Your Own Parting Tool at the end of the page.
I’ll talk a little more on rivets a little latter. First I wanted to talk about drilling the holes for the rivets. I used a 1/4″ brass rod, think I got it from Home Depot or Menards. So after I took off the clamps I laid out [3] 1/4″ holes to drill through the wood handle, through the metal blade and out the other wood handle half.
Like I mentioned before, I’m not a metal guy. Just learning this stuff 🙂
Drilling Holes In Your New Parting Tool
I guess that sawzall blade is hardened steel, so….. drilling through it was a real pain! I couldn’t start with a 1/4″ drill bit…it went through the wood but stopped dead when it hit the steel blade. I ended up starting with a 1/16″ drill bit and had to use cutting oil, had to use cutting oil with each size increase of the drill bit and it kinda trashed the wood handle!
So, if you’re gonna do this and you are really anal about what it looks like, you had better predrill the steel so you don’t mess up the wood handle. I know that’s what I’ll do next time.
Next I cut the brass rod about 3/16″ longer than the thickness of the handle. I put some epoxy on the brass pins and in the holes of the handle. Then I used the smallest hammer I could find to ping the brass rivets on both sides. I really needed a small ball peen hammer …never really knew what those things were used for …got a good idea now 🙂
I did pretty good, but got carried away and cracked the handle on both sides on different riviets!
You really don’t need to smush out the brass rivets that much because you’ll take the handle to a belt sander or a disk sander and sand down the handle and the soft brass rivets. So, that’s what I did. I just used the disc sander to round off the edges and flatten the flat of the handle. Then took it to my 1″ belt sander and further shaped it.
I took some 120 grit sandpaper and then 220 grit to it, got it nice and smoother and put a couple coats of clear shellac on it.
The only thing I had to play around with was the top and bottom angle in the front cutting edge of the parting tool. As I write this, I can’t remember what the angle was….will have to come back and let you know latter. I just keep trying until I found something that cuts well.
That’s about it.
My DIY Parting Tool doesn’t look like it came from a factory but from someone’s shop….my shop!
I can’t tell you how satisfying it is to make the tools. Not sure why. I have designed and built multimillion houses, strip malls, factories and some pretty big and expensive room additions ….I get more satisfaction out of making one of these tools that actually works than any of those big projects.
Here’s a quick video I did …just made of some still pics with my narration, I think its about a minute or so but will give you an idea of what and how I make my own parting tool 🙂


 Hope that helps ….I say this for you or anyone getting started. Rmember you need to learn how to sharpen your tools, dull tools are dangerous. So… why not get a set of cheap tools, get a sharpening jig, practice sharpening until you know you can put an edge on your tools and then buy the good stuff.


